Exploring the Organizations page
The Organizations page lists all organizations associated with your account and provides key information for monitoring and management.
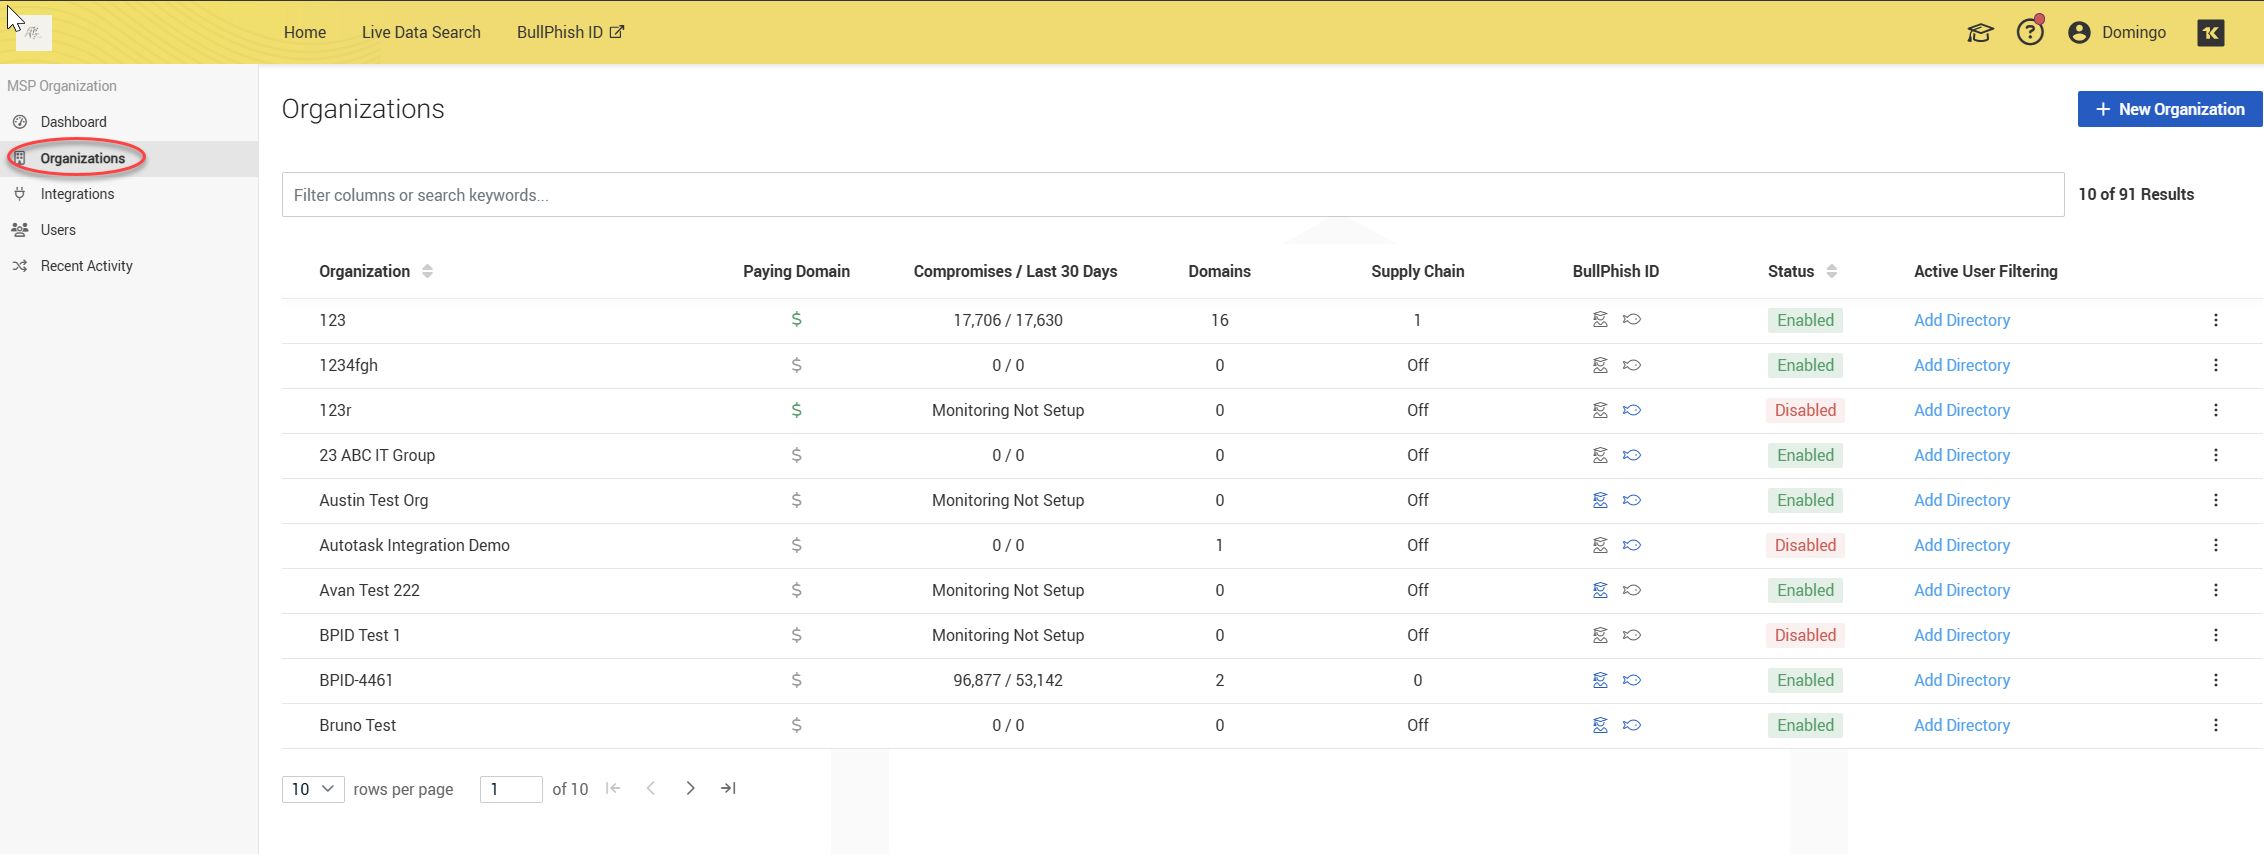
Column details
Below are the descriptions for each column:
-
Organization
-
Displays the name of the organization being monitored.
-
Clicking the name opens the Organization details page, where you can access tabs like Dashboard, Compromises, Supply Chain, Users, and Reporting.
-
-
Paying Domain
-
Indicates whether the organization has a paying domain associated with its account.
-
A green $ symbol denotes billing or subscription status for the domain.
-
-
Compromises / Last 30 Days
Shows two values:
-
Total Compromises detected for the organization
-
Compromises in the last 30 days (after the slash)
Example: 117,739 / 38 means 117,739 total compromises, 38 detected in the last 30 days.
-
-
Domains
-
Displays the number of monitored domains for the organization.
-
Domains are used to track exposures related to email addresses and credentials.
-
-
Supply Chain
-
Indicates whether Supply Chain monitoring is active.
-
This is displayed as a number or Displays a number or Off:
-
A number: The organization has third-party associations being monitored.
-
Off: No supply chain monitoring is enabled.
-
-
-
BullPhish ID
Shows if BullPhish ID Phishing Simulation and BullPhish ID Training & Awareness are enabled for the organization. The icons used represent their status:
-
A blue fish icon signifies that BullPhish ID Phishing Simulation is enabled.
-
A gray fish icon indicates that it is disabled.
-
A blue graduate icon signifies that BullPhish ID Training & Awareness is enabled.
-
A gray graduate icon indicates that it is disabled.
-
-
Status
Displays whether Dark Web ID monitoring is active for the organization:
-
Enabled: Monitoring is active.
-
Disabled: Monitoring is inactive.
-
-
Active User Filtering
-
Provides a link to Add Directory for Active Directory integration.
-
This feature allows syncing user accounts from Active Directory for automated monitoring. For detailed information, refer to Overview of the Active User Filtering feature.
-
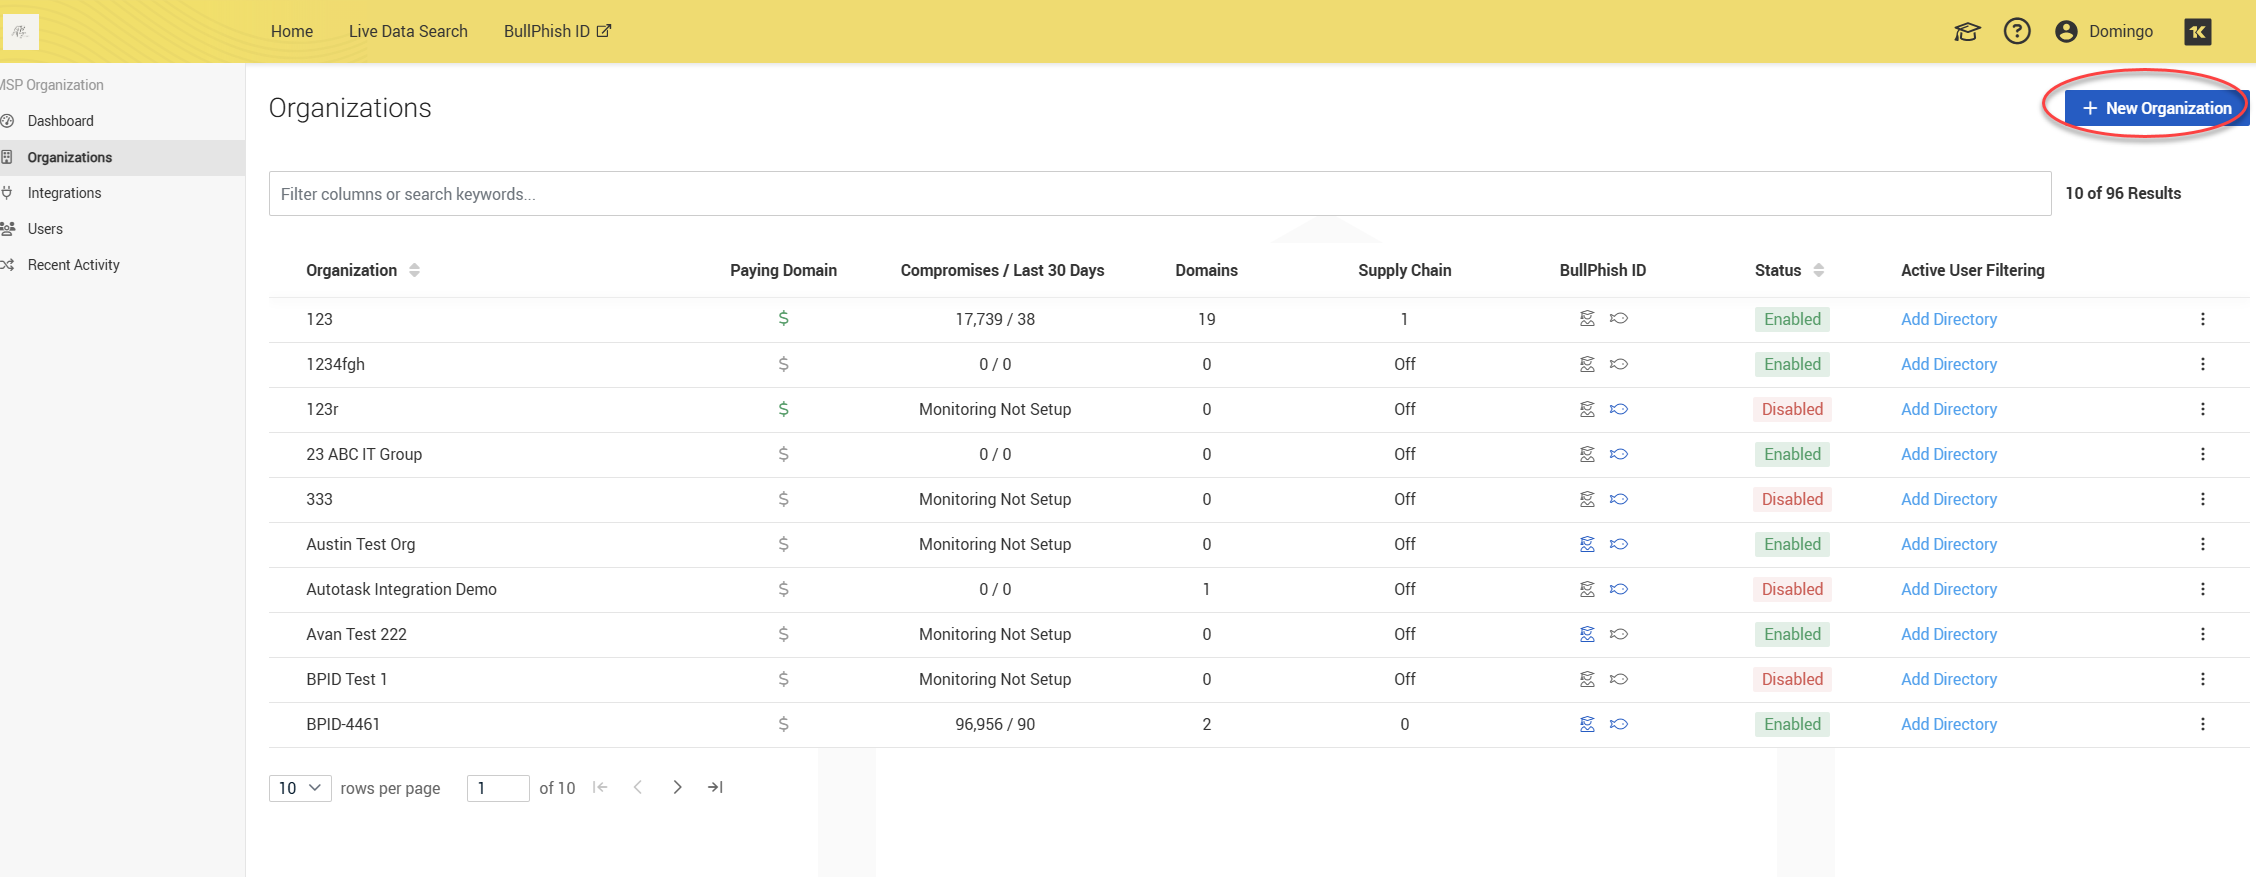
Adding organizations
1. To add an organization, click + New Organization.
2. Fill in the required and optional fields in the Add Organization page:
-
Organization Name: Enter the name of the organization. This field is required.
-
Industry: Specify the industry in which the organization operates. This field is required.
-
Employee Count: Input the number of employees in the organization. This field is required.
-
Notification Preferences:
-
Date Format: Choose the preferred date format for communications.
-
Would this Organization like to receive clean bill of health emails?: Decide if you want to receive monthly reports if no new compromises are detected. The options are Yes or No. If you select Yes, fill the following fields:
-
Recipient Email: Provide the email address where notifications will be sent.
-
Reply-To Email: Enter your reply-to email address.
-
-
Alert Frequency: Select how often notifications should be received: Monthly, Monthly & Daily, or None. Any option different from None will make you fill the Recipient email field.
-
-
Subscription Utilization: This section indicates that licenses may be in use by some organizations. To lower the number of licenses, please disassociate the organization as per the provided details regarding subscriptions.
-
Supply Chain: Indicate whether the organization is part of the supply chain.
-
BullPhish ID Phishing Simulation Enabled
-
BullPhish ID Training & Awareness Enabled
-
-
Reporting Preferences: Choose what information will be included in the automated report and the Date Format:
-
Dark Web ID Executive Summary
-
Benchmark Averages
-
Monitoring
-
Organizational Compromises
-
Breaches
-
BullPhish ID Overview
-
Full Phishing Campaign Details
-
Full Training Campaign Details
-
DarkWeb Benefits
-
-
Associated Integrations: This section allows you to specify any integrations associated with the organization.
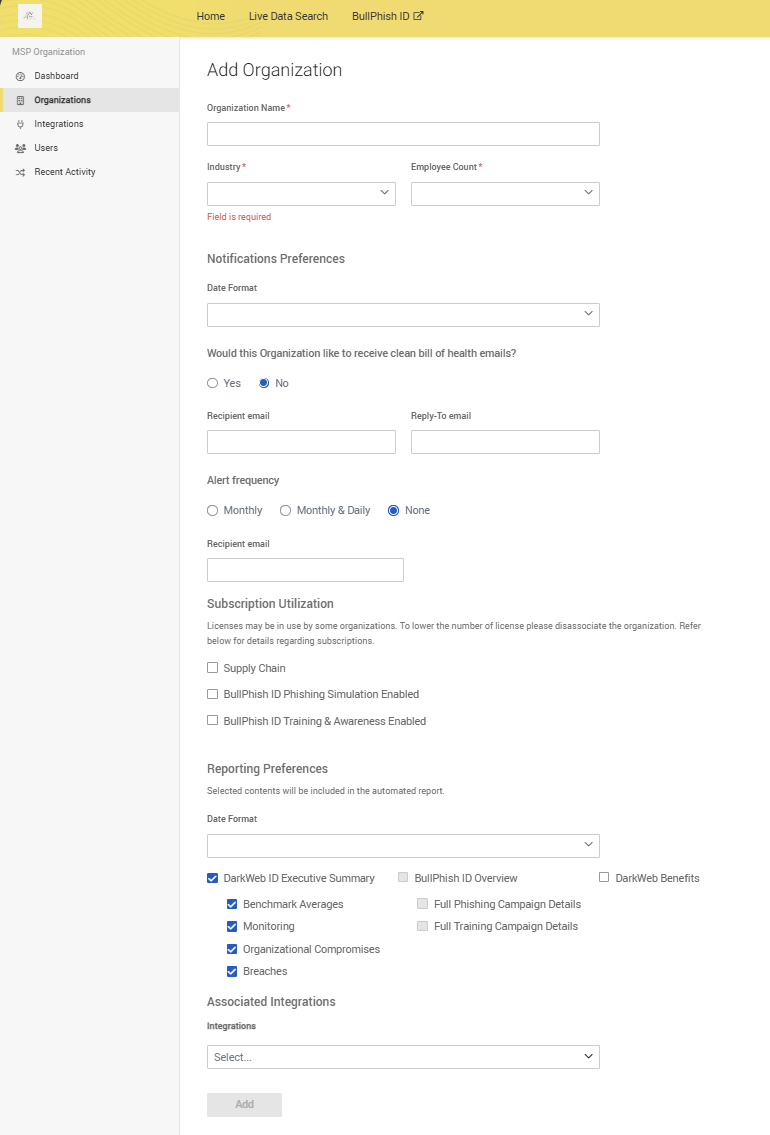
3. Click Add.

4. A success message will confirm that the organization has been successfully created.
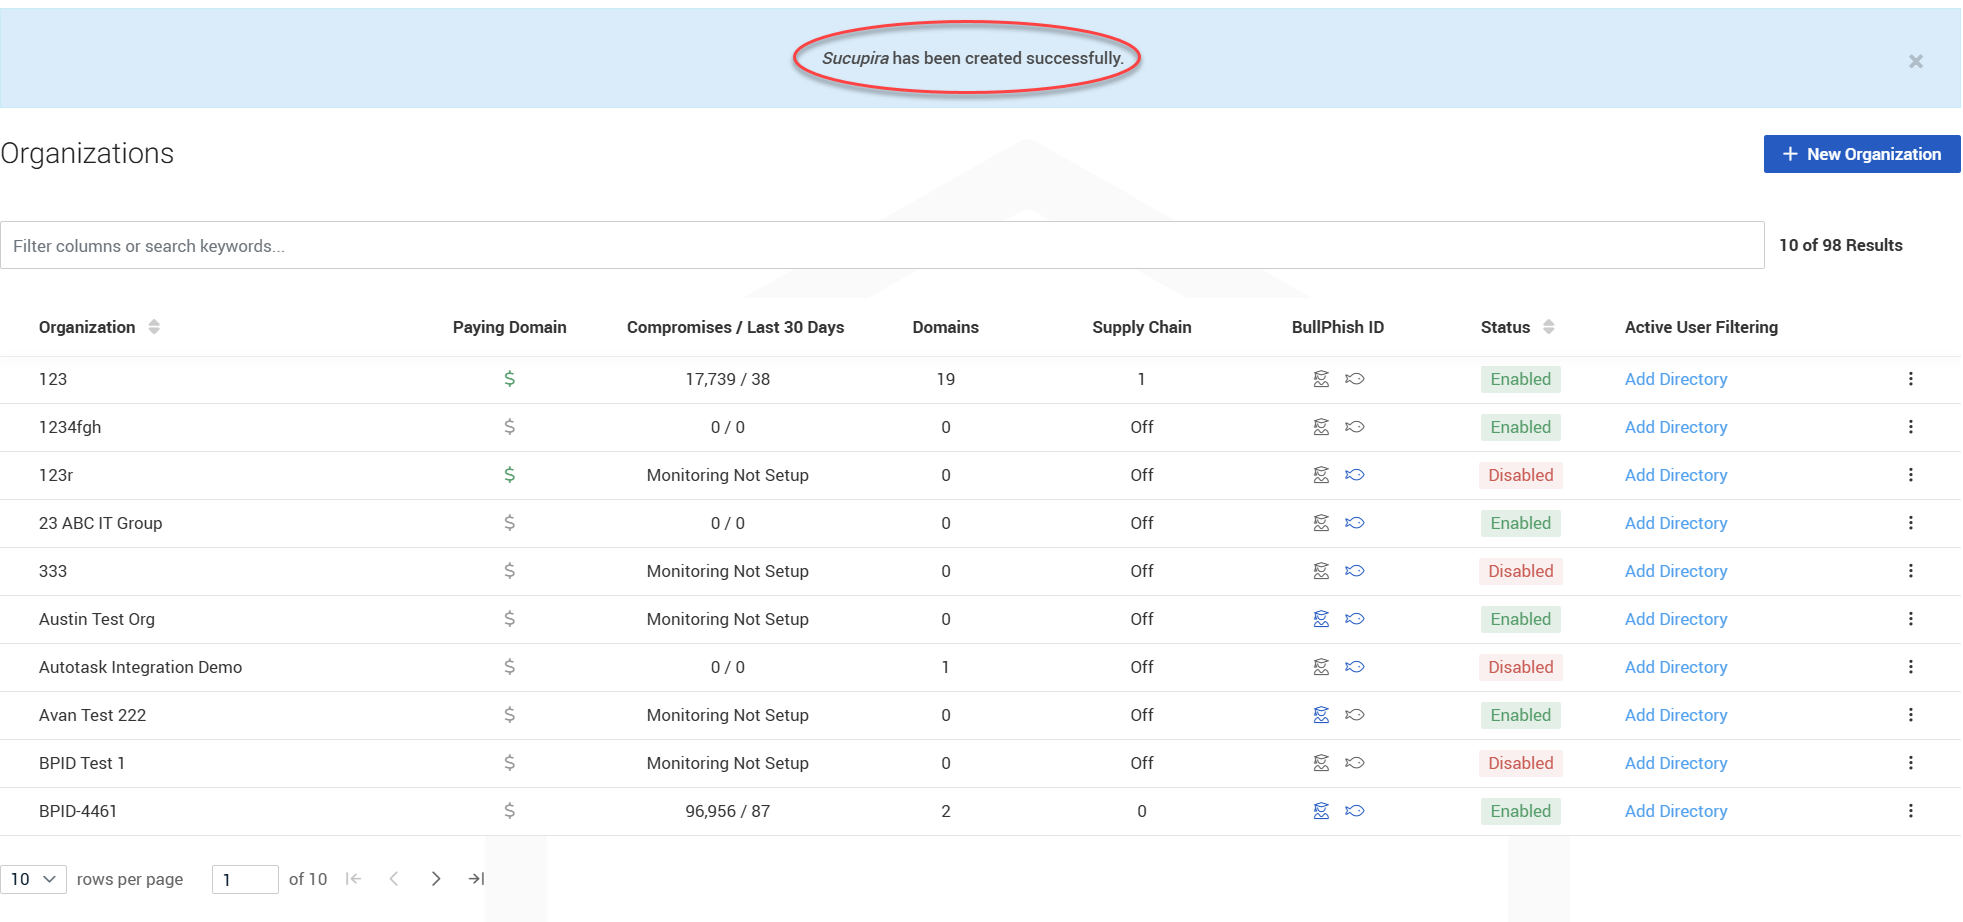
NOTE Please allow 24 hours for the historical data to fully load into the platform after adding a new organization. You will receive your first New Compromises email once this historical data has loaded. However, please note that the platform sends you this email because it treats all the loaded data as new upon first viewing it.
Clicking Monitor to add domains, IPs, and personal emails for monitoring
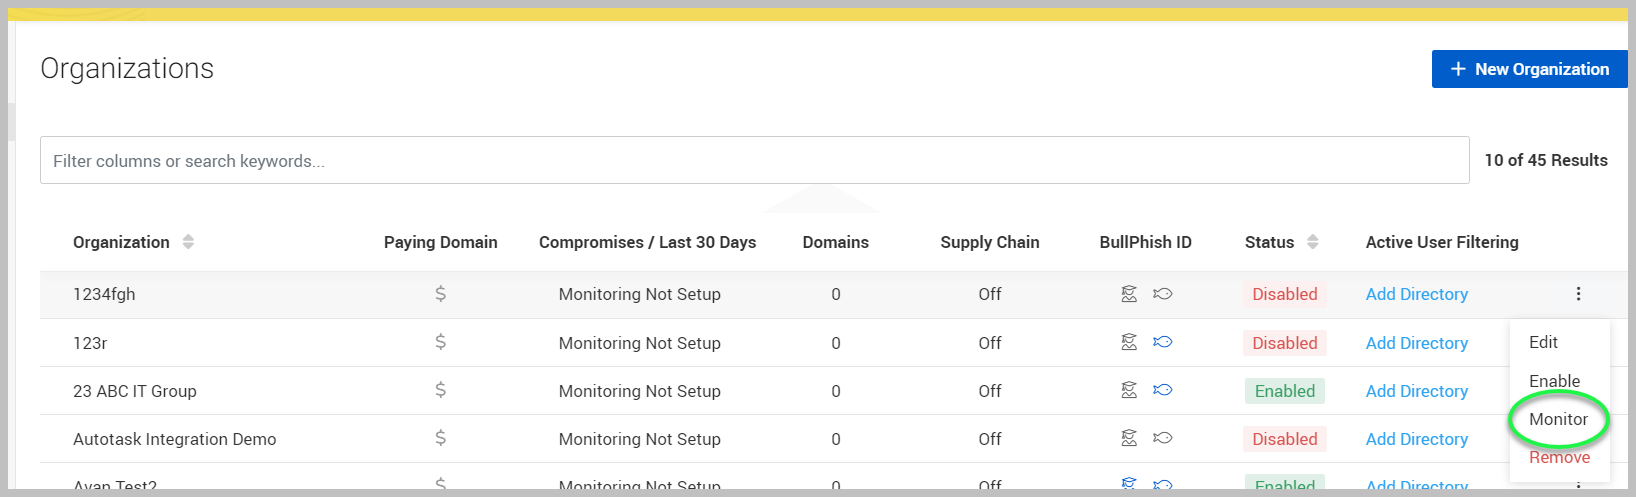
Organizations may be edited, disabled, monitored, or removed through the ellipsis menu icon  located on the right side of each organization entry.
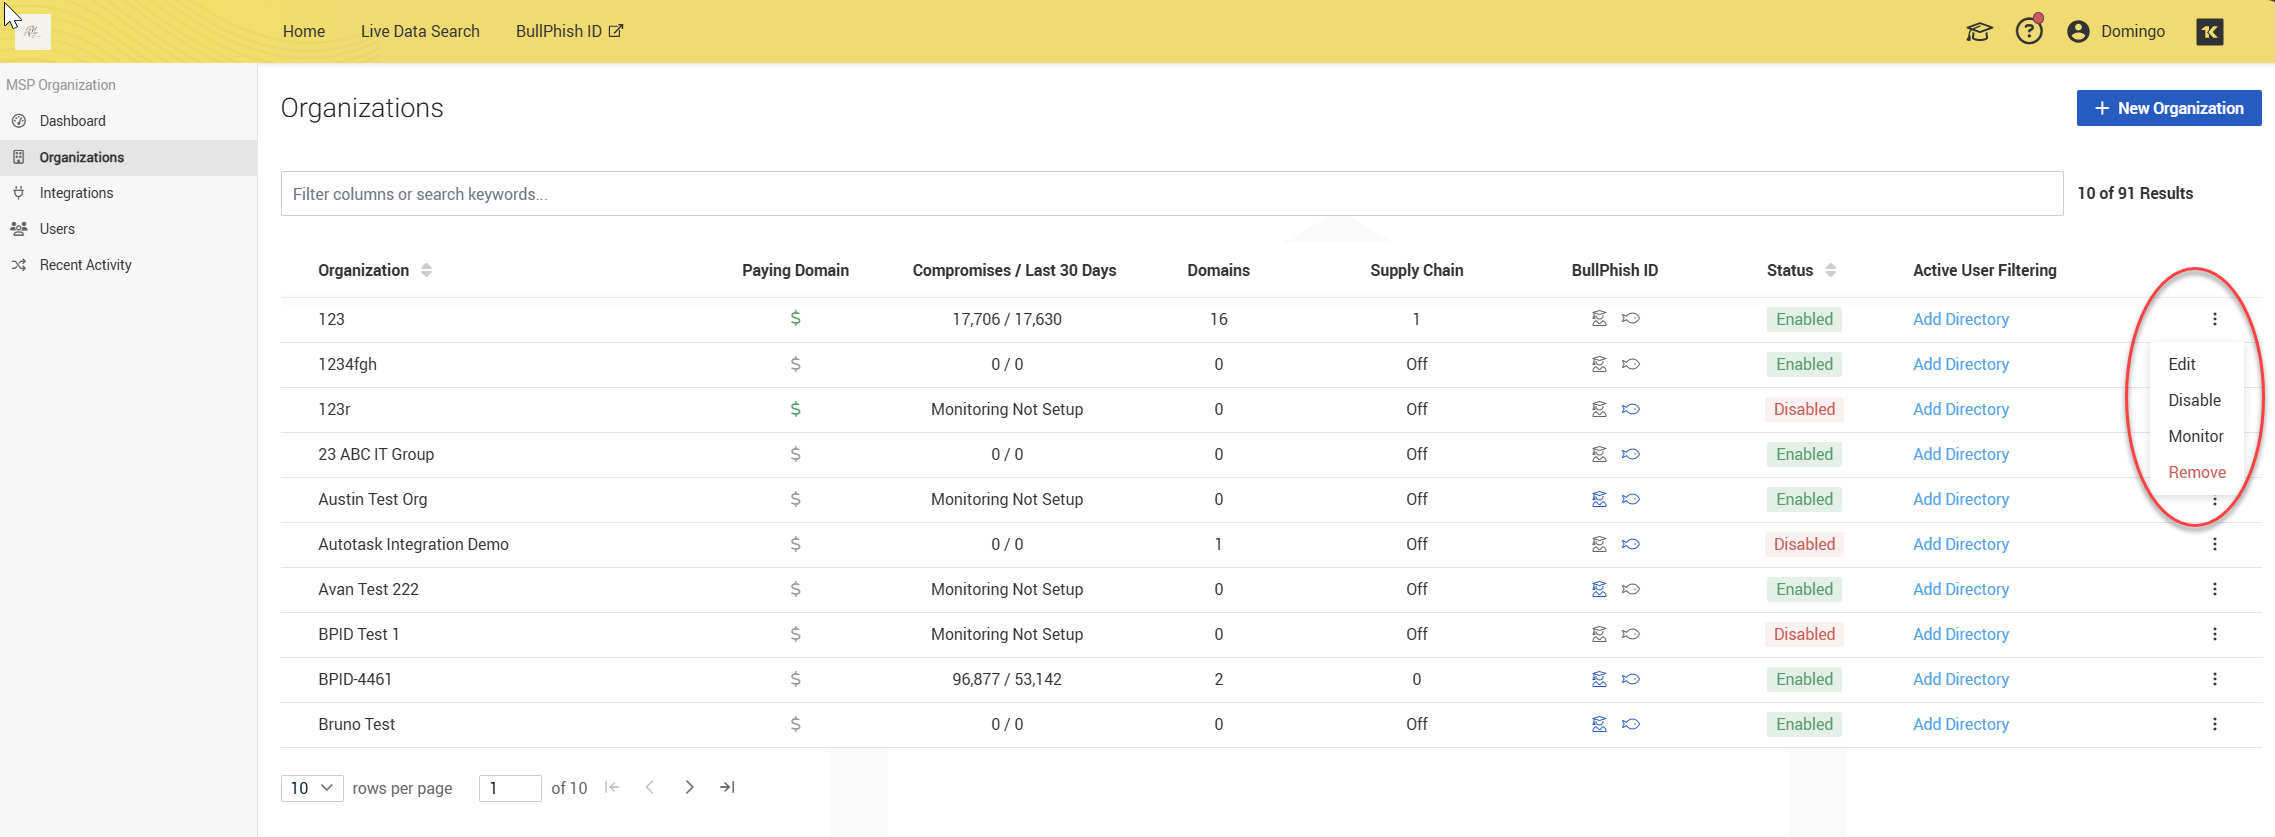
To add domains, IPs, and personal emails for monitoring, select Monitor.
The Manage Monitored Values page will be displayed. Here you can select + Add Domain, + Add An IP Address, or + Add An Email Address, depending on what you wish to monitor. You can add domains, IP addresses, or email addresses in bulk by clicking + Bulk Add Domains, + Bulk Add IP Addresses, or + Bulk Add Personal Emails, respectively.
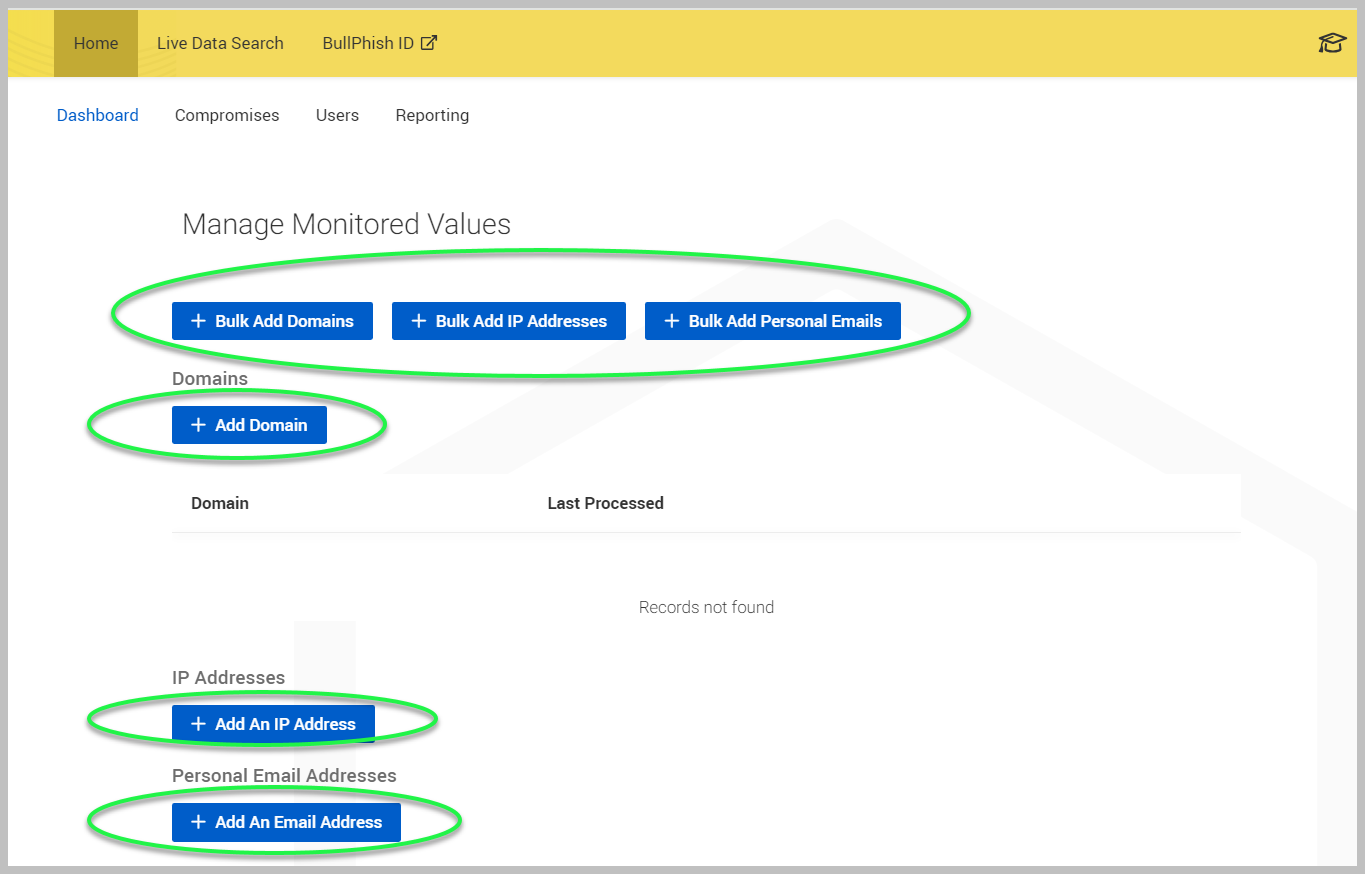
For detailed information, refer to Adding domains, IPs, and personal emails for monitoring.
Organization details page
You can access an organization details page by clicking on it. The organization details page provides access to key management and reporting features for the selected organization. This page allows administrators to:
-
View and manage users associated with the organization.
-
Review compromise data.
-
Access dashboards and reports for monitoring and compliance.
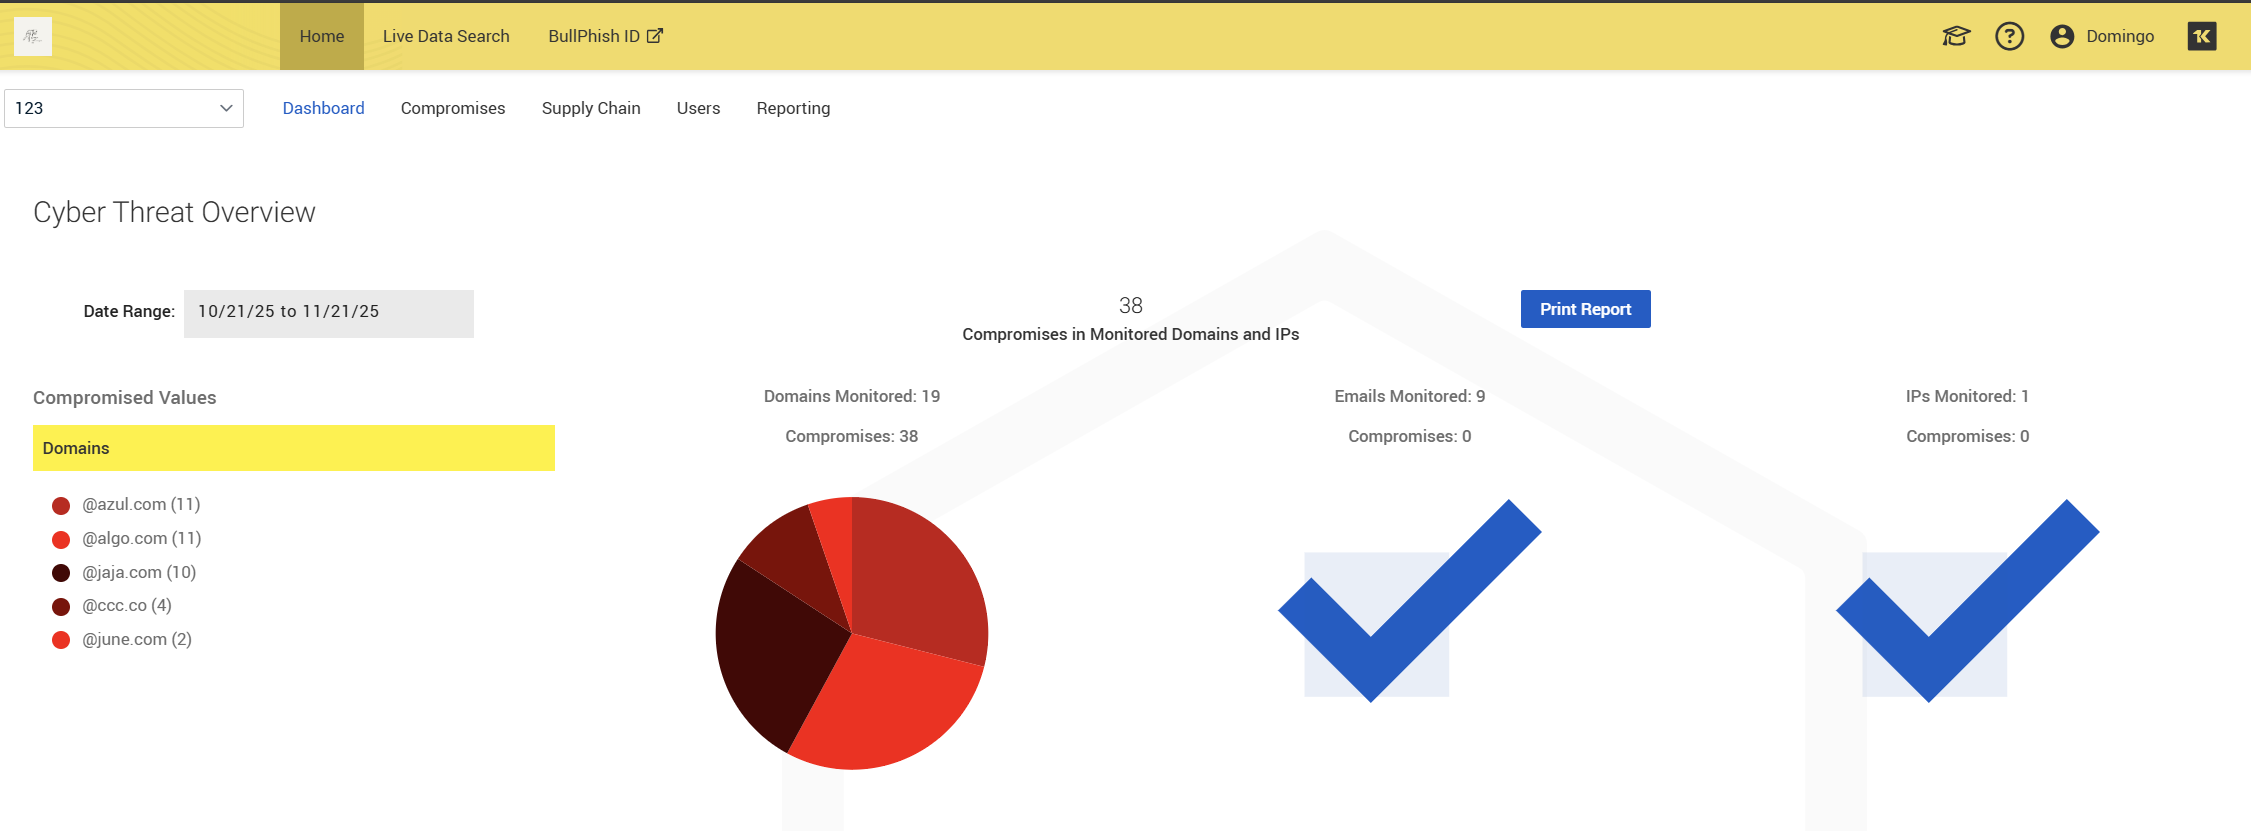
At the top of the page, five main tabs are displayed: Dashboard, Compromises, Supply Chain, Users, and Reporting. The organization details page opens in the Dashboard tab by default.
NOTE The Supply Chain tab only appears when there are third-party organizations associated with your account. If no third-party associations exist, this tab will not be displayed for the organization.
The Dashboard tab, also knows as the Cyber Threat Overview, offers a graphical representation of an organization’s compromises. It provides a high-level overview of the organization’s security posture and monitoring status. On the left side, you will find a list of all the active domains that you are monitoring. Additionally, this page provides an overview of all the compromises that have occurred within the selected date range from the Date Range calendar.
The Compromises tab serves as your gateway to all detected exposures related to that organization’s monitored assets (email domains, IP addresses, etc.).
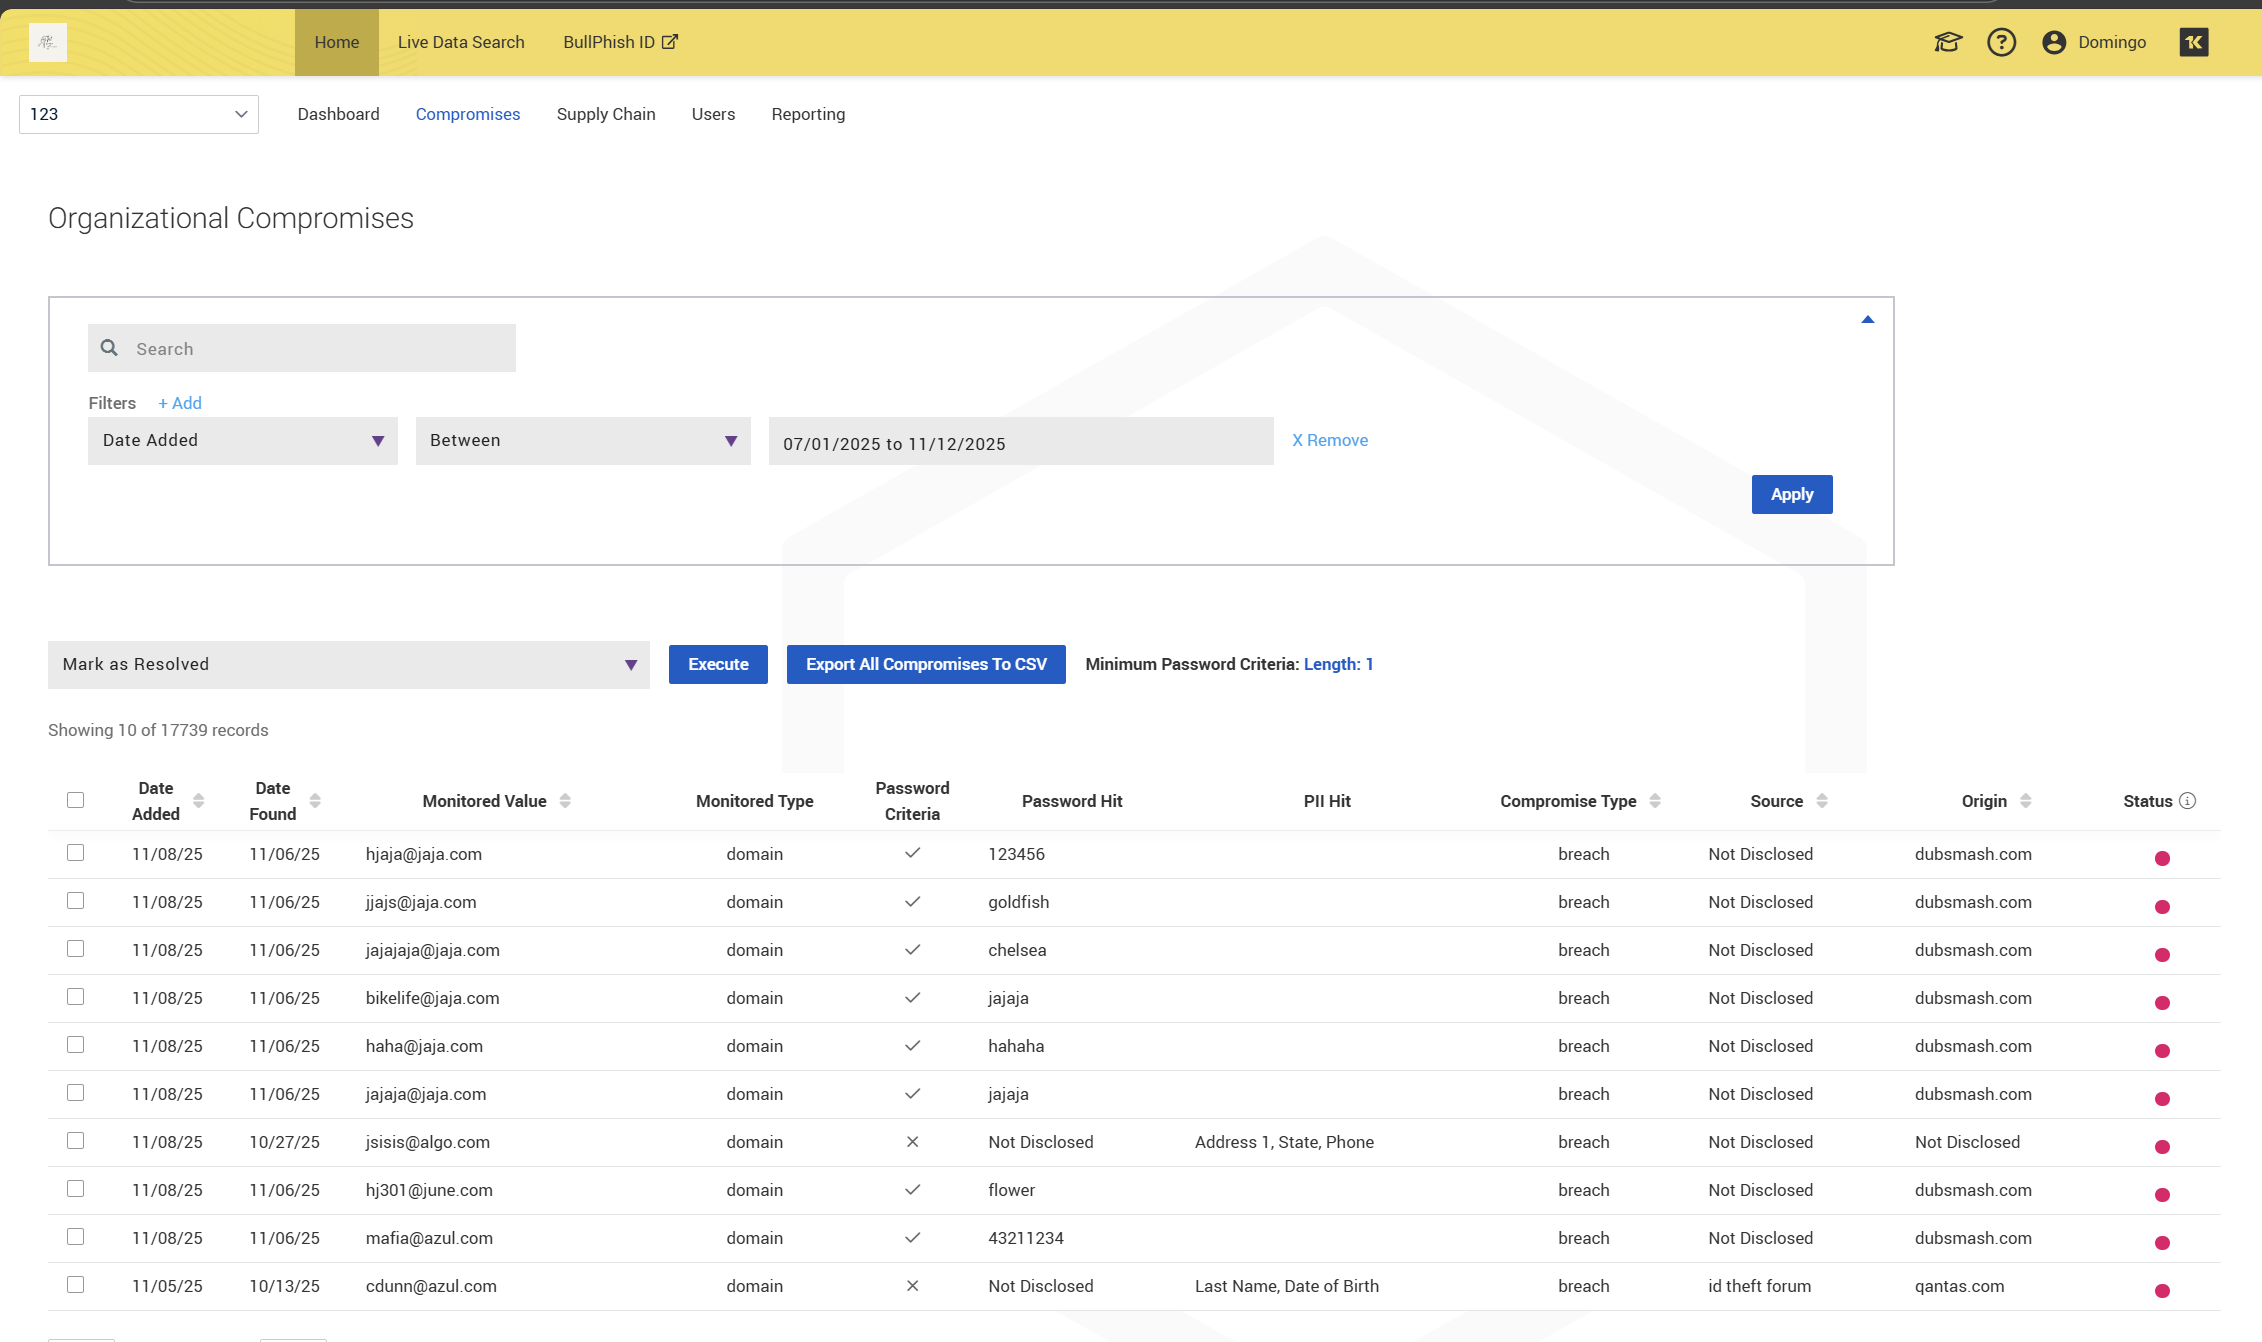
The Search bar allows quick keyword searches within the compromise records. On this tab, you can also apply or remove filters using the Apply and Remove buttons. Click Apply to update the compromise list. The list of filters is the same as the column names. See the Data table columns below for an explanation of what every filter means.
Some action buttons on this tab include the following:
-
Mark as Resolved: Select records and mark them as resolved after remediation.
-
Execute: Applies selected actions to chosen records.
-
Export All Compromises to CSV: Downloads all compromise data for offline review.
-
Minimum Password Criteria: Displays the minimum password length configured for detection.
Data table columns
| Column | Description |
| Date Found | The earliest confirmed date the compromised data was discovered on the dark web. |
| Monitored Value | Displays the exact monitored item (email, domain, or IP). |
| Email Address | Provides clearer visibility into identity‑specific compromises. |
| Monitored Type | Type of monitored asset (e.g., domain, IP). |
| Password | Shows the compromised password (masked or “Not Disclosed” if unavailable). |
| Password Criteria | Indicates if the password meets the configured criteria (✓ or blank). |
| PII Hit | Displays any exposed Personally Identifiable Information (e.g., address, DOB). |
| Compromise Type | Categorizes the compromise (e.g., breach, bot, phishing). |
| Source | Indicates where the data was found (e.g., Not Disclosed, chat forum). |
| Origin | The originating domain or platform associated with the compromise. |
| Status |
Visual indicator (red dot = unresolved; green dot: resolved compromise, after remediation). |
Compromise types explained
| Type | Description |
| Accidental Exposure | The compromise of data is attributed to an unintentional disclosure by non-malicious actors on a web page, social media, or peer-to-peer site. |
| Bogus | Spam server that presents an invalid value. |
| Bot | The compromise of data is attributed to botnet activity. |
| Breach | Data leaked during a known security breach. |
| BSIP | Spam server that presents as a different IP. |
| Combolist | Credential and password pairs (username:password or email:password) found on paste sites, forums, or combolists — often without attribution to a specific breach. Many contain recycled credentials from older exposures or breached datasets. |
| Data Dump | A consolidated collection of new and/or previously compromised credentials were made available for bulk consumption. |
| Dox | The data was disclosed as a part of a Doxing effort. Doxing is the research, collection, and broadcast of private or personally identifiable information (PII) about an individual or organization. Doxing may be carried out for various reasons, including extortion, coercion, inflicting harm, harassment, and online shaming. |
| Exfiltrated | Breaches exfiltrated by threat actors from an identifiable organization, often including customer records, user databases, or internal employee info. Typically has a known breach name and metadata. |
| Exposed | Publicly accessible or misconfigured data stores (e.g., open S3 buckets, FTPs) — found unintentionally but can contain sensitive credentials or personal data. |
| FAM | Spam server that presents identity we know to be valid, but not them. |
| Keylogged / Phished | The compromise of data is attributed to entering into a phishing website or extracted through software designed to surreptitiously harvest personally identifiable information (PII) |
| LH | Spam server that presents as localhost. |
| LOC | Spam server that presents as the destination server. |
| Malware | Data captured from infected machines, including login credentials, cookies, autofill data, browsing history, wallet credentials, and device fingerprinting. Collected using infostealer malware such as Redline, Raccoon, Vidar, etc. This is the richest and most behaviorally complete dataset type. |
| MISC | Spam server that presents a broken value. |
| MPD | Spam server that presents as multiple unrelated domains. |
| NEVER | Spam server that presents a forged value. |
| NOHELO | Spam server that does not present an identity. |
| Not Disclosed |
The corresponding metadata associated with the collected information is currently insufficient to accurately attribute to a specific compromise type. |
| Phished | Credentials harvested through phishing campaigns, kits, or spoofed login portals. Often limited in structure but high-fidelity in intent. |
| Sample | The data that was disclosed by an individual or organization to prove its validity of an exploit/breach. |
| Scraped | Usernames, emails, and account metadata scraped from public websites (e.g., social media, forums) — not stolen directly, but aggregated at scale. |
| SSIP | Spam server that presents as own IP. |
| Tested | The data was legally tested to determine if it is live/active data. |
Best practices
-
Regularly export CSV reports for compliance and internal audits.
-
Use filters to prioritize recent or high-risk compromises.
-
Use the Compromises tab for remediation tracking and mark resolved items promptly to maintain accurate tracking.
-
Leverage Reporting for compliance and stakeholder communication.
Report download and status actions
In the Compromises tab, the Select Operation drop-down menu and Execute button allow you to download reports or update the status of selected records.
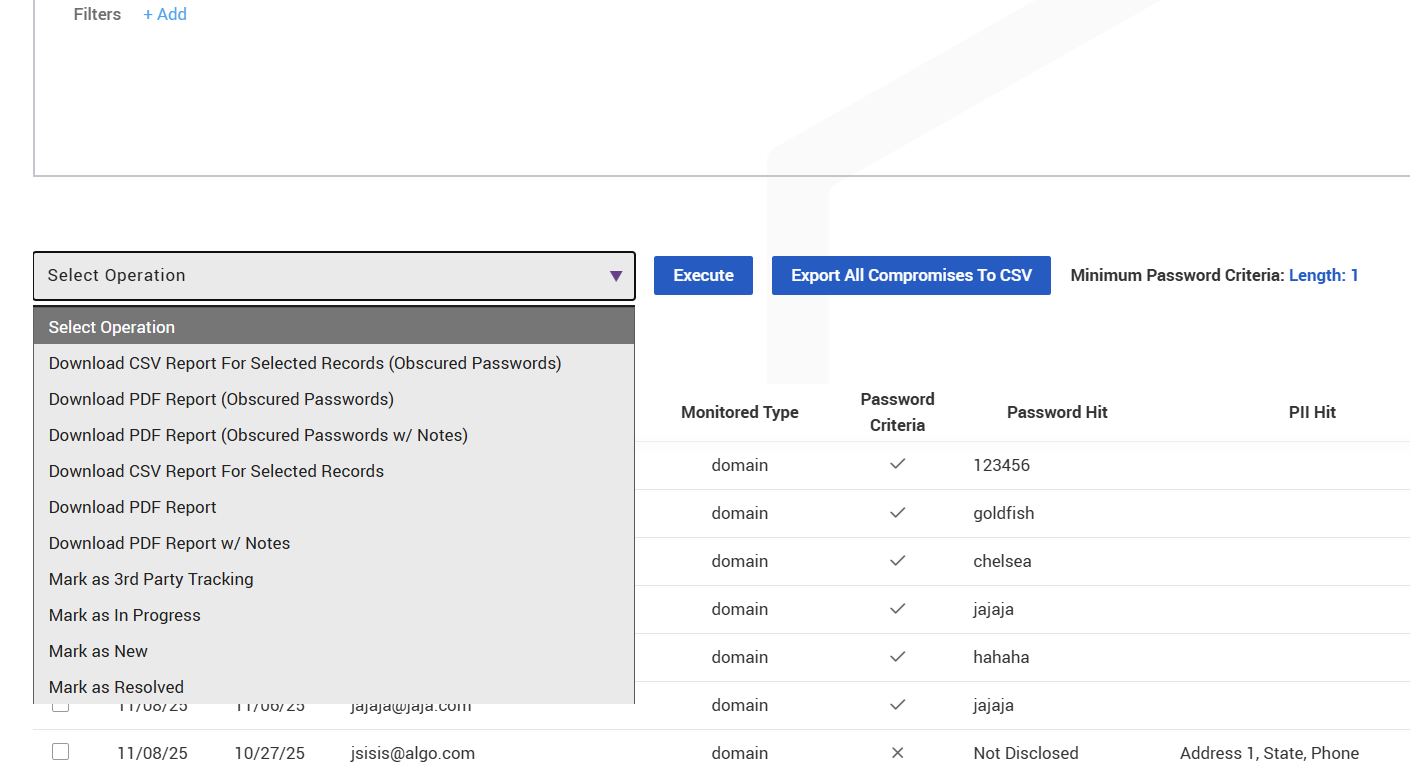
Drop-down menu options
-
Download CSV Report for Selected Records (Obscured Passwords): Exports selected compromises in CSV format with passwords masked.
-
Download PDF Report (Obscured Passwords): Generates a PDF report with masked passwords.
-
Download PDF Report (Obscured Passwords w/ Notes): Includes masked passwords and any notes added to the records.
-
Download CSV Report for Selected Records: Exports selected compromises in CSV format (passwords visible if allowed).
-
Download PDF Report: Generates a PDF report with full details.
-
Download PDF Report w/ Notes: Includes notes for context in the PDF report.
Status update options
-
Mark as 3rd Party Tracking: Indicates the compromise is being tracked by a third party.
-
Mark as In Progress: Shows remediation is underway.
-
Mark as New: Resets the record to “New” status.
-
Mark as Resolved: Marks the compromise as resolved after remediation.
How to use
-
Select one or more records using the checkboxes.
-
Choose an operation from the Select Operation dropdown.
-
Click Execute to apply the selected action.
NOTE Compromises found with fake email addresses occur when employees create throwaway accounts to gain access to systems or data. However, these fake accounts are frequently used to carry out sophisticated social engineering or phishing attacks. The presence of fake email accounts can indicate that an organization has previously been targeted by individuals or groups.
The Supply Chain tab provides visibility into third-party organizations associated with your account. It helps monitor and manage compromises across your supply chain, affiliates, and partner organizations.
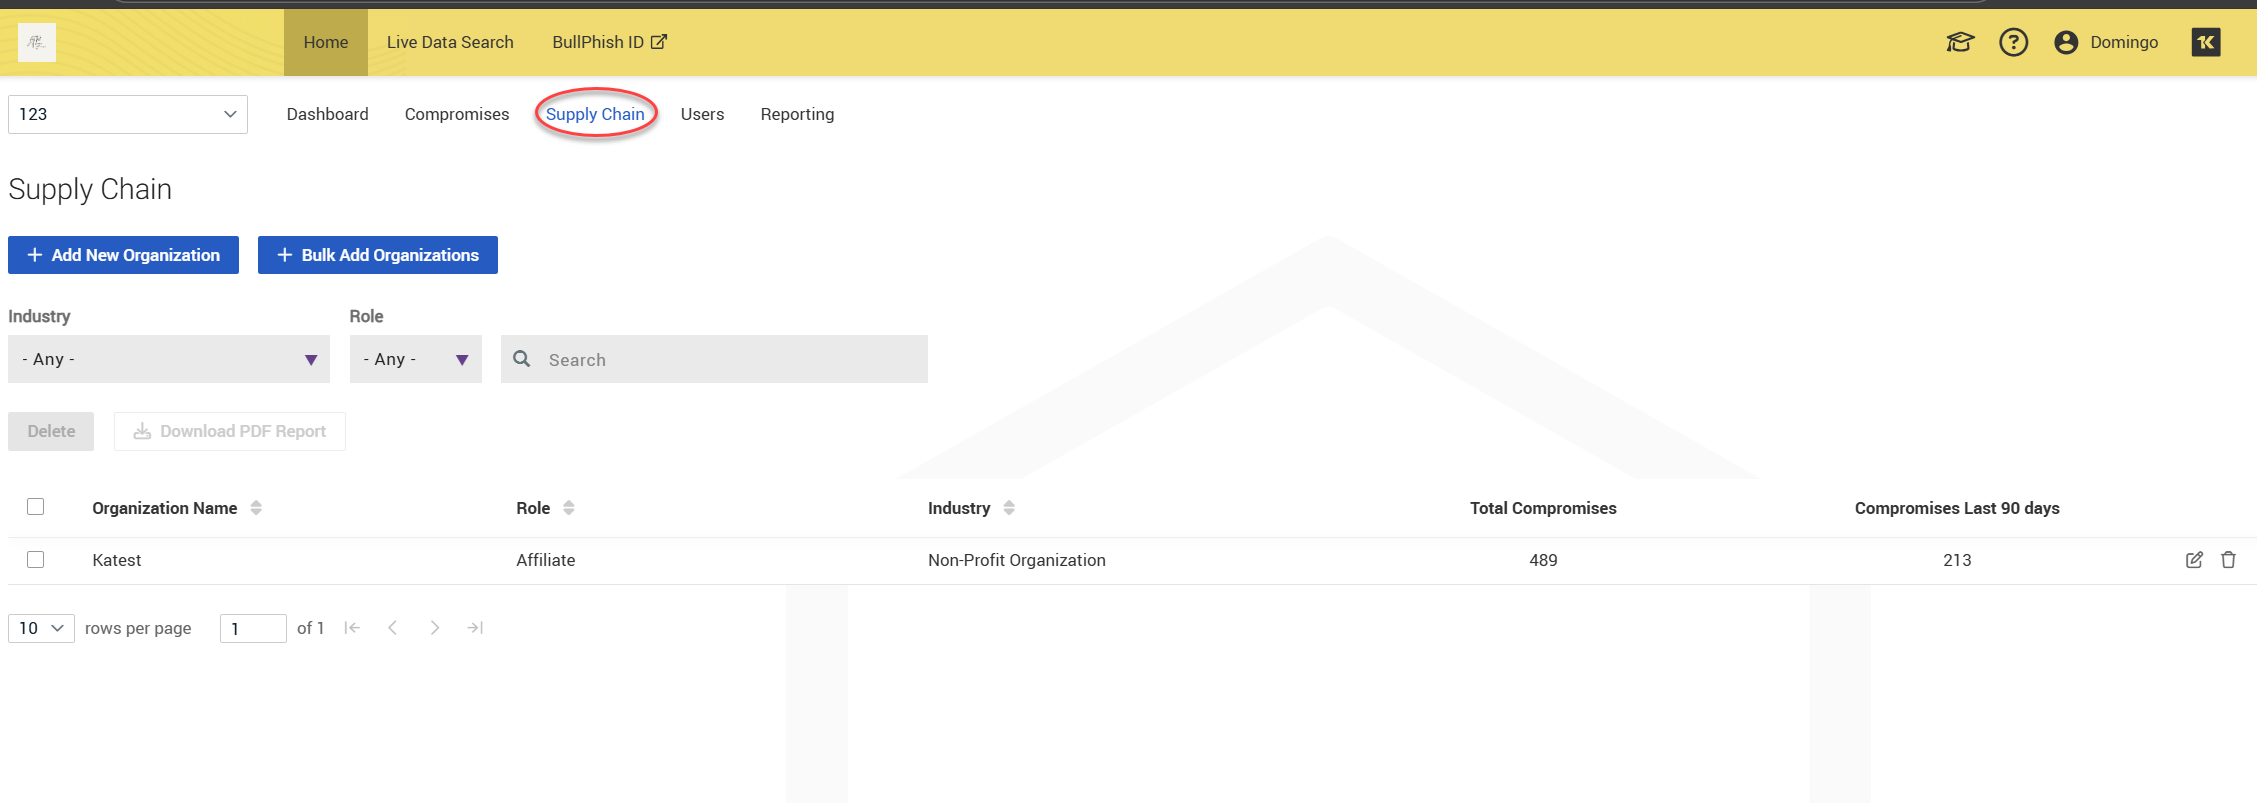
Page layout and components
The action buttons on this tab are the following:
-
+ Add New Organization: Allows you to manually add a single organization to your supply chain monitoring list.
-
+ Bulk Add Organizations: Enables adding multiple organizations at once using a bulk upload process.
The filters are:
-
Industry: Drop-down filter to narrow results by industry type (e.g., Non-Profit, Healthcare, Finance).
-
Role: Drop-down filter to filter organizations by their role (e.g., Affiliate, Vendor).
-
Search bar: Quickly locate an organization by name.
Table columns
Each table row represents a monitored organization in your supply chain. Columns include:
| Column | Description |
| Organization Name | The name of the monitored organization. |
| Role | The relationship type (e.g., Affiliate, Vendor). |
| Industry | The industry classification of the organization. |
| Total Compromises | The cumulative number of compromises detected for this organization. |
| Compromises Last 90 Days | Compromises found in the last 90 days. |
Additional options
-
Delete: Remove selected organizations from the supply chain list.
-
Download PDF Report: Generate a PDF summary of the supply chain data for reporting or compliance purposes.
-
Pagination Controls: Adjust the number of rows displayed per page and navigate between pages.
Best practices
-
Regularly review Total Compromises and 90-Day Compromises to identify high-risk partners.
-
Use Industry and Role filters to prioritize critical vendors or affiliates.
-
Export reports for compliance audits and internal risk assessments.
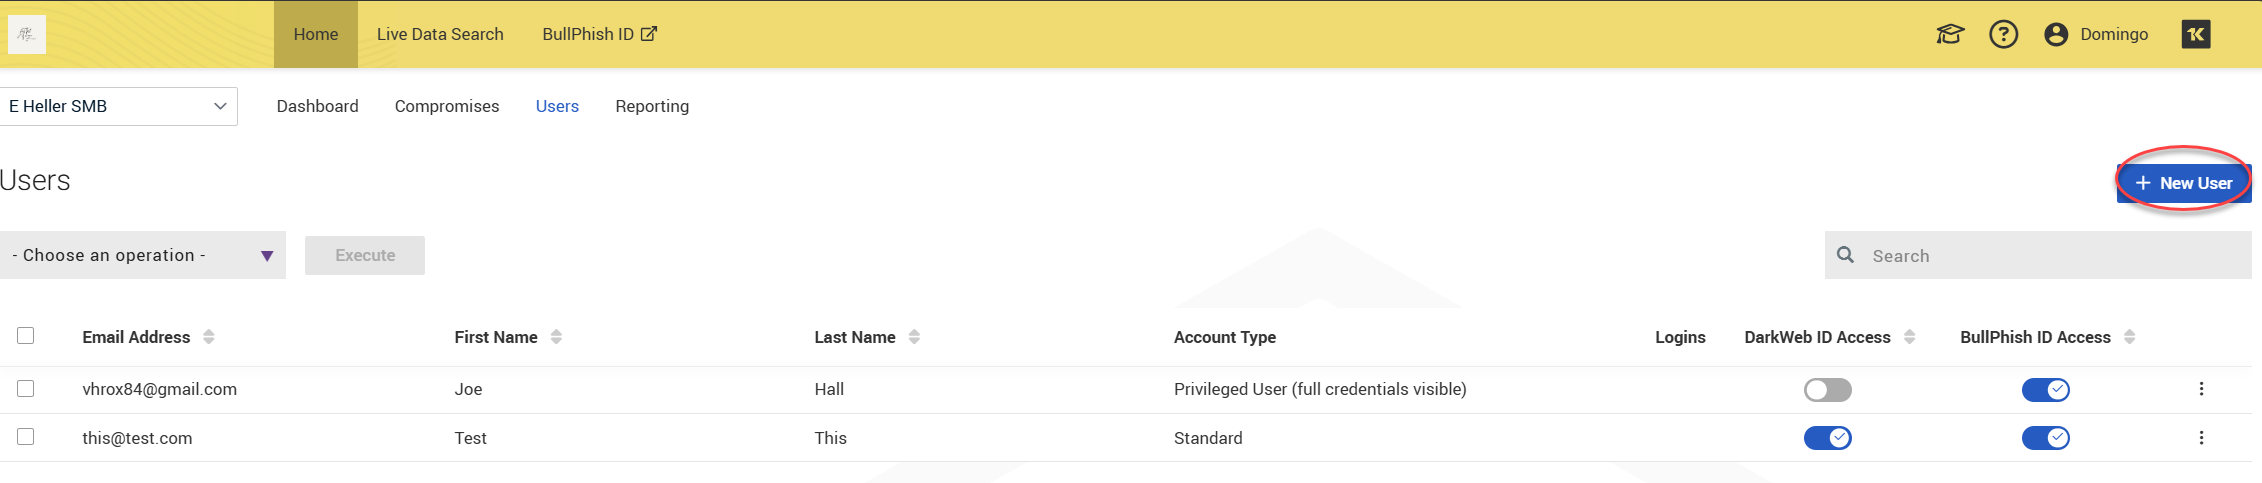
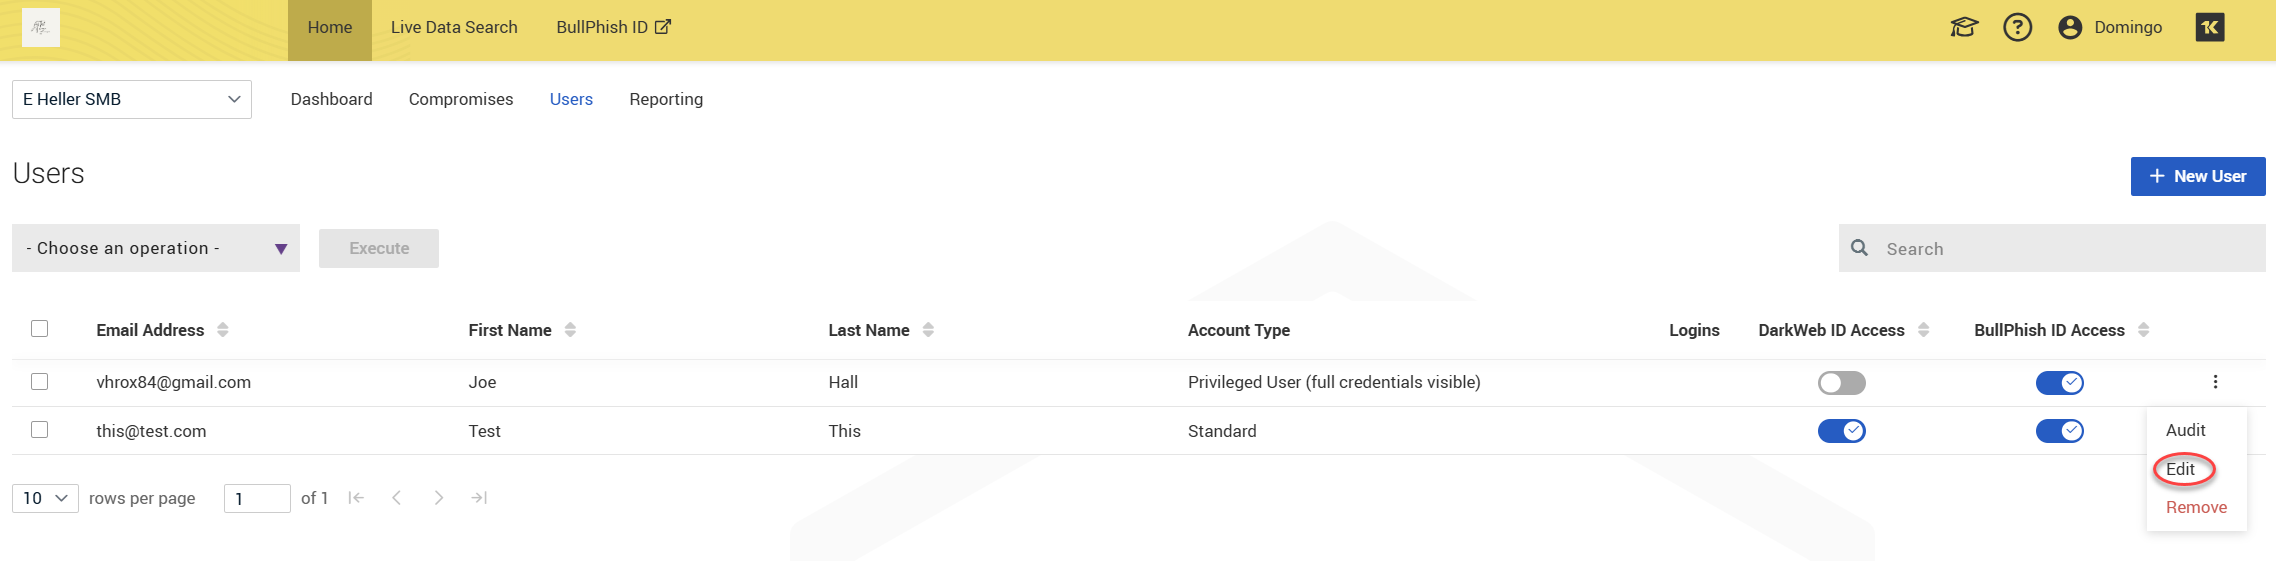
The Users tab lists all monitored users of an organization with details:
-
Email Address
-
First and Last Name
-
Account Type (Privileged or Standard)
-
Login toggles for Dark Web ID and BullPhish ID access.
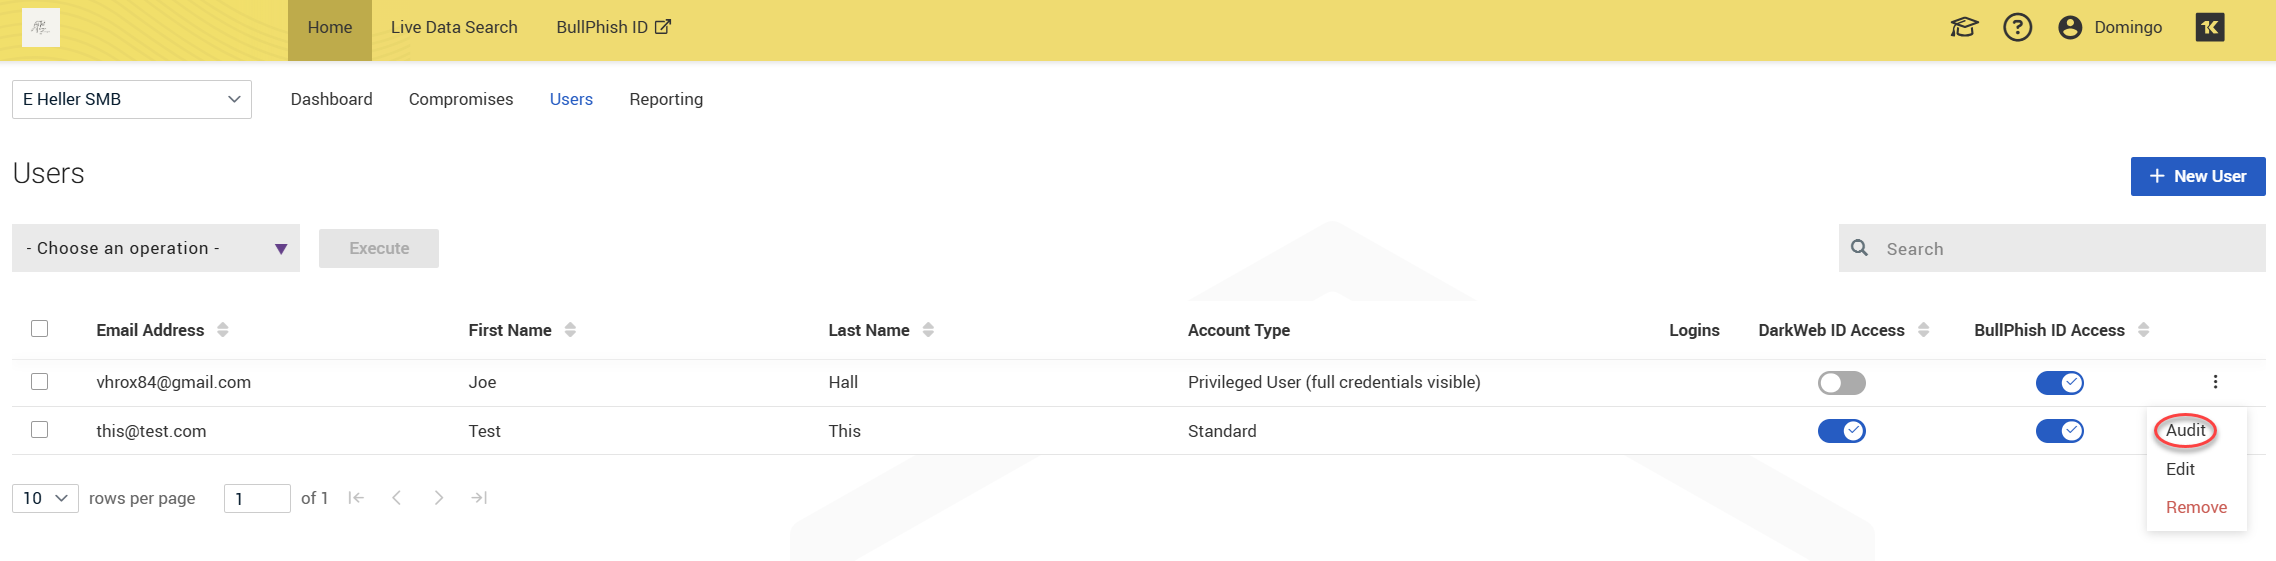
On this tab, you can perform the following actions:
-
Add new users by clicking + New User. For detailed information, refer to Adding a user to a client's organization.
-
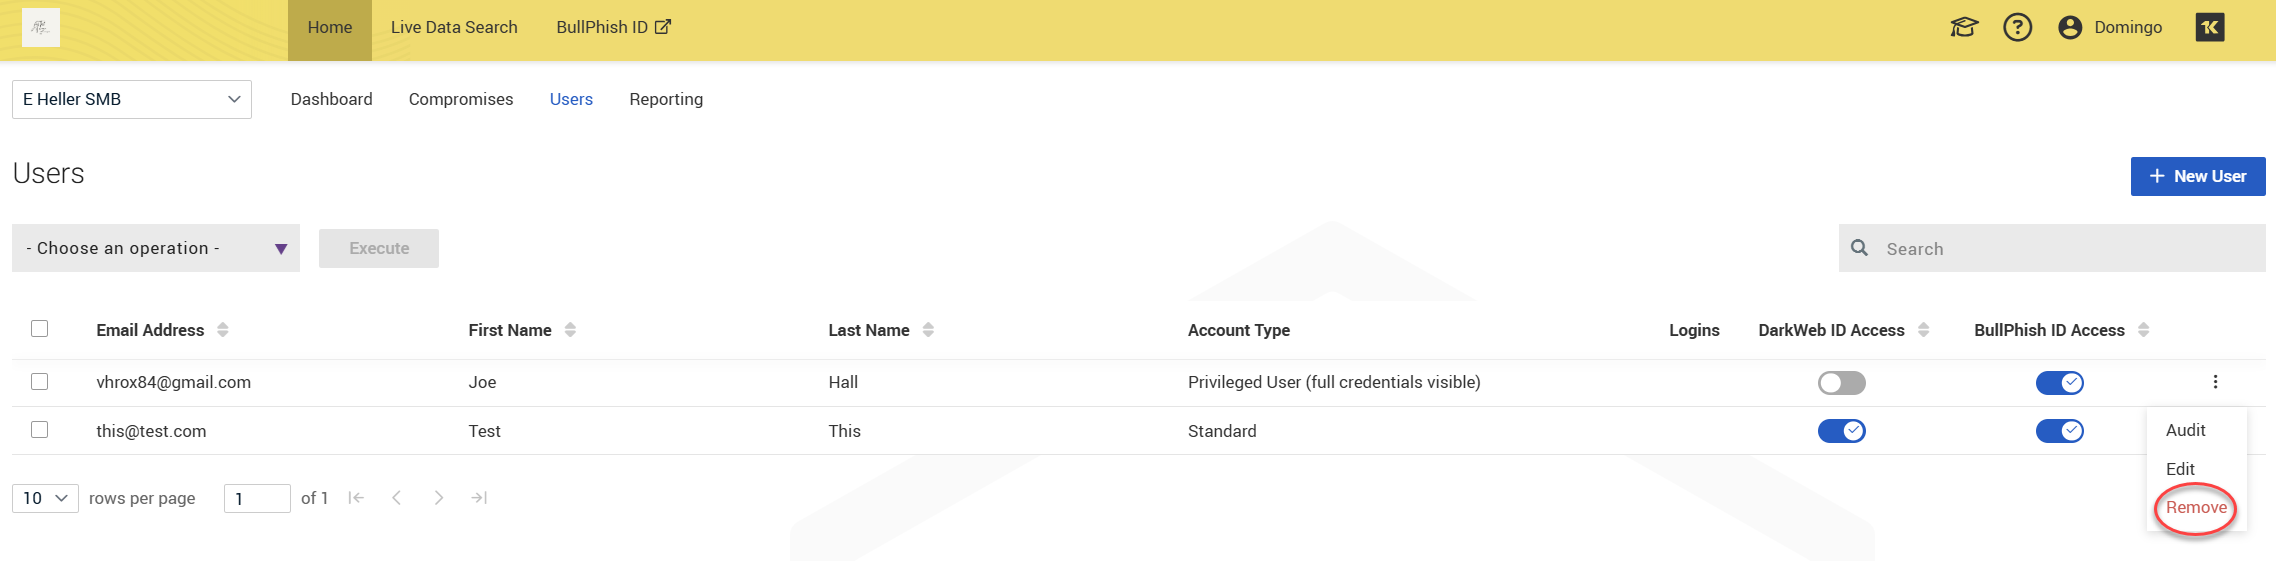
Edit or remove existing users (via the Edit option in the three-dot menu).
-
Audit user activity (via the Audit option in the three-dot menu). Audit Log will give you a summary of how many times a user accessed the platform and when they accessed it.
-
Remove a user (via the Remove option in the three-dot menu).
The Reporting tab allows administrators to generate, download, and automate reports for the selected organization. These reports provide insights into compromise trends, user monitoring, and overall security posture.
The Reporting tab is designed for:
-
Compliance and audit: Generate monthly or quarterly reports for internal and external audits.
-
Executive summaries: Share security posture updates with stakeholders.
-
Automation: Schedule recurring reports to reduce manual effort.
Page layout and features
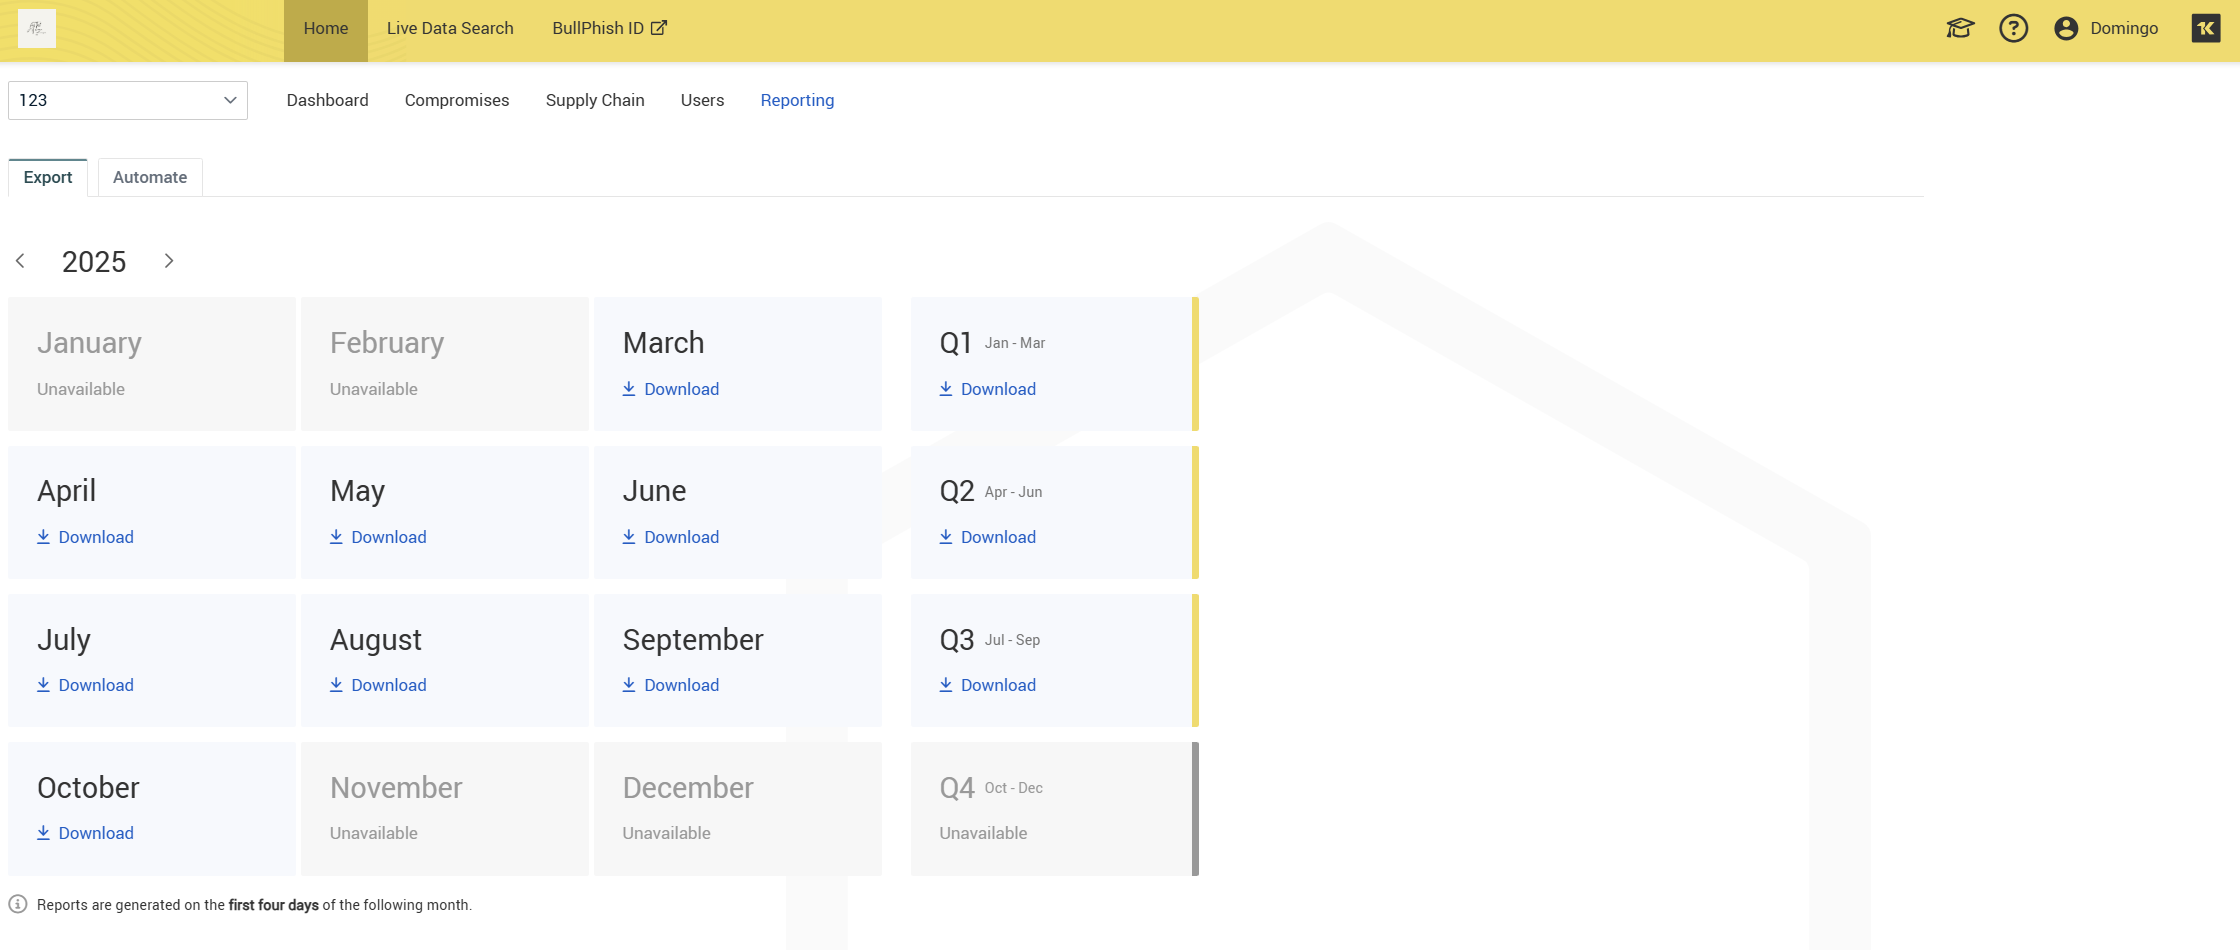
1. Export tab
The Export tab displays available reports by month and quarter.
-
Monthly reports:
-
Each month is listed (January–December).
-
Click Download under a month to retrieve the report.
-
If unavailable, the month is grayed out.
-
-
Quarterly reports:
-
Q1 (Jan–Mar), Q2 (Apr–Jun), Q3 (Jul–Sep), Q4 (Oct–Dec).
-
Click Download to retrieve quarterly summaries.
-
-
Report generation timing: Reports are generated during the first four days of the following month.

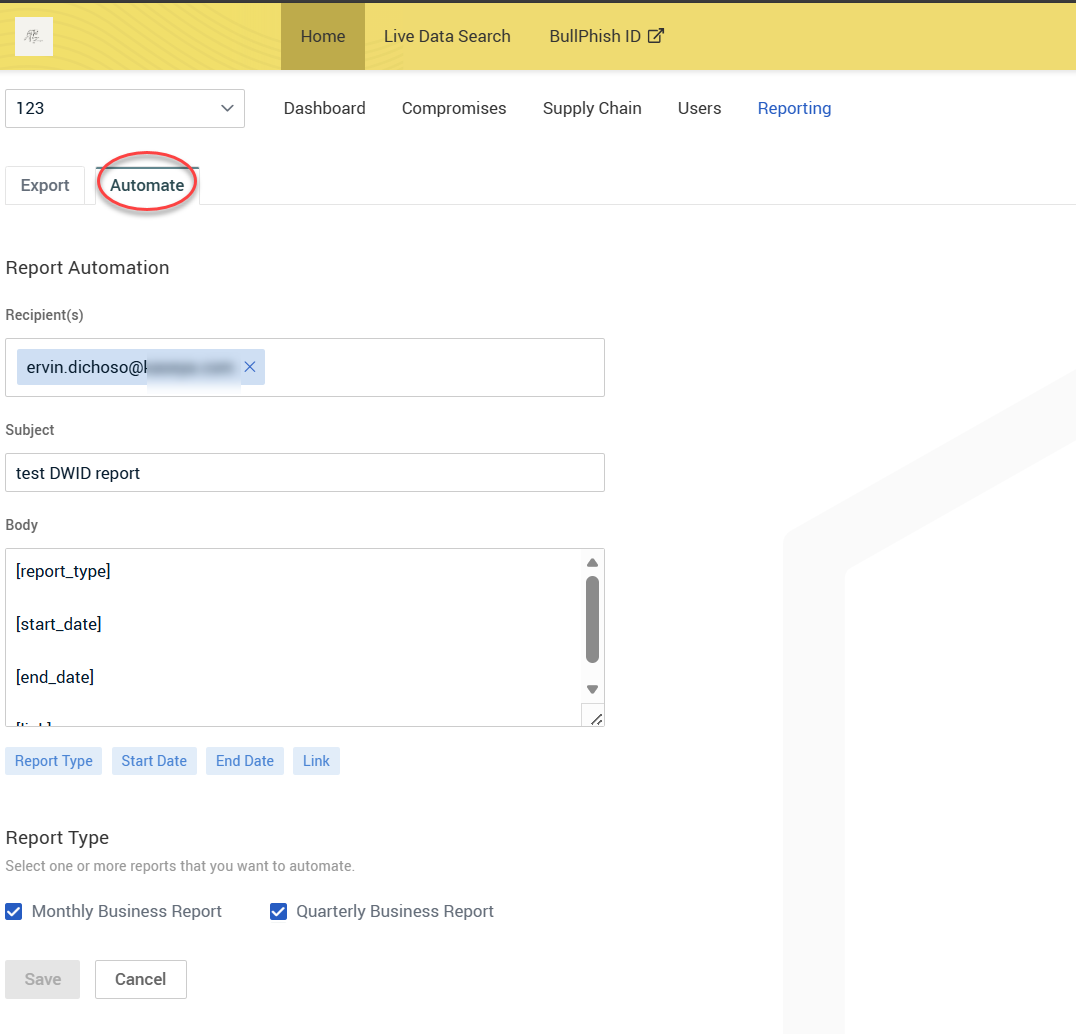
2. Automate tab
The Automate tab enables report scheduling and customization.
-
Report Automation fields
-
Recipient(s): Enter one or more email addresses to receive automated reports.
-
Subject: Define the subject line for the email.
-
Body: Customize the email body using placeholders:
-
[report_type] – Inserts the report type.
-
[start_date] – Inserts the start date.
-
[end_date] – Inserts the end date.
-
[link] – Adds a download link.
-
Quick insert buttons for placeholders: Report Type, Start Date, End Date, Link.
-
-
-
Report Type selection. Select one or both options:
-
Monthly Business Report
-
Quarterly Business Report
-
Click Save to activate automation or Cancel to discard changes.
Best practices
-
Enable automation for recurring compliance needs.
-
Download reports early in the month to ensure timely review.
-
Use placeholders for dynamic email content in automated reports.
-
Verify recipients to ensure reports reach the correct stakeholders.
NOTE BullPhish ID organizations are directly linked to Dark Web ID. Deleting an organization in BullPhish ID will also remove it from Dark Web ID. This action does not generate any corresponding logs within Dark Web ID.


