Kaseya 365 User: Getting started with Dark Web ID
This article is for customers that have purchased Dark Web ID as part of their Kaseya 365 subscription. It provides the recommended steps to begin the Dark Web ID onboarding process. You should perform the steps in the order they are presented. If you have purchased Dark Web ID as a standalone subscription, refer to Standalone: Getting started with Dark Web ID.
NOTE If you are using both Dark Web ID and BullPhish ID, please note that a single user login account provides access to both modules. Updating your password in either module will automatically update it for the other. It is recommended that you activate Dark Web ID first, and then access BullPhish ID directly from the Dark Web user interface, rather than clicking the Activate link for BullPhish ID on the Kaseya 365 Setup Guides page. 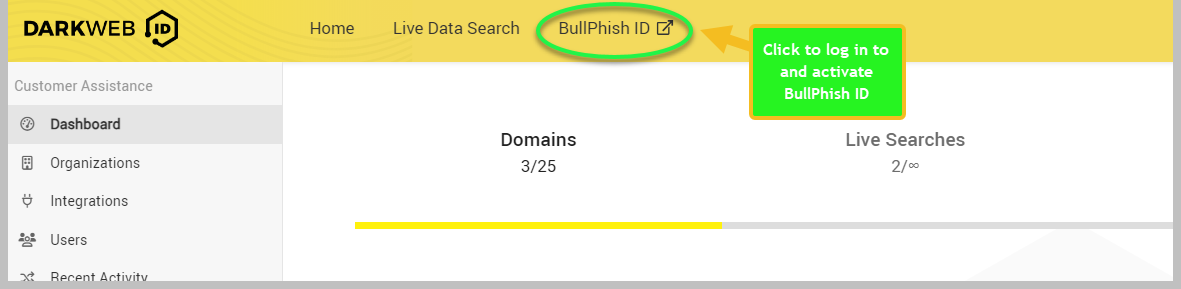
When using Dark Web ID as part of a Kaseya 365 subscription, your Kaseya 365 experience starts in KaseyaOne, the central hub for managing your subscriptions and accessing all your IT Complete modules. Upon initial access to KaseyaOne via the welcome email, you will be directed to the Kaseya 365 Setup Guides page. This guide provides comprehensive instructions for securing your environment using your newly acquired Kaseya 365 subscriptions.
Understanding welcome emails
Your Kaseya 365 subscription includes multiple welcome emails sent to the implementation contact of the subscription. The specific welcome emails received by the implementation contact depend on the type of subscription purchased and whether the organization was already using any Kaseya 365 modules before the subscription was purchased.
The following list details information about each welcome email:
-
Welcome to Kaseya: This email is sent to the designated implementation contact within 24 hours following the subscription purchase. It contains the contact details for the Project Manager assigned to your subscription from Kaseya's Professional Services team, along with links to documentation and your pre-implementation checklist.

-
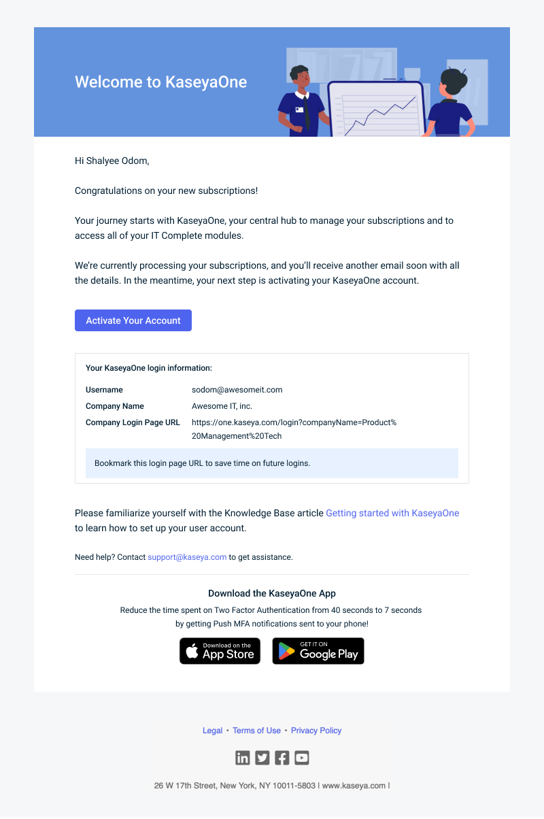
Welcome to KaseyaOne: This email is sent to the designated implementation contact within 24 hours following the subscription purchase. It is only sent for new KaseyaOne instances (not for organizations already using KaseyaOne.) Click Activate your account to enable your KaseyaOne account.
-
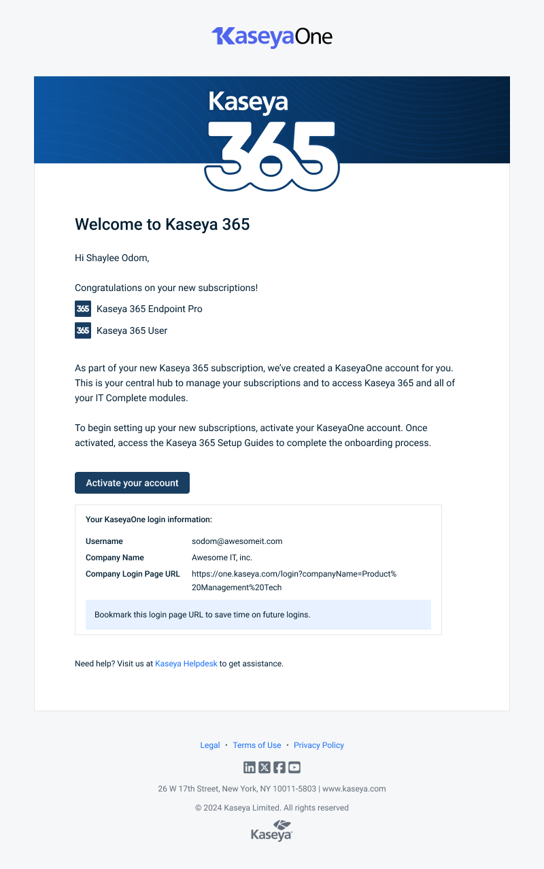
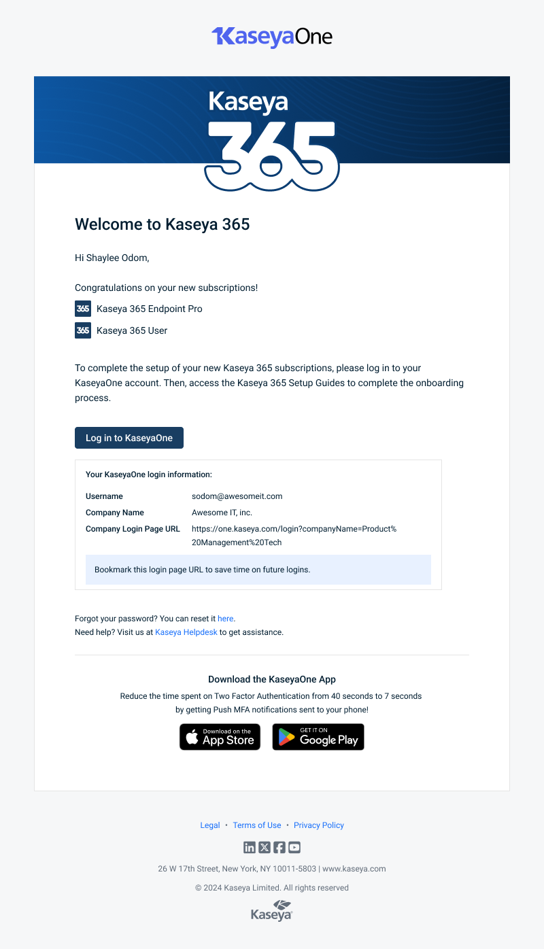
Welcome to Kaseya 365: This email is sent to the implementation contact 48 hours before the subscription start date. There are two email variants with the Welcome to Kaseya 365 subject:
-
One version is sent when a KaseyaOne account has not been set up. Click Activate your account to enable your KaseyaOne account and access your Kaseya 365 setup.
-
Another version is sent when a KaseyaOne account has already been activated. Click Log in to KaseyaOne to log in to your existing KaseyaOne account and access your Kaseya 365 setup.
-
-
Welcome to Dark Web ID: This email is sent to the implementation contact 48 hours before the subscription start date. You can activate your Dark Web ID module from your subscription's Kaseya 365 Setup Guides page or by clicking the link in this email.
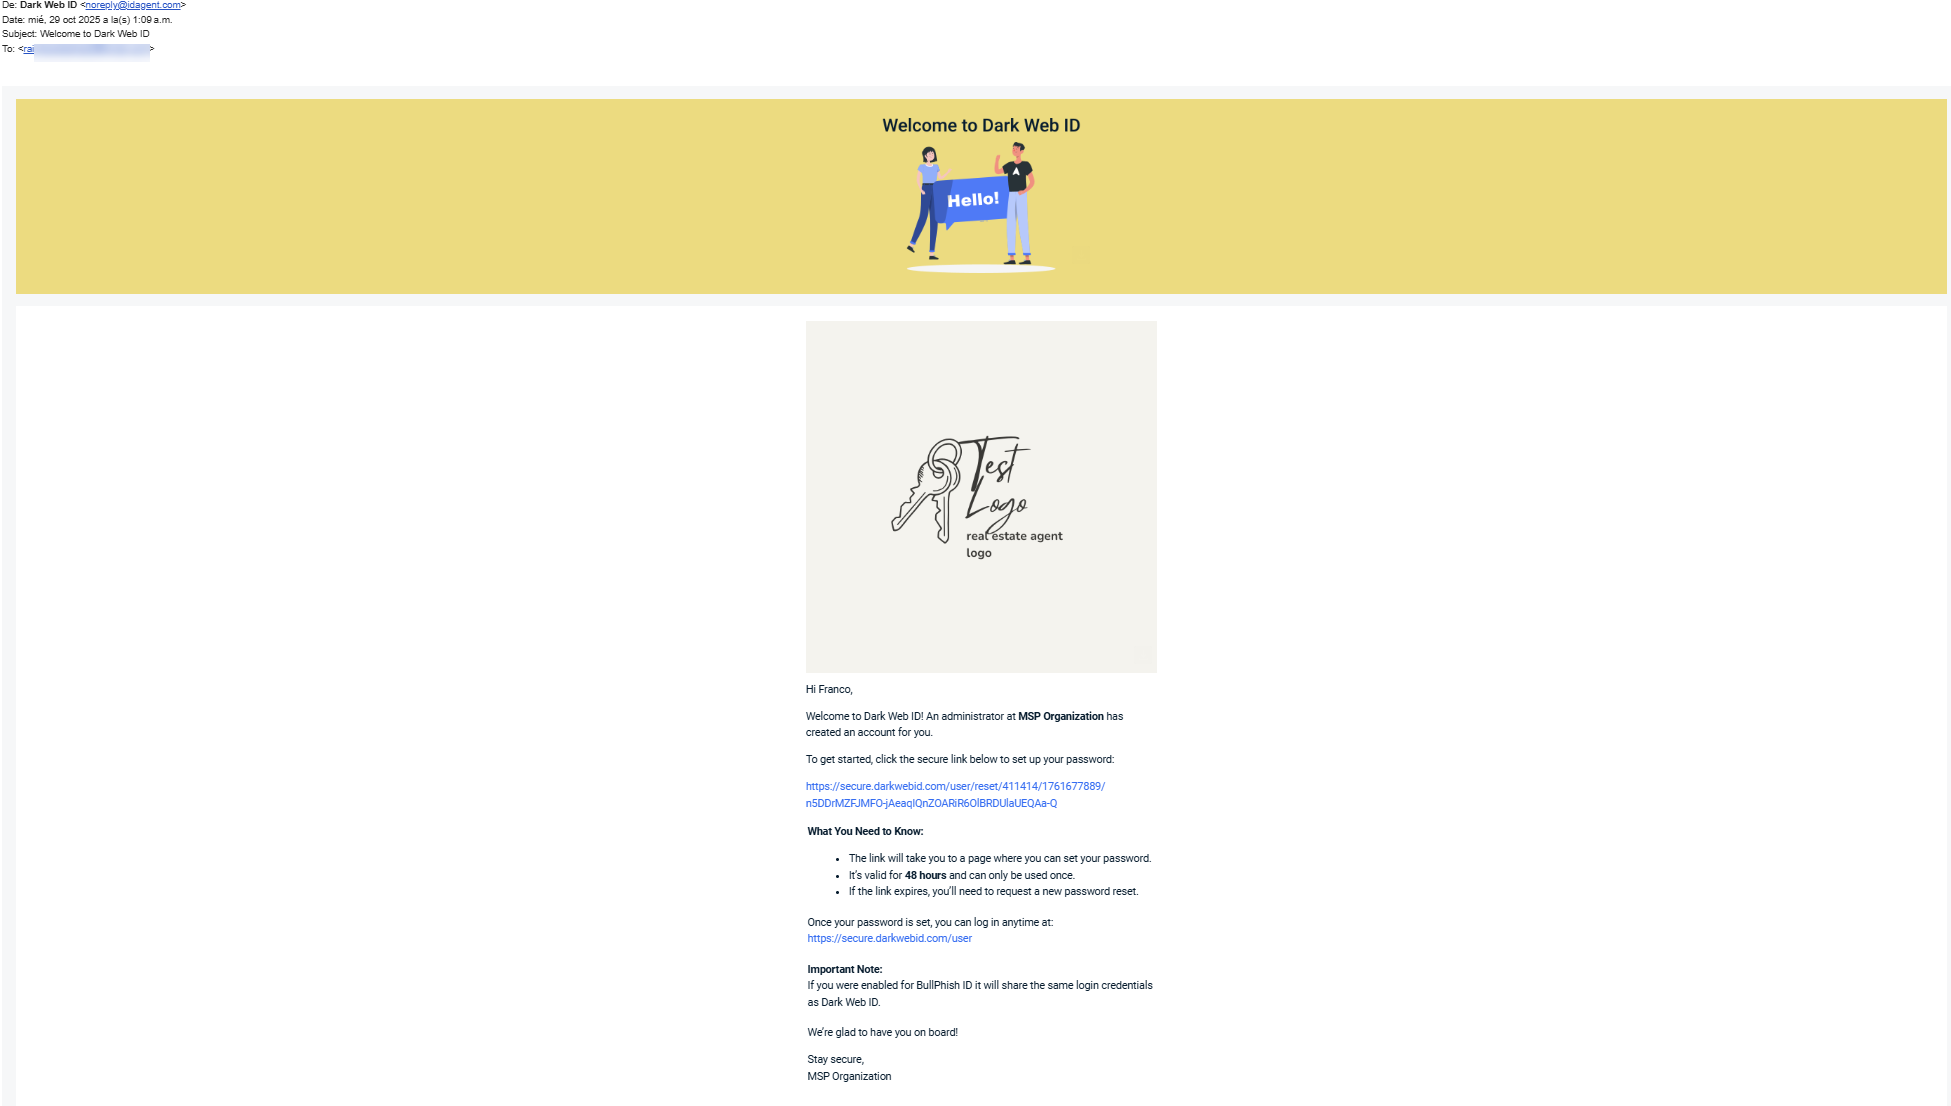
If your KaseyaOne account has already been set up, your Welcome to Dark Web ID email will appear somewhat distinct, as it will display two links:
-
The first link will grant you access to your KaseyaOne account and facilitate the activation of your Dark Web ID module via the Kaseya 365 Setup Guides page within your subscription.
-
The second link will directly navigate you to the Dark Web ID login page, where you can choose to Log in with KaseyaOne

Understanding the Kaseya 365 Setup Guides page
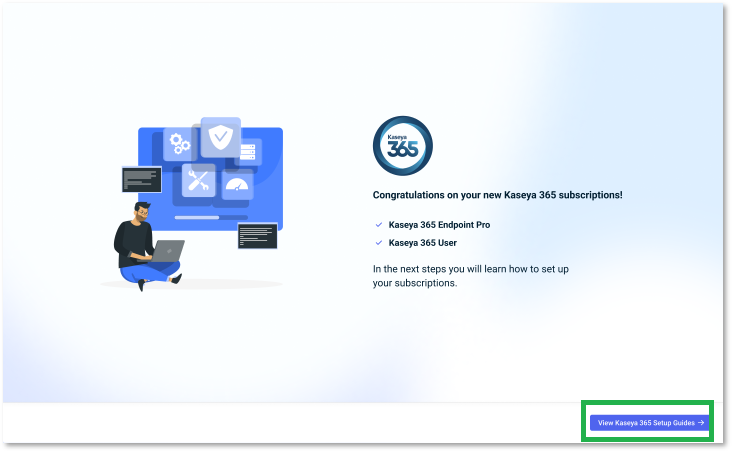
Upon logging in to KaseyaOne, you will be greeted by the Congratulations on your new Kaseya 365 subscriptions! page. Proceed by clicking View Kaseya 365 Setup Guides.
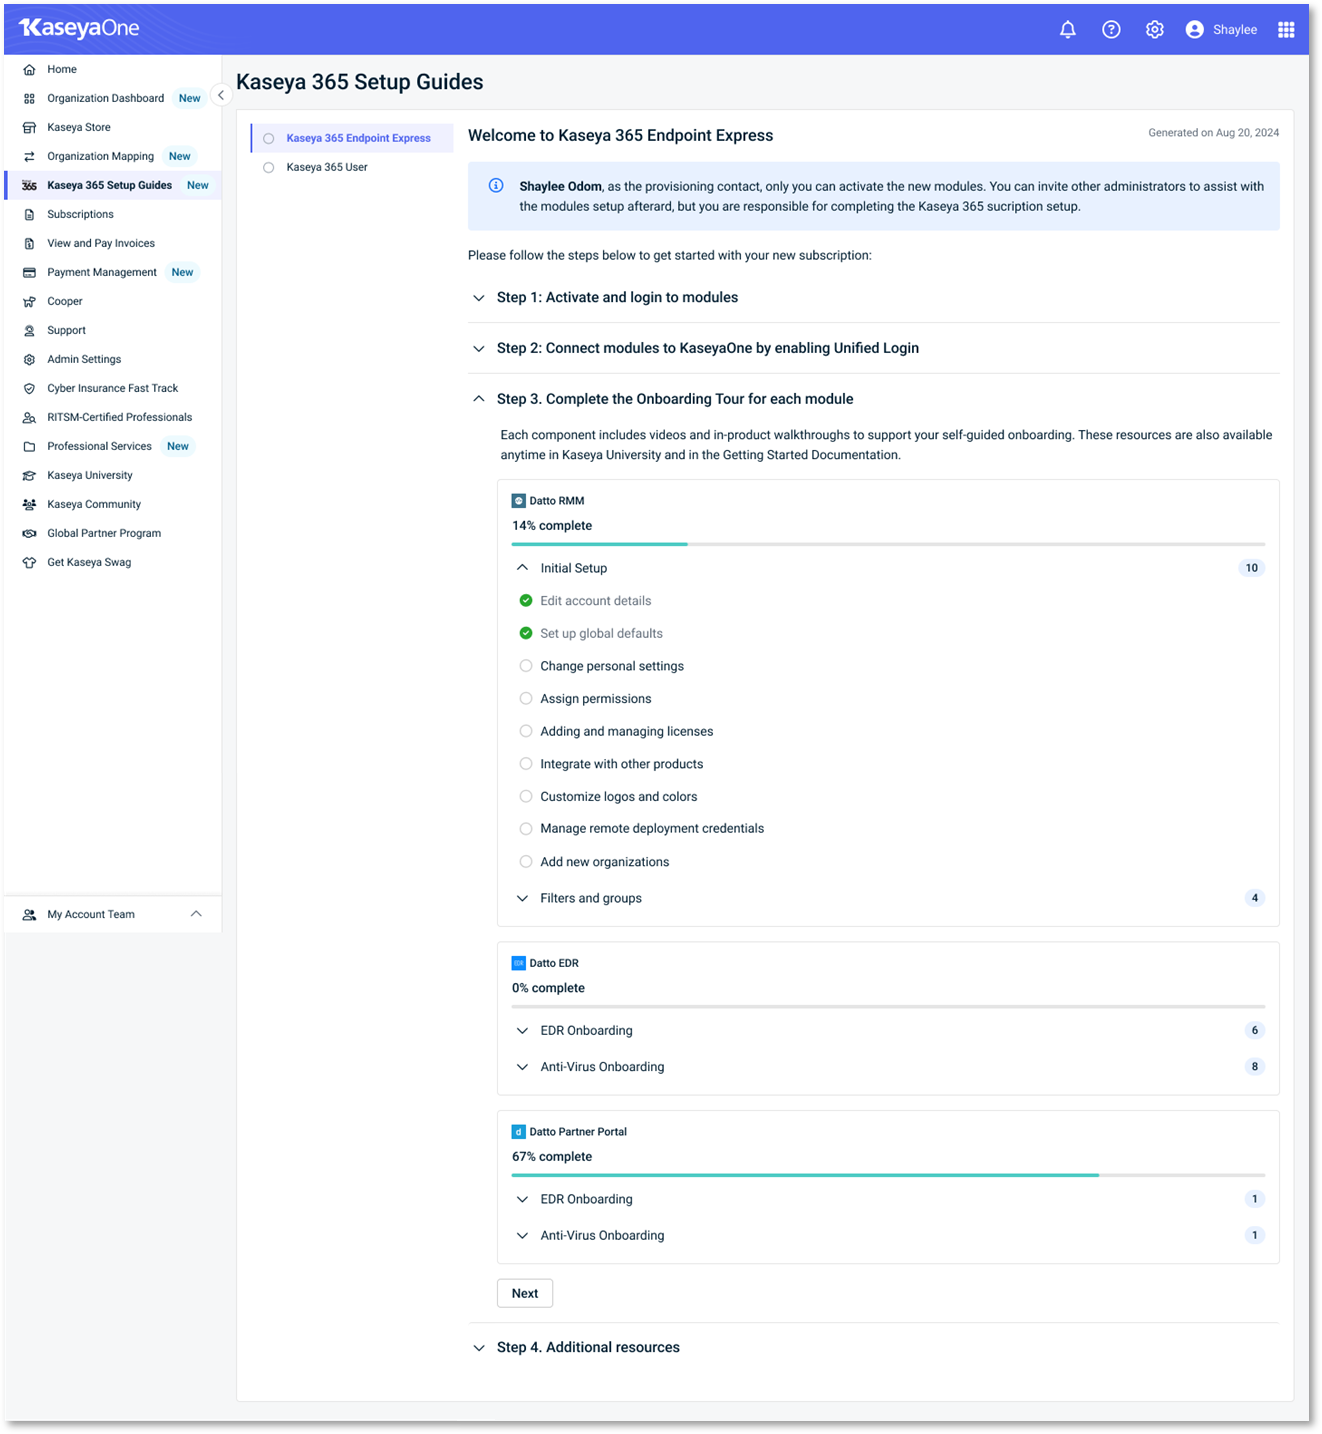
The Kaseya 365 Setup Guides page will open, serving as the platform for activating and logging in to your modules, including Dark Web ID. Furthermore, this page facilitates the connection of these modules to KaseyaOne through the enabling of Unified Login, along with the completion of onboarding tours. To accomplish these tasks, follow these steps:
 1. Activate and log in to modules
1. Click Kaseya 365 User, find your Dark Web ID module, and click Activate (the Activate button will continue to be displayed even after the module has been activated).
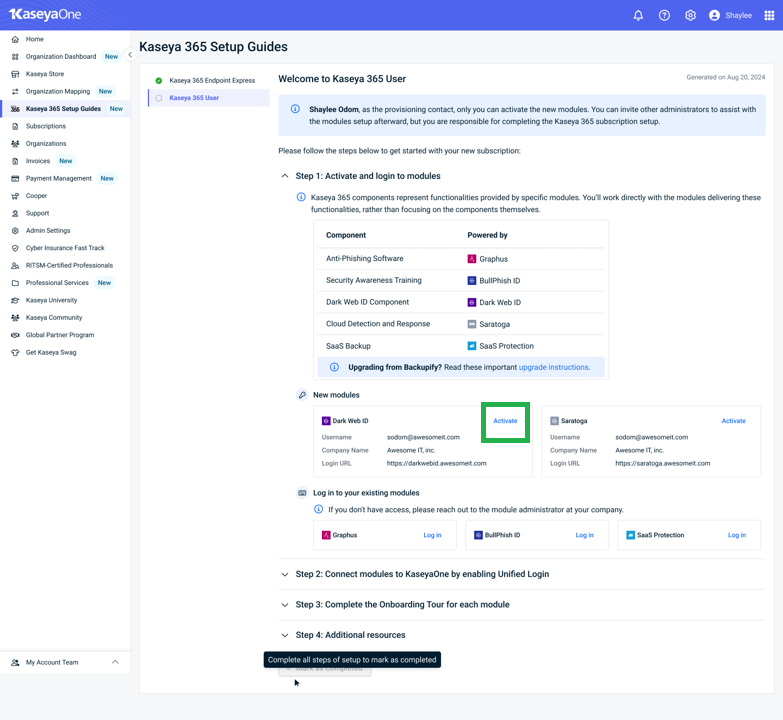
2. Type a password in the New Password field following the listed requirements. Then, retype your new password in the Confirm Password field and click Save.
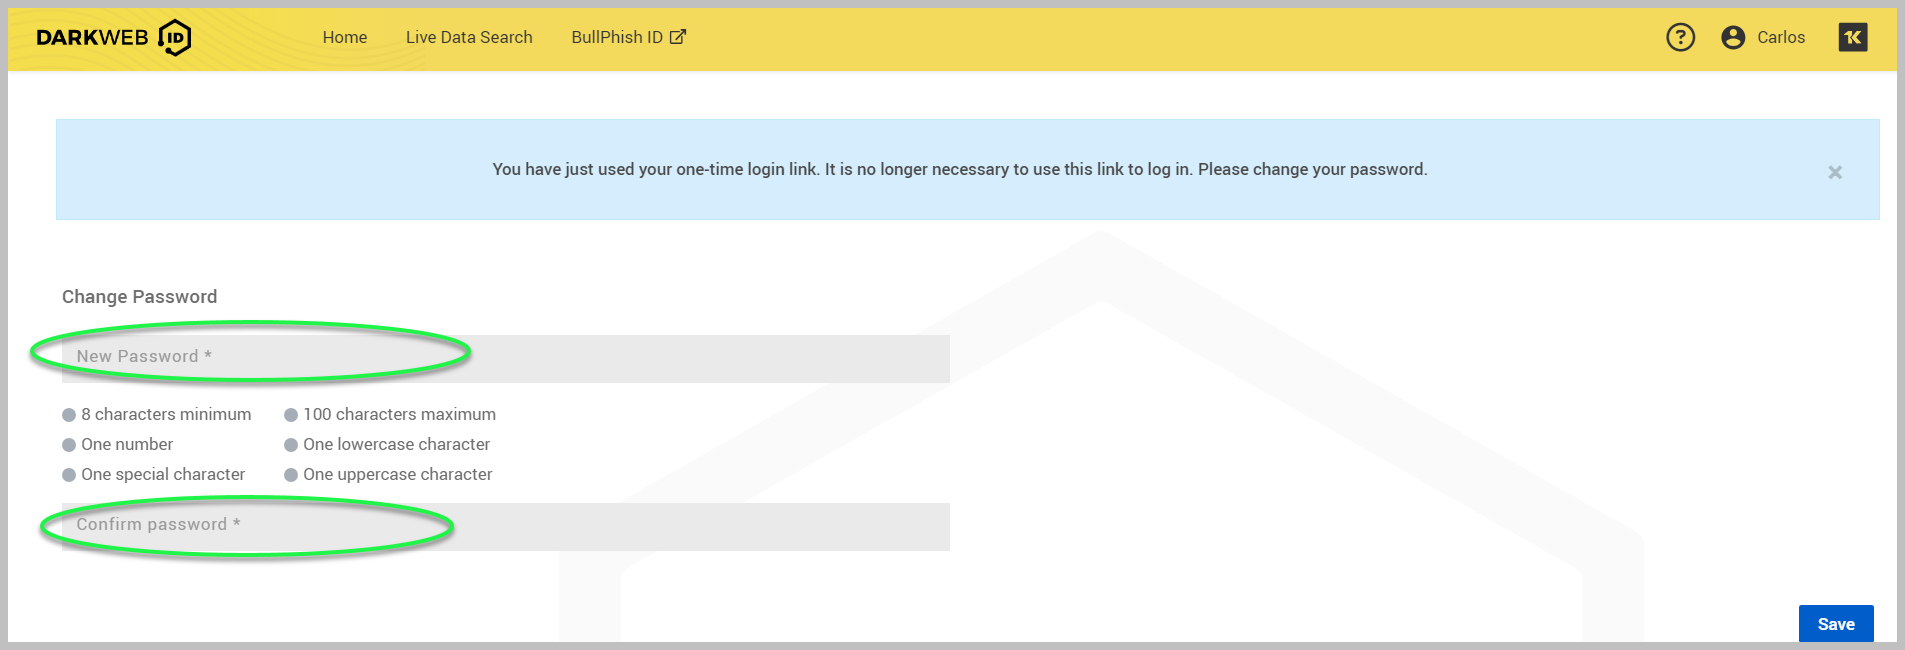
3. Upon clicking Save, the self-guided onboarding feature is initiated with a welcome pop-up announcement.
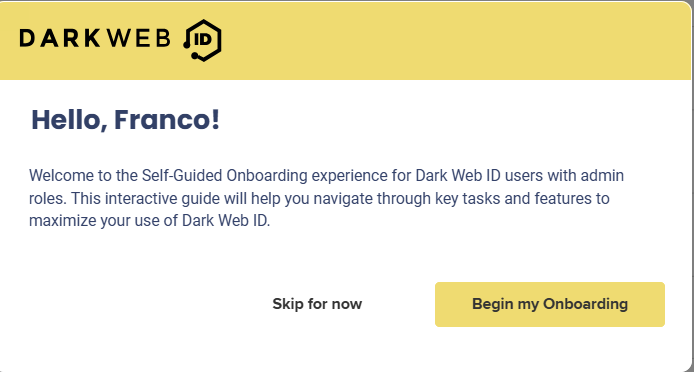
You can choose to complete it immediately or skip it for later. To learn more about this process, refer to Accessing the self-guided onboarding feature.
Please refer to the Onboarding section for essential tasks and information to use Dark Web ID effectively.
Step 2: Connect modules to KaseyaOne by enabling Unified Login
The Unified Login feature (otherwise known as Log in with KaseyaOne) enables you to access all IT Complete modules to which you are subscribed without managing multiple login credentials, providing convenient access to all your subscriptions through the KaseyaOne portal. Here, you can link Dark Web ID with KaseyaOne so you can log in to Dark Web ID with KaseyaOne as a single sign-on. In Step 2: Connect modules to KaseyaOne by enabling Unified Login, click the How to set up Unified Login link located under Instructions.
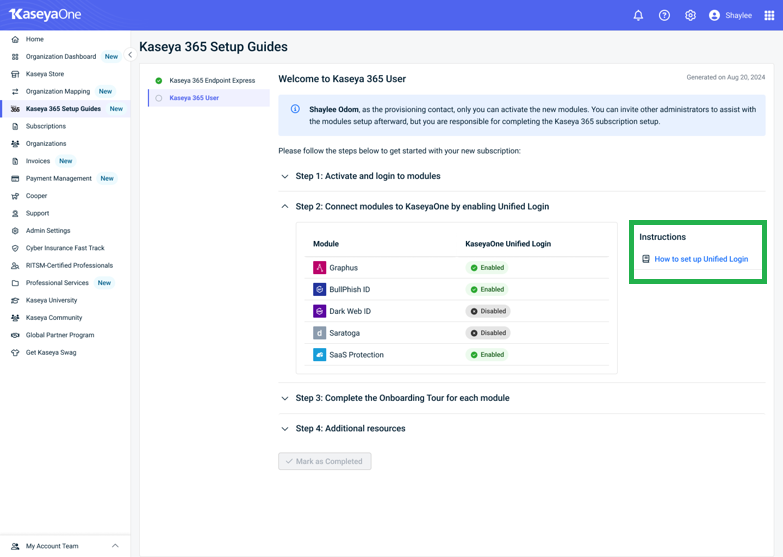
This link provides specific information in the KaseyaOne Help on enabling Unified Login with KaseyaOne for Dark Web ID. KaseyaOne is the customer portal and central hub for all Kaseya IT Complete portfolio products. Configuring KaseyaOne Unified Login provides easy access to all of your IT complete modules. It is highly recommended that you configure KaseyaOne Unified Login. To enable this feature, refer to Enabling login with KaseyaOne.
In Step 2, you can also see each module's KaseyaOne Unified Login status, including Dark Web ID:
-
Once you successfully configure Unified Login with KaseyaOne for Dark Web ID, you will see Dark Web ID marked as Enabled
 . No further action will be needed.
 -
Disabled indicates that Unified Login has not been configured for Dark Web ID:
 If so, you can review the information provided on the How to set up Unified Login link in Step 2 or refer to Enabling Login with KaseyaOne.
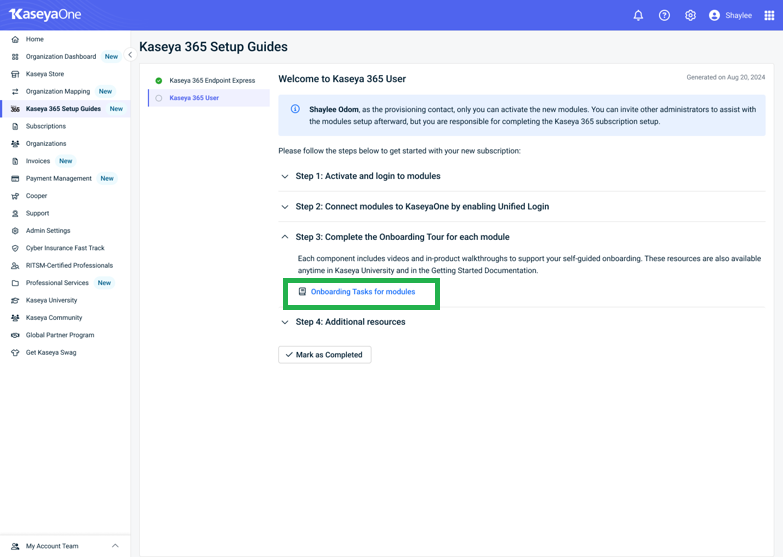
Step 3: Complete the Onboarding Tour for each module
If you still need to complete your self-guided onboarding for Dark Web ID, in the event that you closed it while configuring other setups, you can proceed by accessing it directly clicking the Tasks tab in the graduation cap icon of your Dark Web ID instance or by following the steps outlined below:
-
On the Kaseya 365 Setup Guides page in KaseyaOne, navigate to Step 3: Complete the Onboarding Tour for each module and click Onboarding Tasks for modules.
-
The Onboarding Tasks for modules link will direct you to an article on getting started with Kaseya 365, where you can learn how to access onboarding for Dark Web ID.
-
On the Step 3: Complete the Onboarding Tour for each module page, you will also be able to monitor your Dark Web ID onboarding completion status.
-
Onboarding
Now that you've logged in for the first time, it's time to start working in the platform. This section introduces you to the Dark Web ID modules and is designed to get you started in Dark Web ID quickly and efficiently. It includes the initial setup steps for onboarding your organization. The sections should be performed in the order they are presented.
Account details
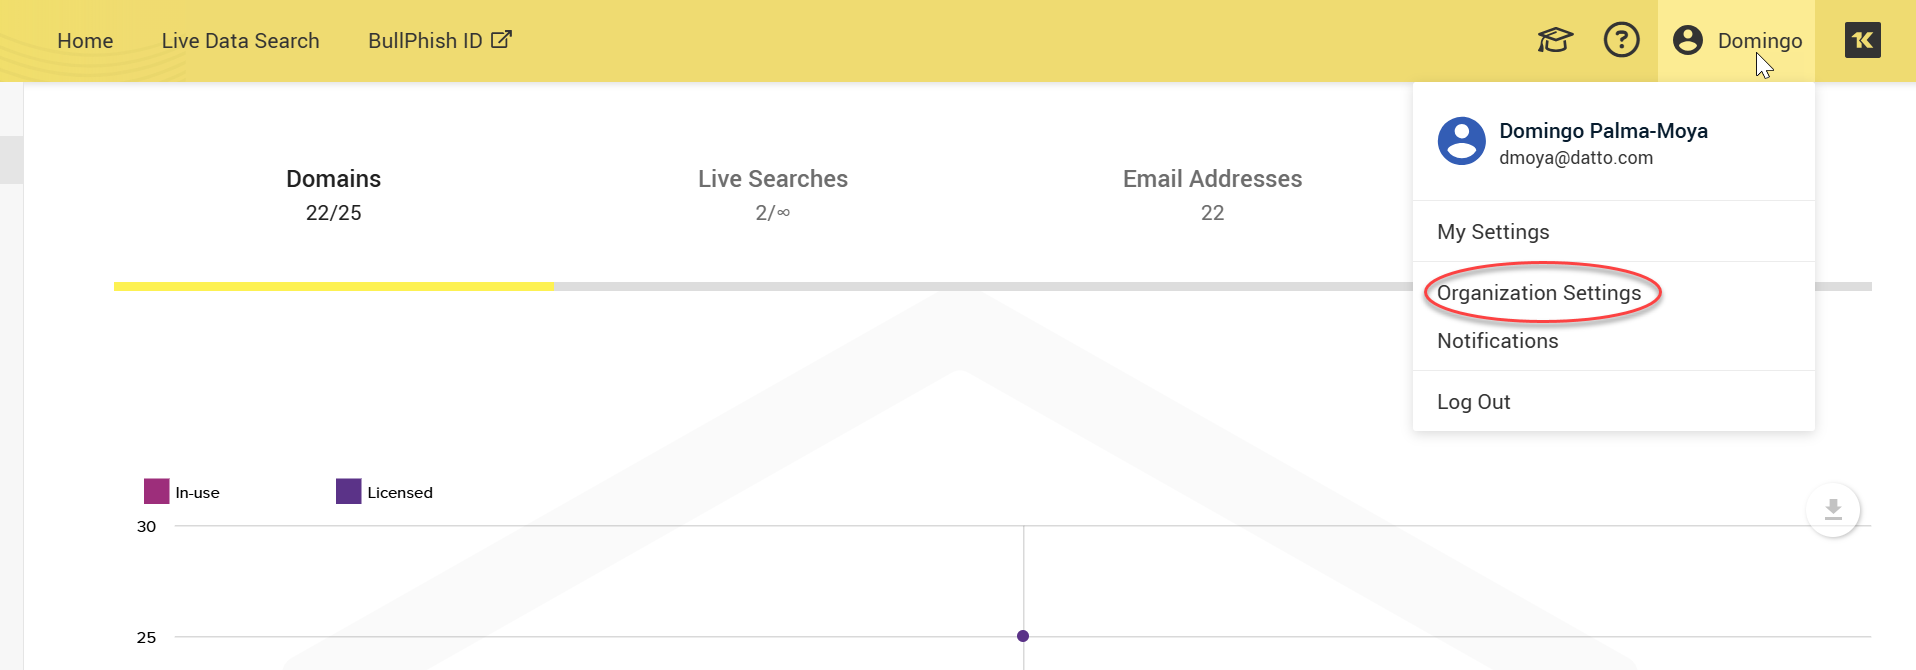
Once you're logged in, the first thing you want to do is to configure your profile settings. Here, you can customize your personal information to ensure your best experience for Dark Web ID. Click your name (My Account) on the upper right-hand corner of the platform.
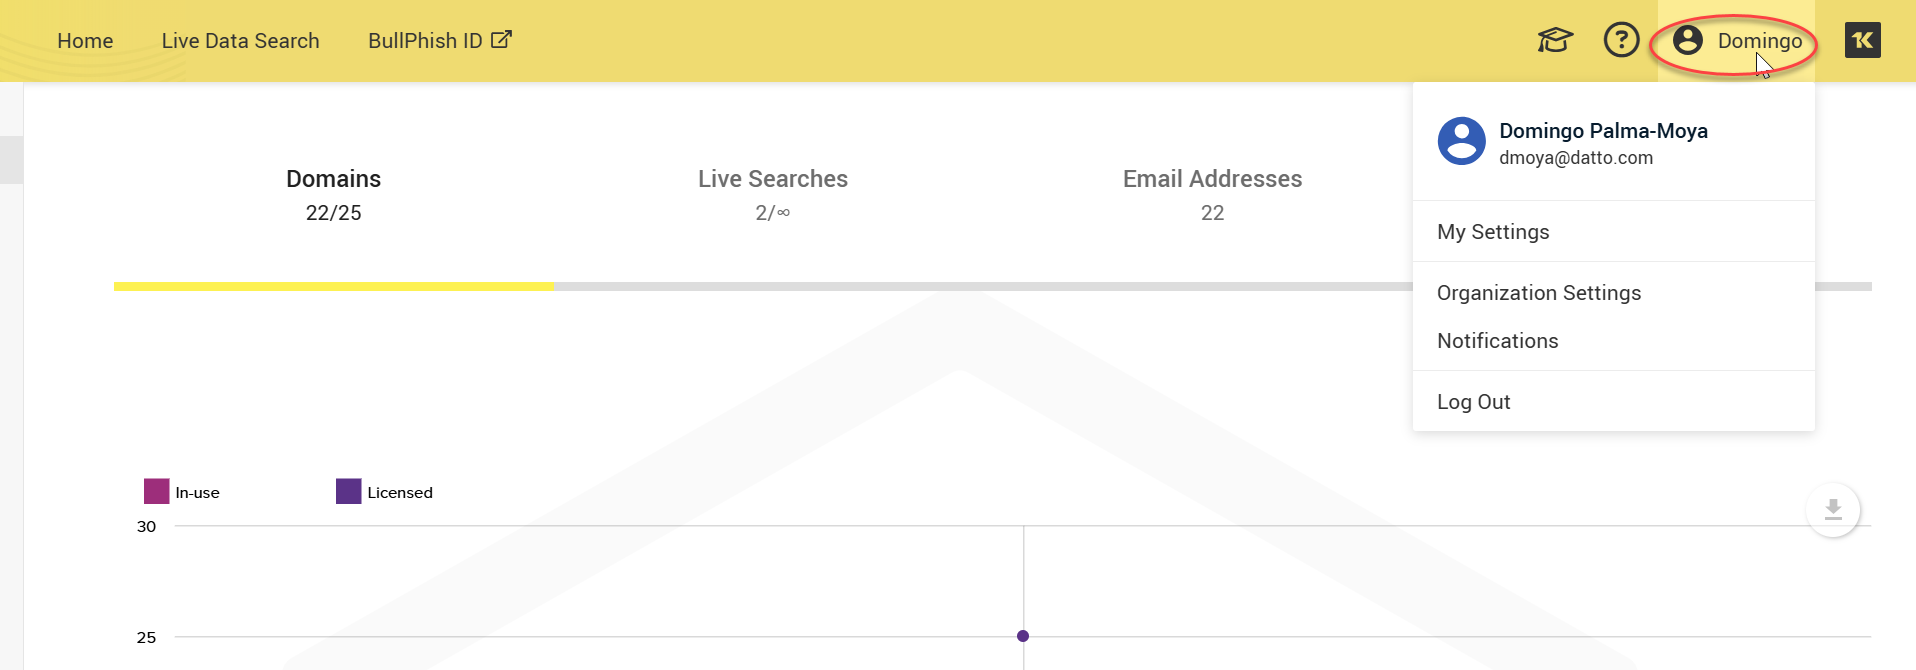
Upon clicking your name, you will have the option to access and modify your settings efficiently. You can select from the following:
-
My Settings
-
Organization Settings
-
Notifications
My Settings
The My Settings page allows you to configure your settings for effective use of Dark Web ID. It allows the ability to create your profile, edit and update your email, phone number, change passwords, and reset your multi-factor authentication.
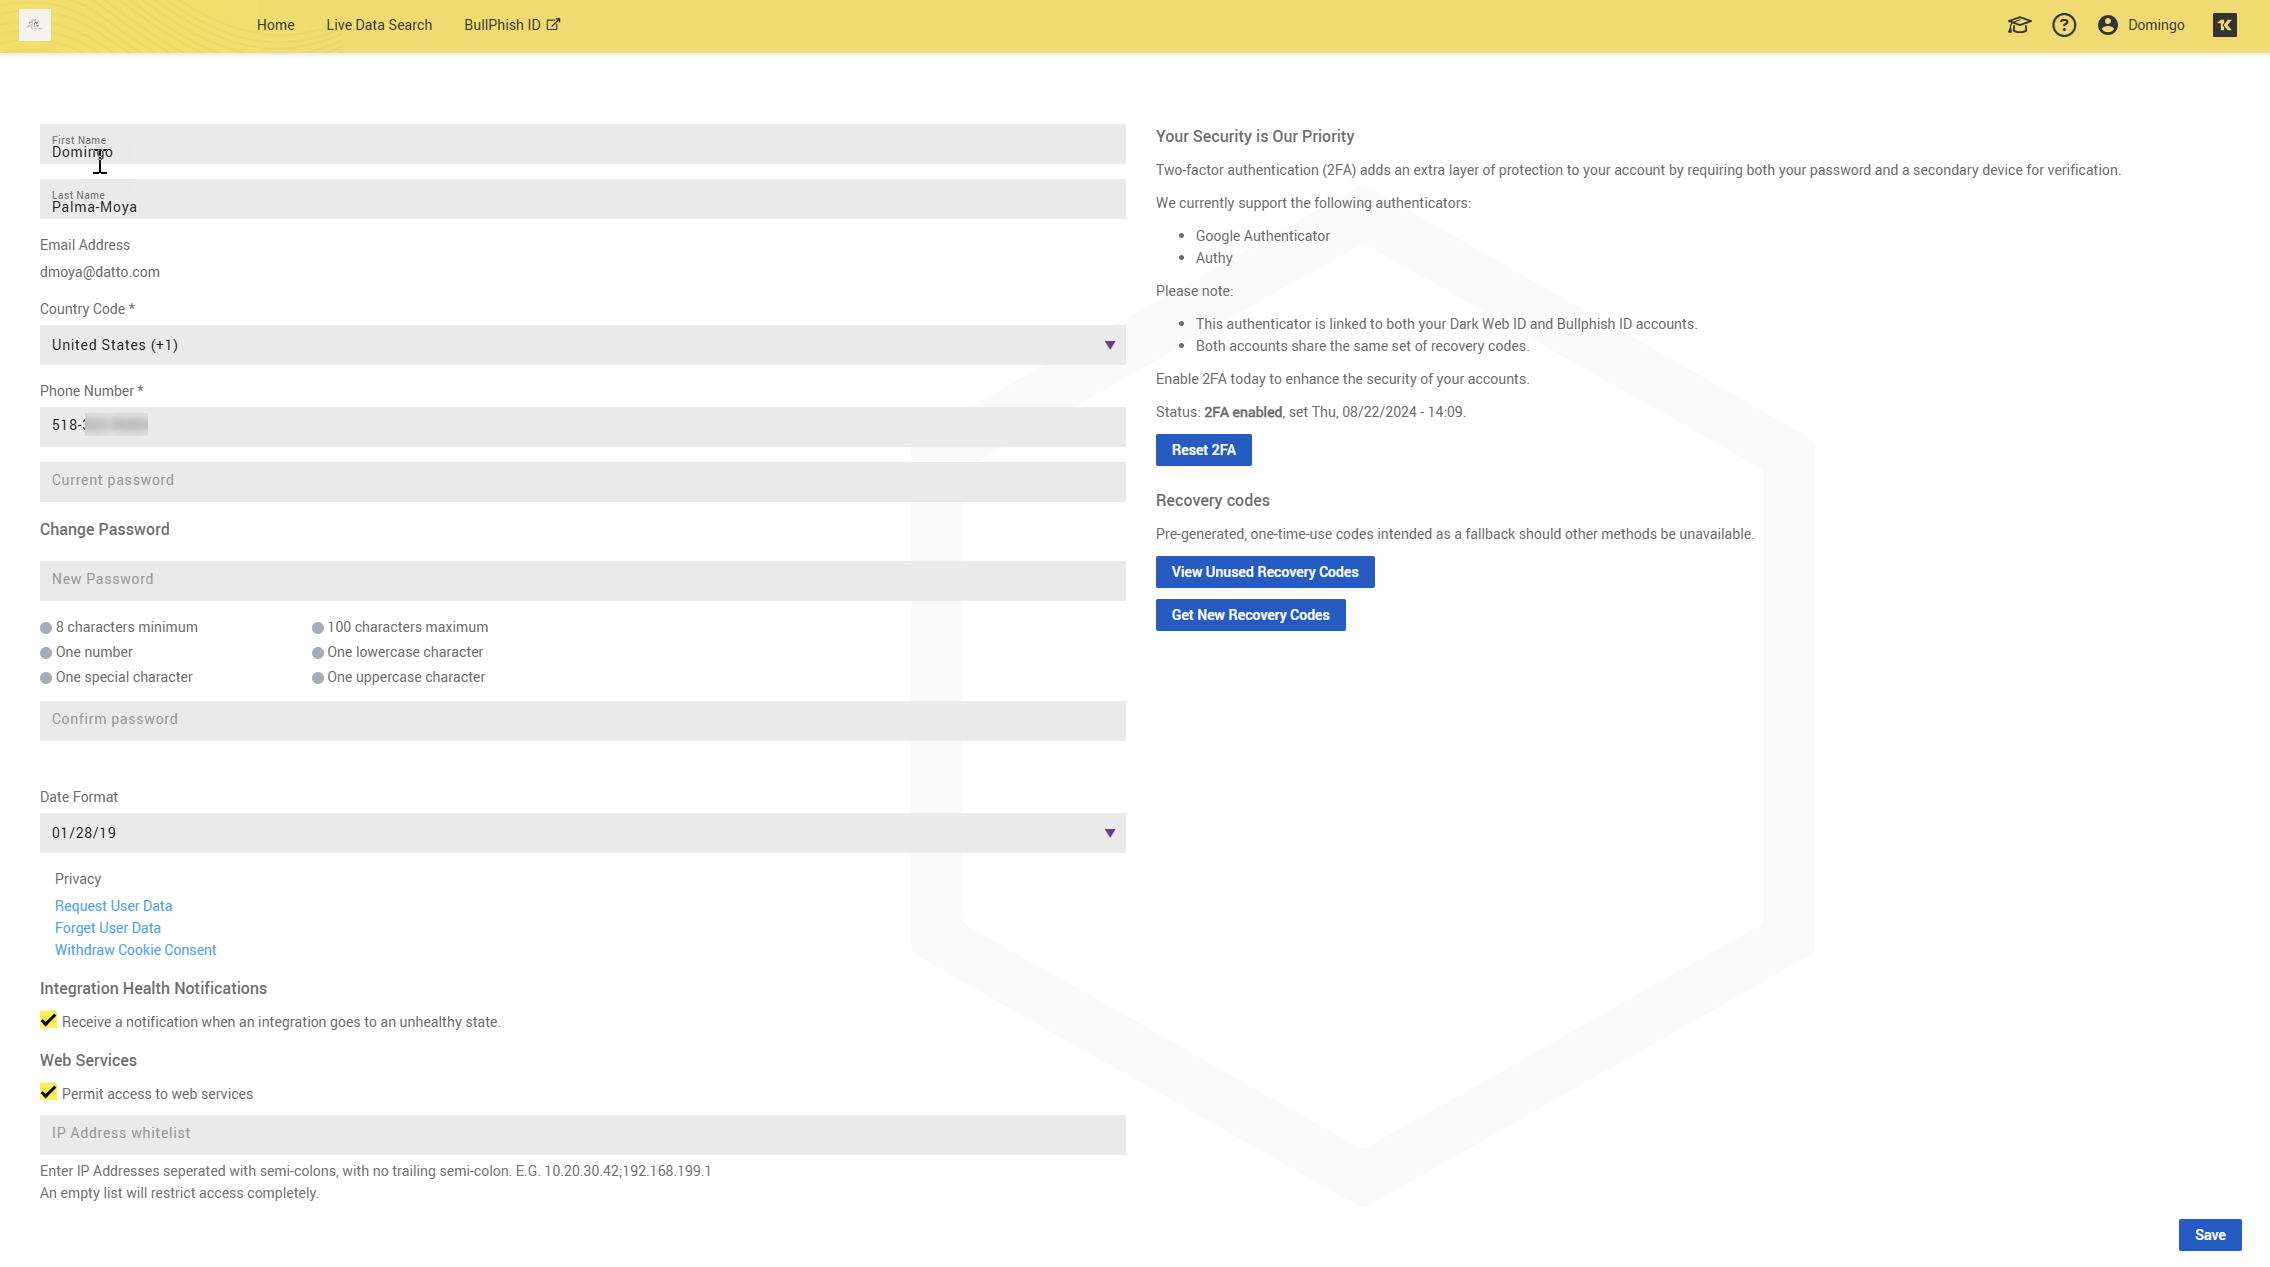
Proceed though the following steps:
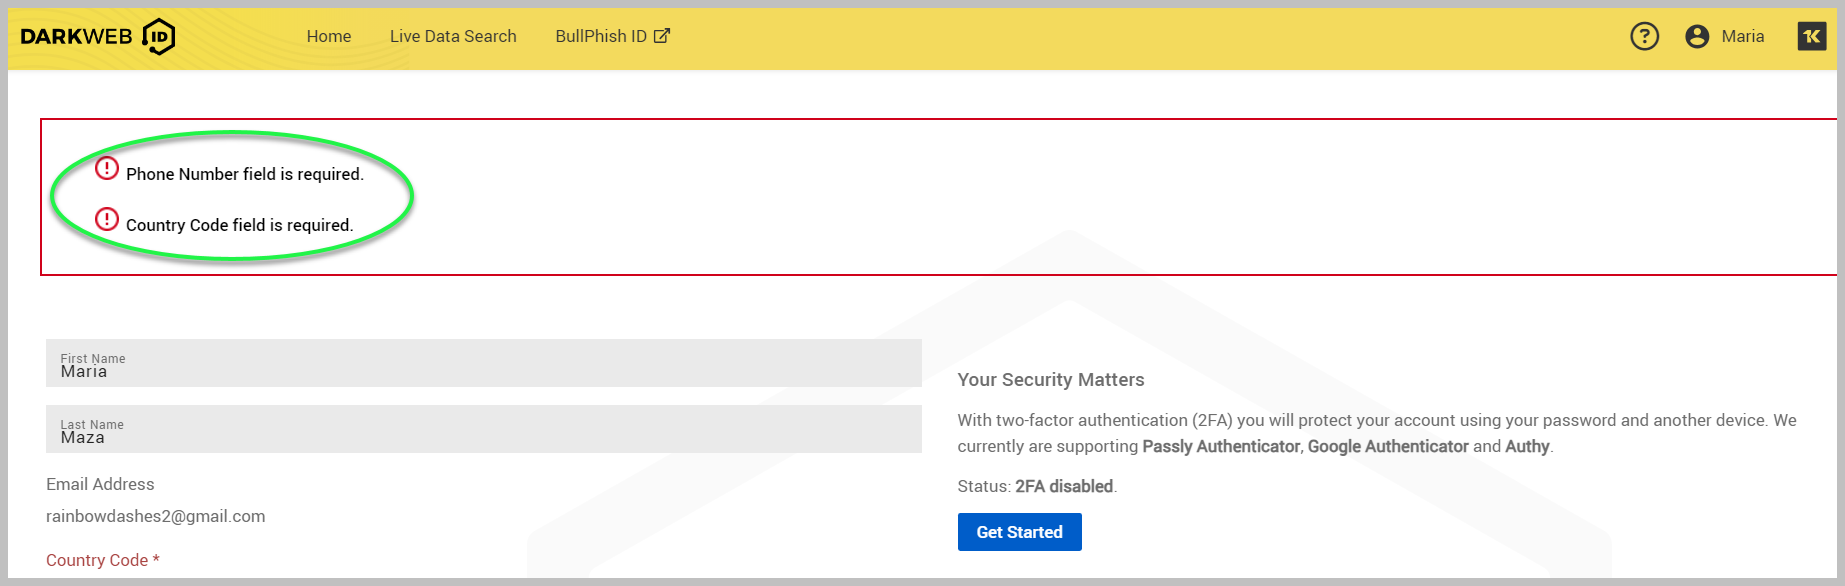
1. On the My Settings page, click Get Started to enable two-factor authentication.
2. If you have yet to fill out the Country Code and Phone Number fields, the system will require you to do so before enabling two-factor authentication.
3. Clicking Get Started will take you to a list of steps to enable two-factor authentication (2FA).
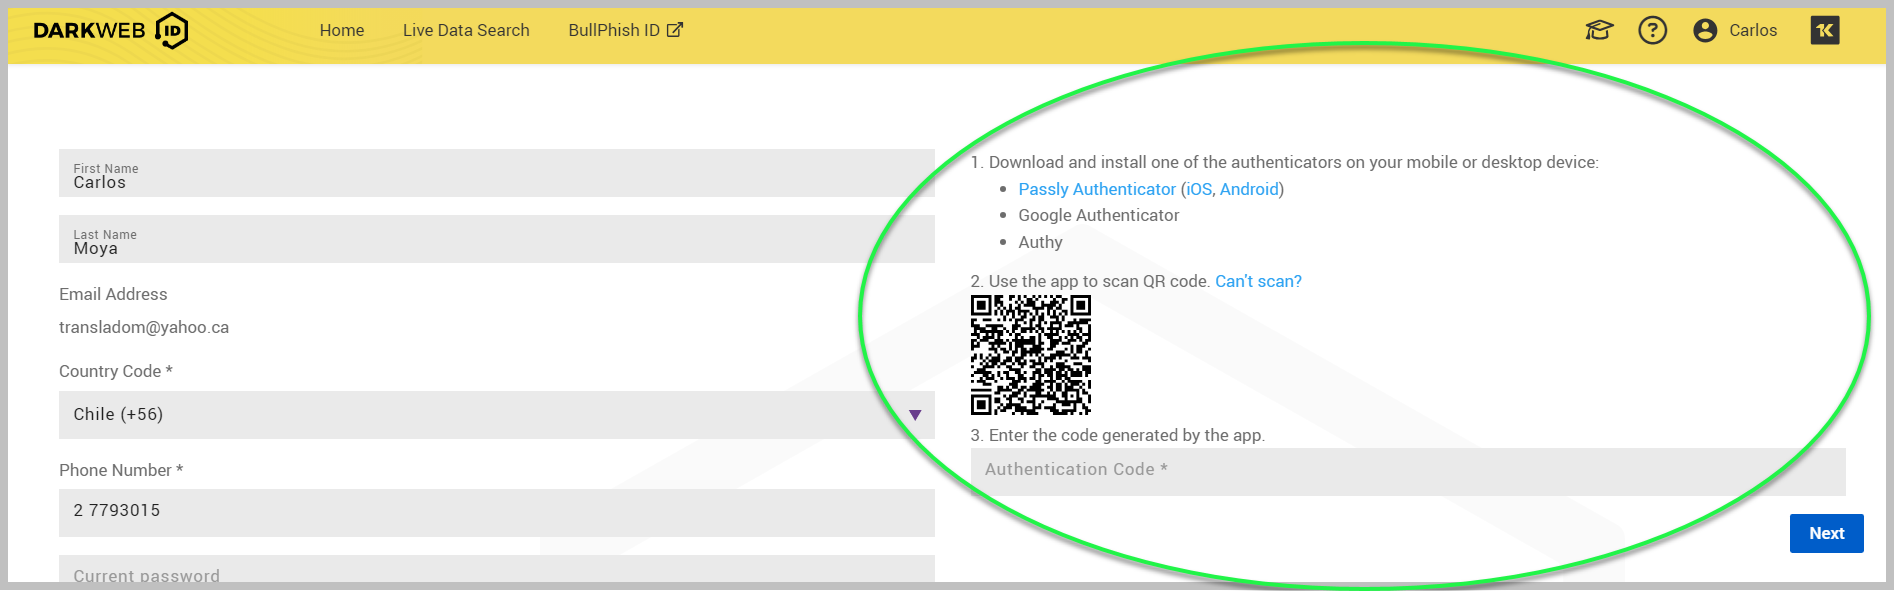
4. When you enter the code generated by your chosen app, click Next.
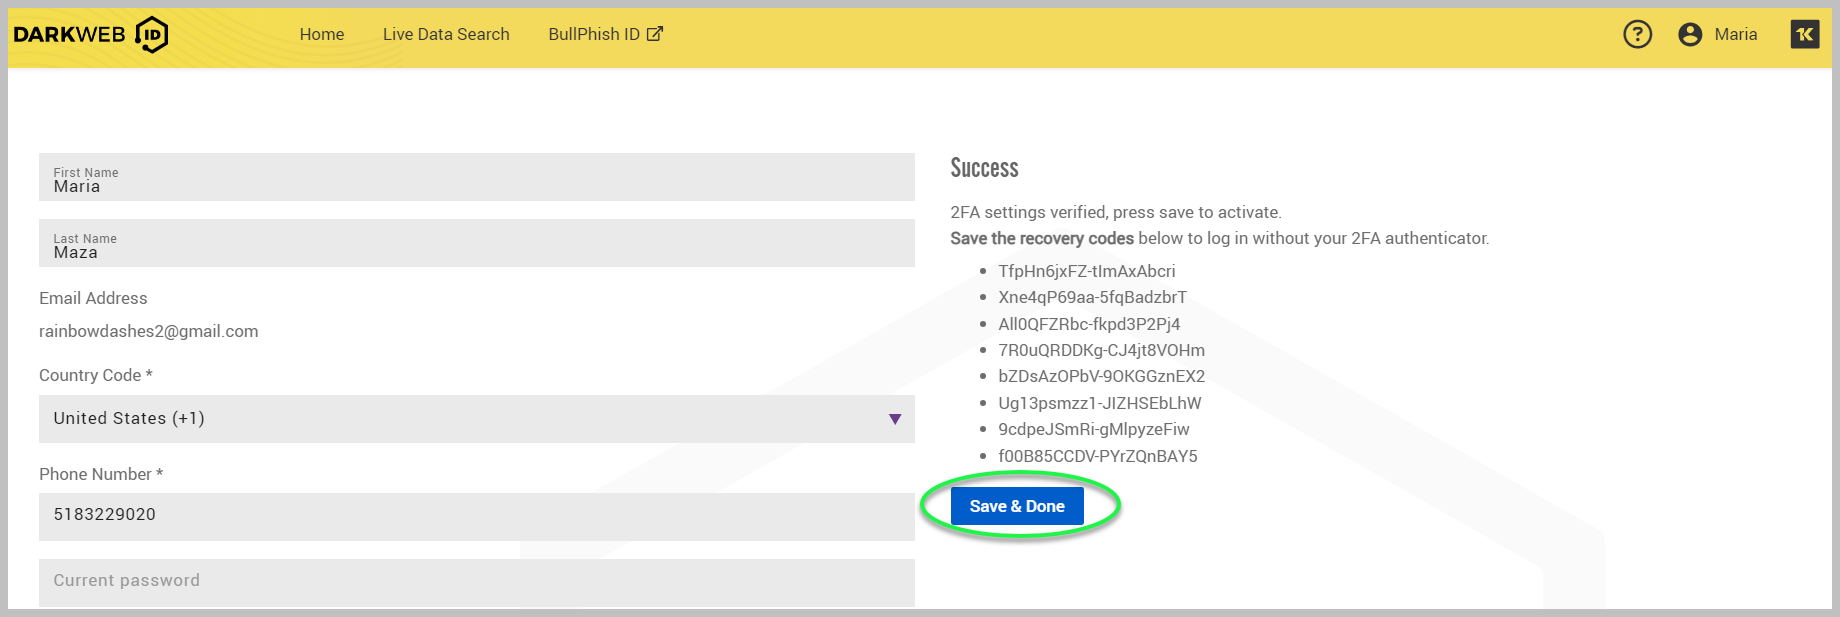
5. A Success message will be displayed along with recovery codes that you can save if you wish to log in without your 2FA Authenticator. Click Save & Done to activate 2FA.
6. The next page will confirm that the 2FA setup has been successfully set up. On this page, you can reset 2FA, view unused recovery codes, and get new ones.
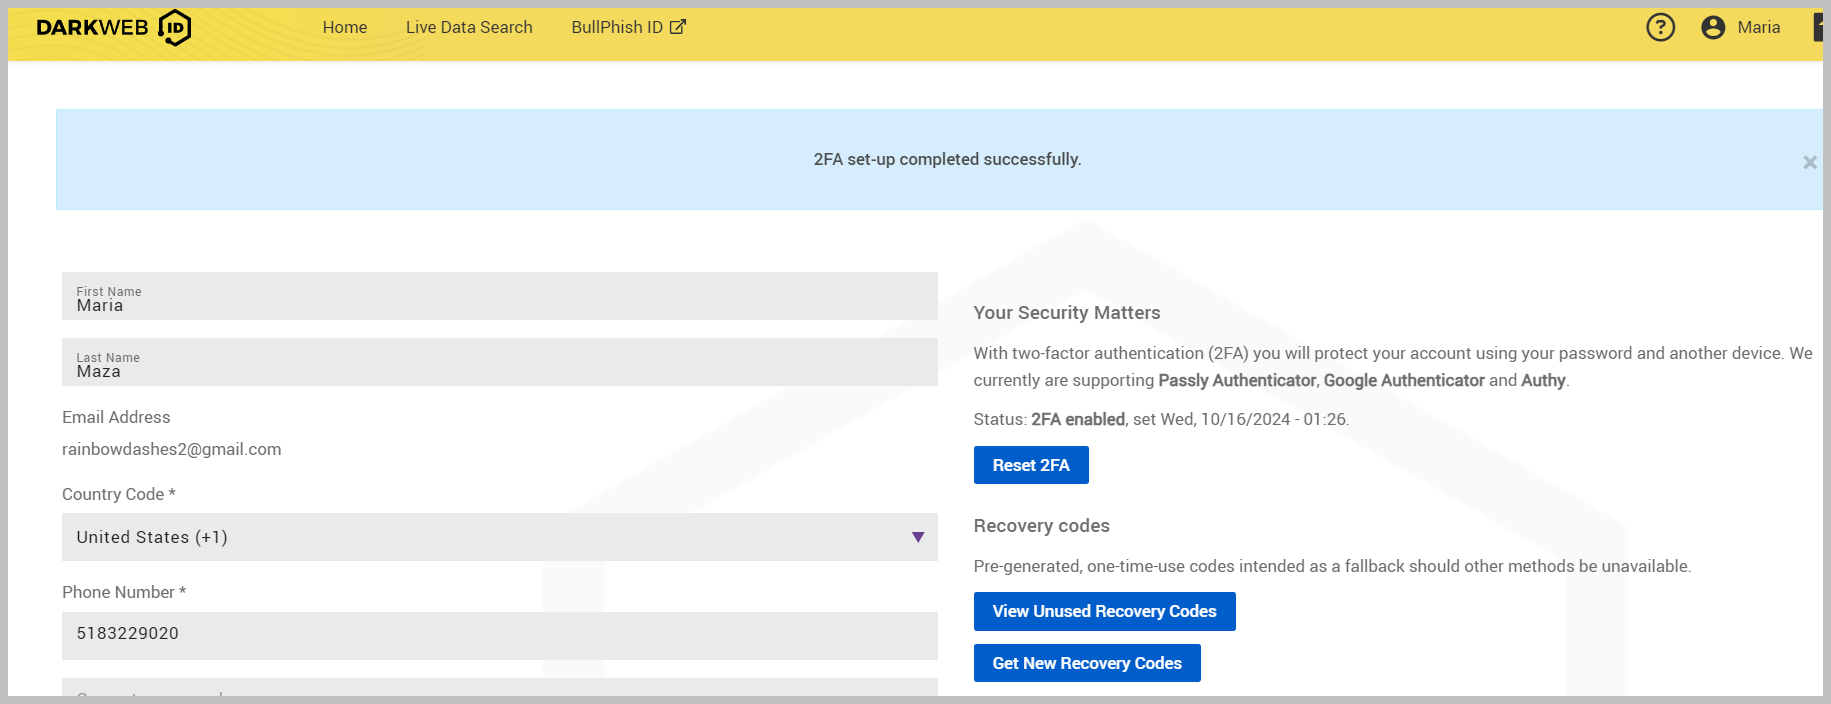
7. You will also receive a confirmation email informing you that your 2FA has been correctly configured.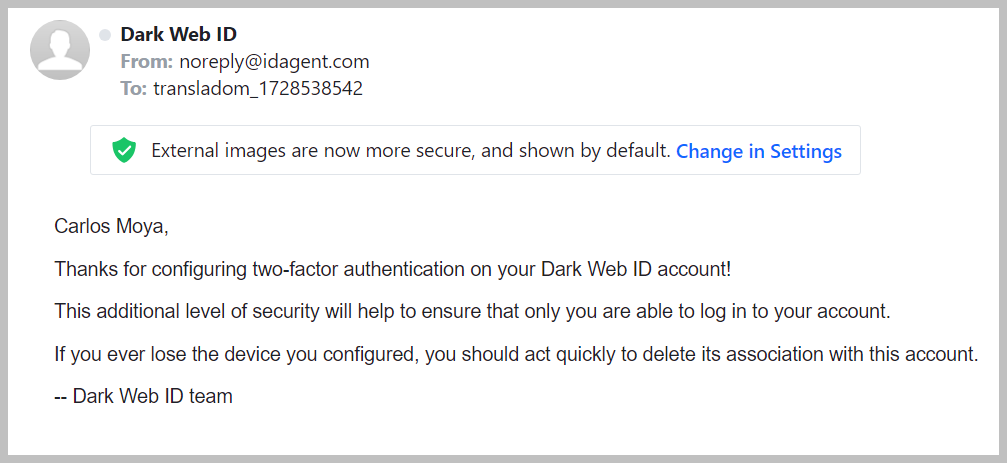
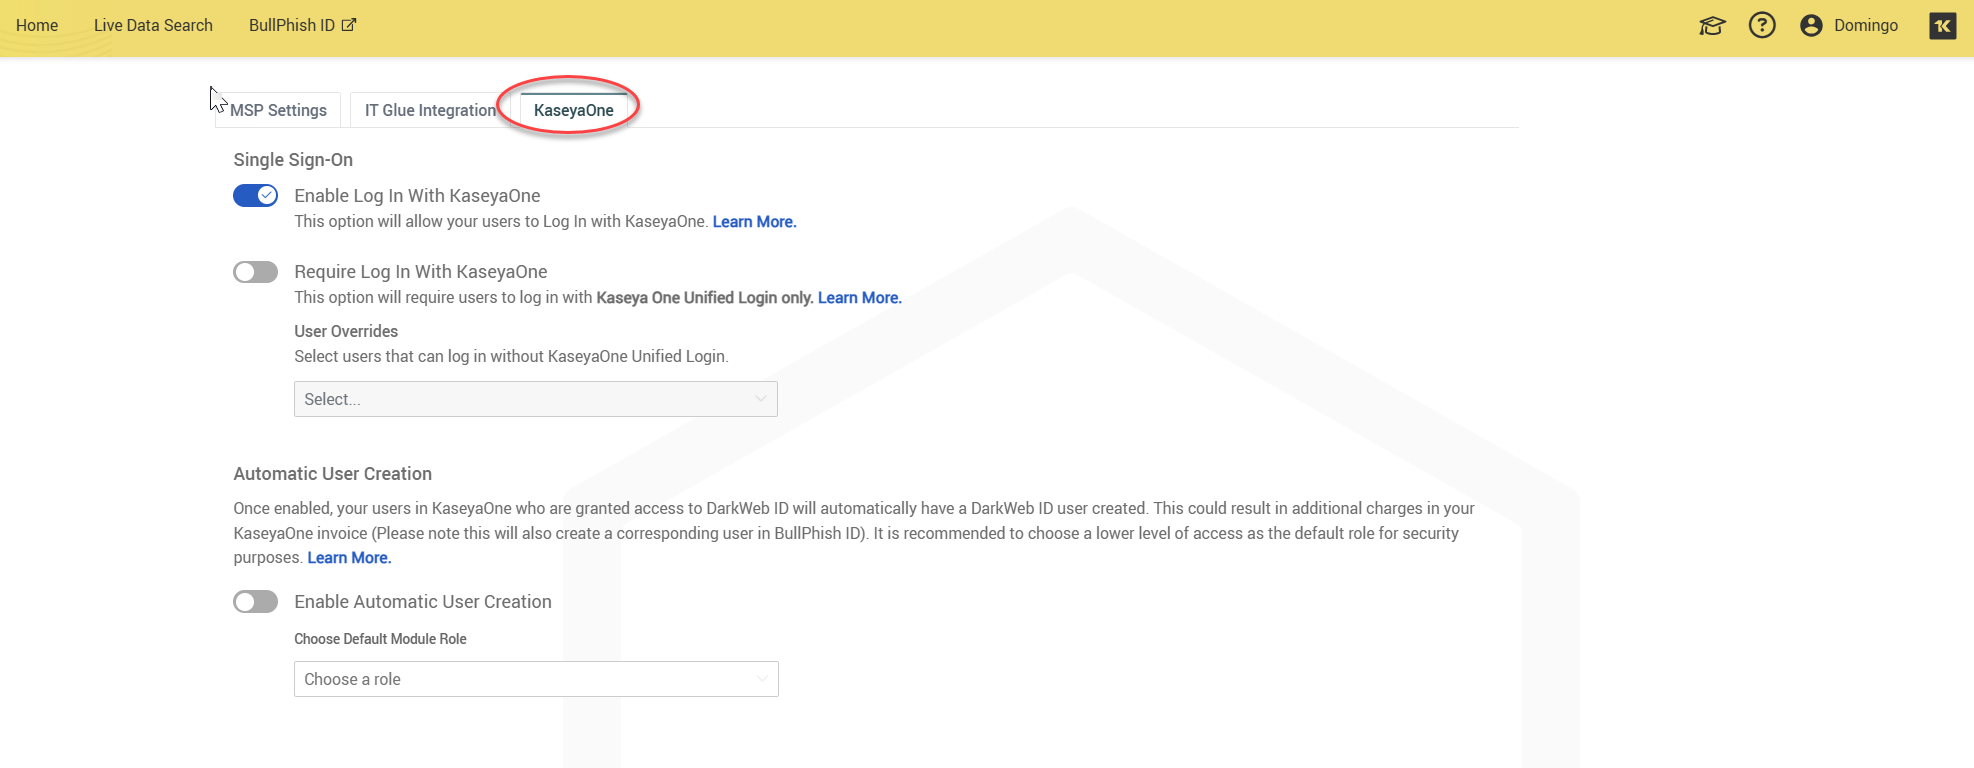
Organization Settings
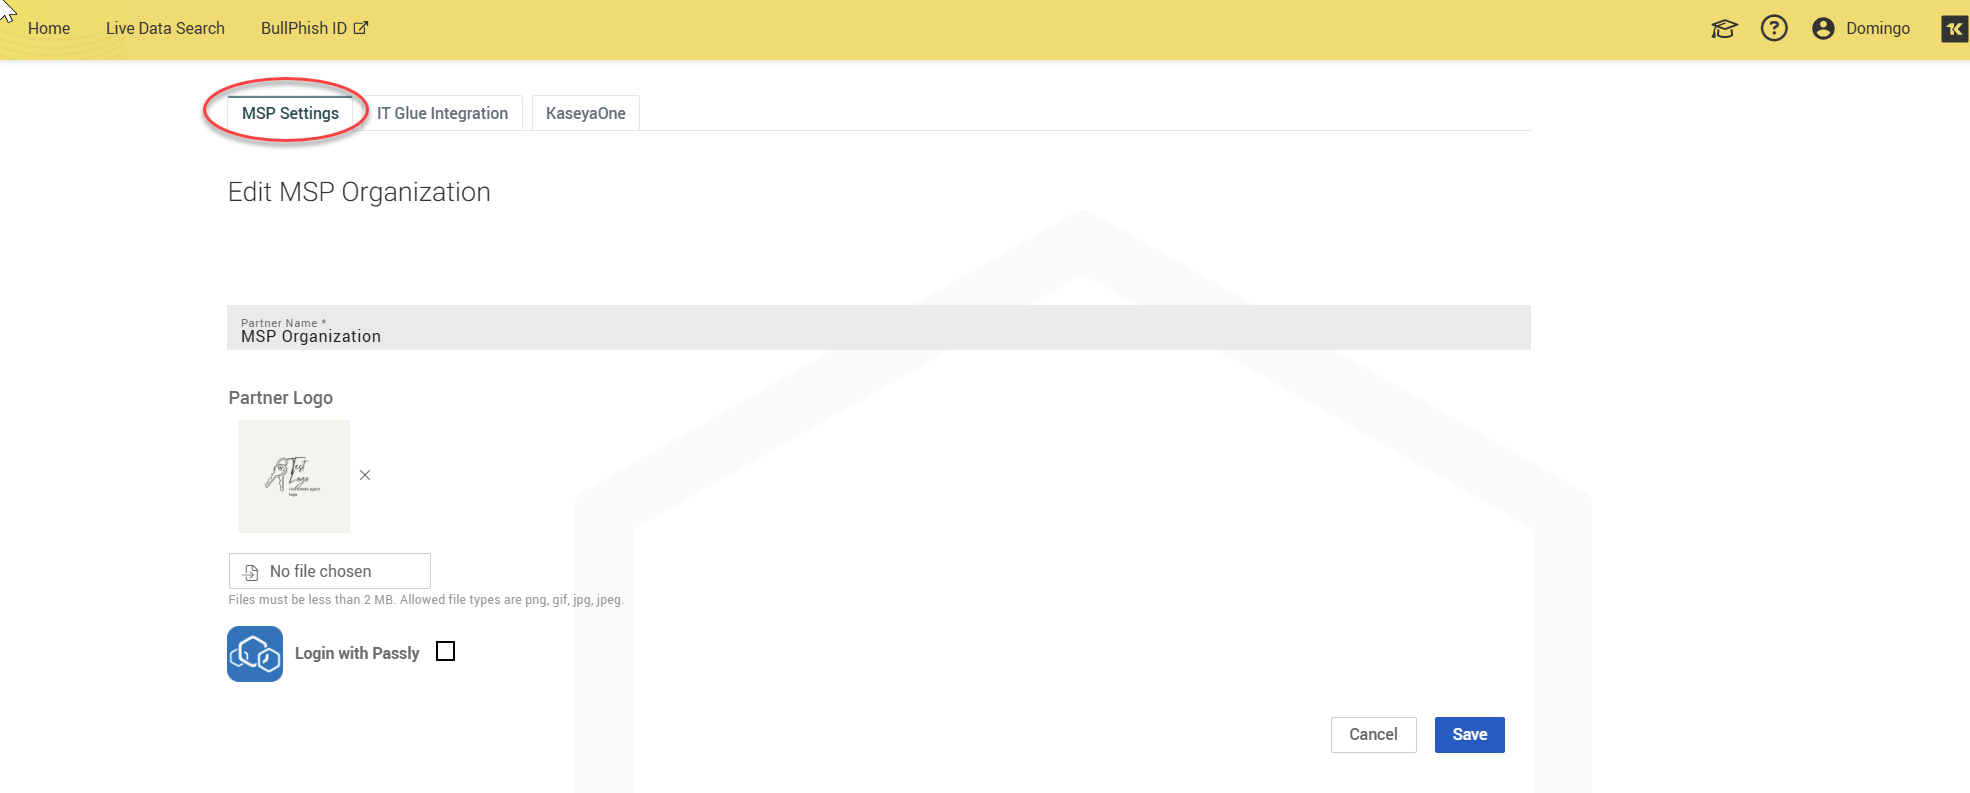
To start setting up Dark Web ID for your organization, click Organization Settings. This is the foundation for managing your organization's Dark Web ID setup.
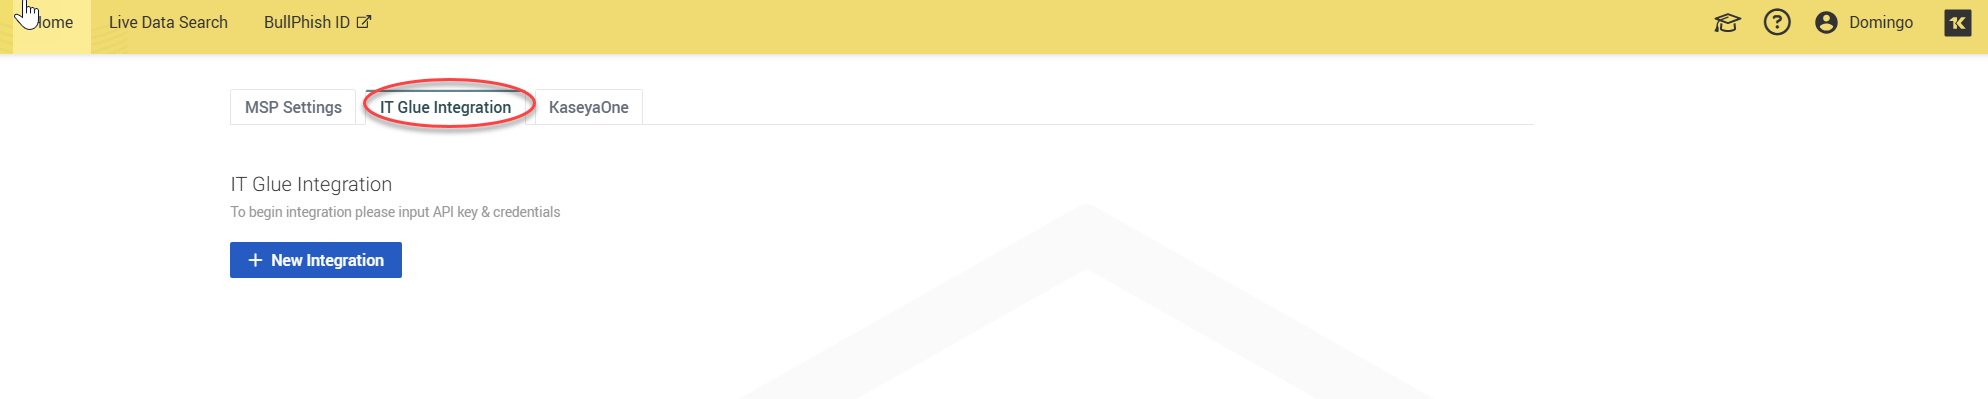
There are three organization settings tabs:
-
MSP Settings: Here, you can create and manage your partner name and logo.
-
IT Glue Integration: Here, you can load your IT Glue organizations into Dark Web ID by supplying the API key from your IT Glue instance.
-
KaseyaOne: This tab allows you to enable your Kaseya Single Sign-on and enable automatic user creation.
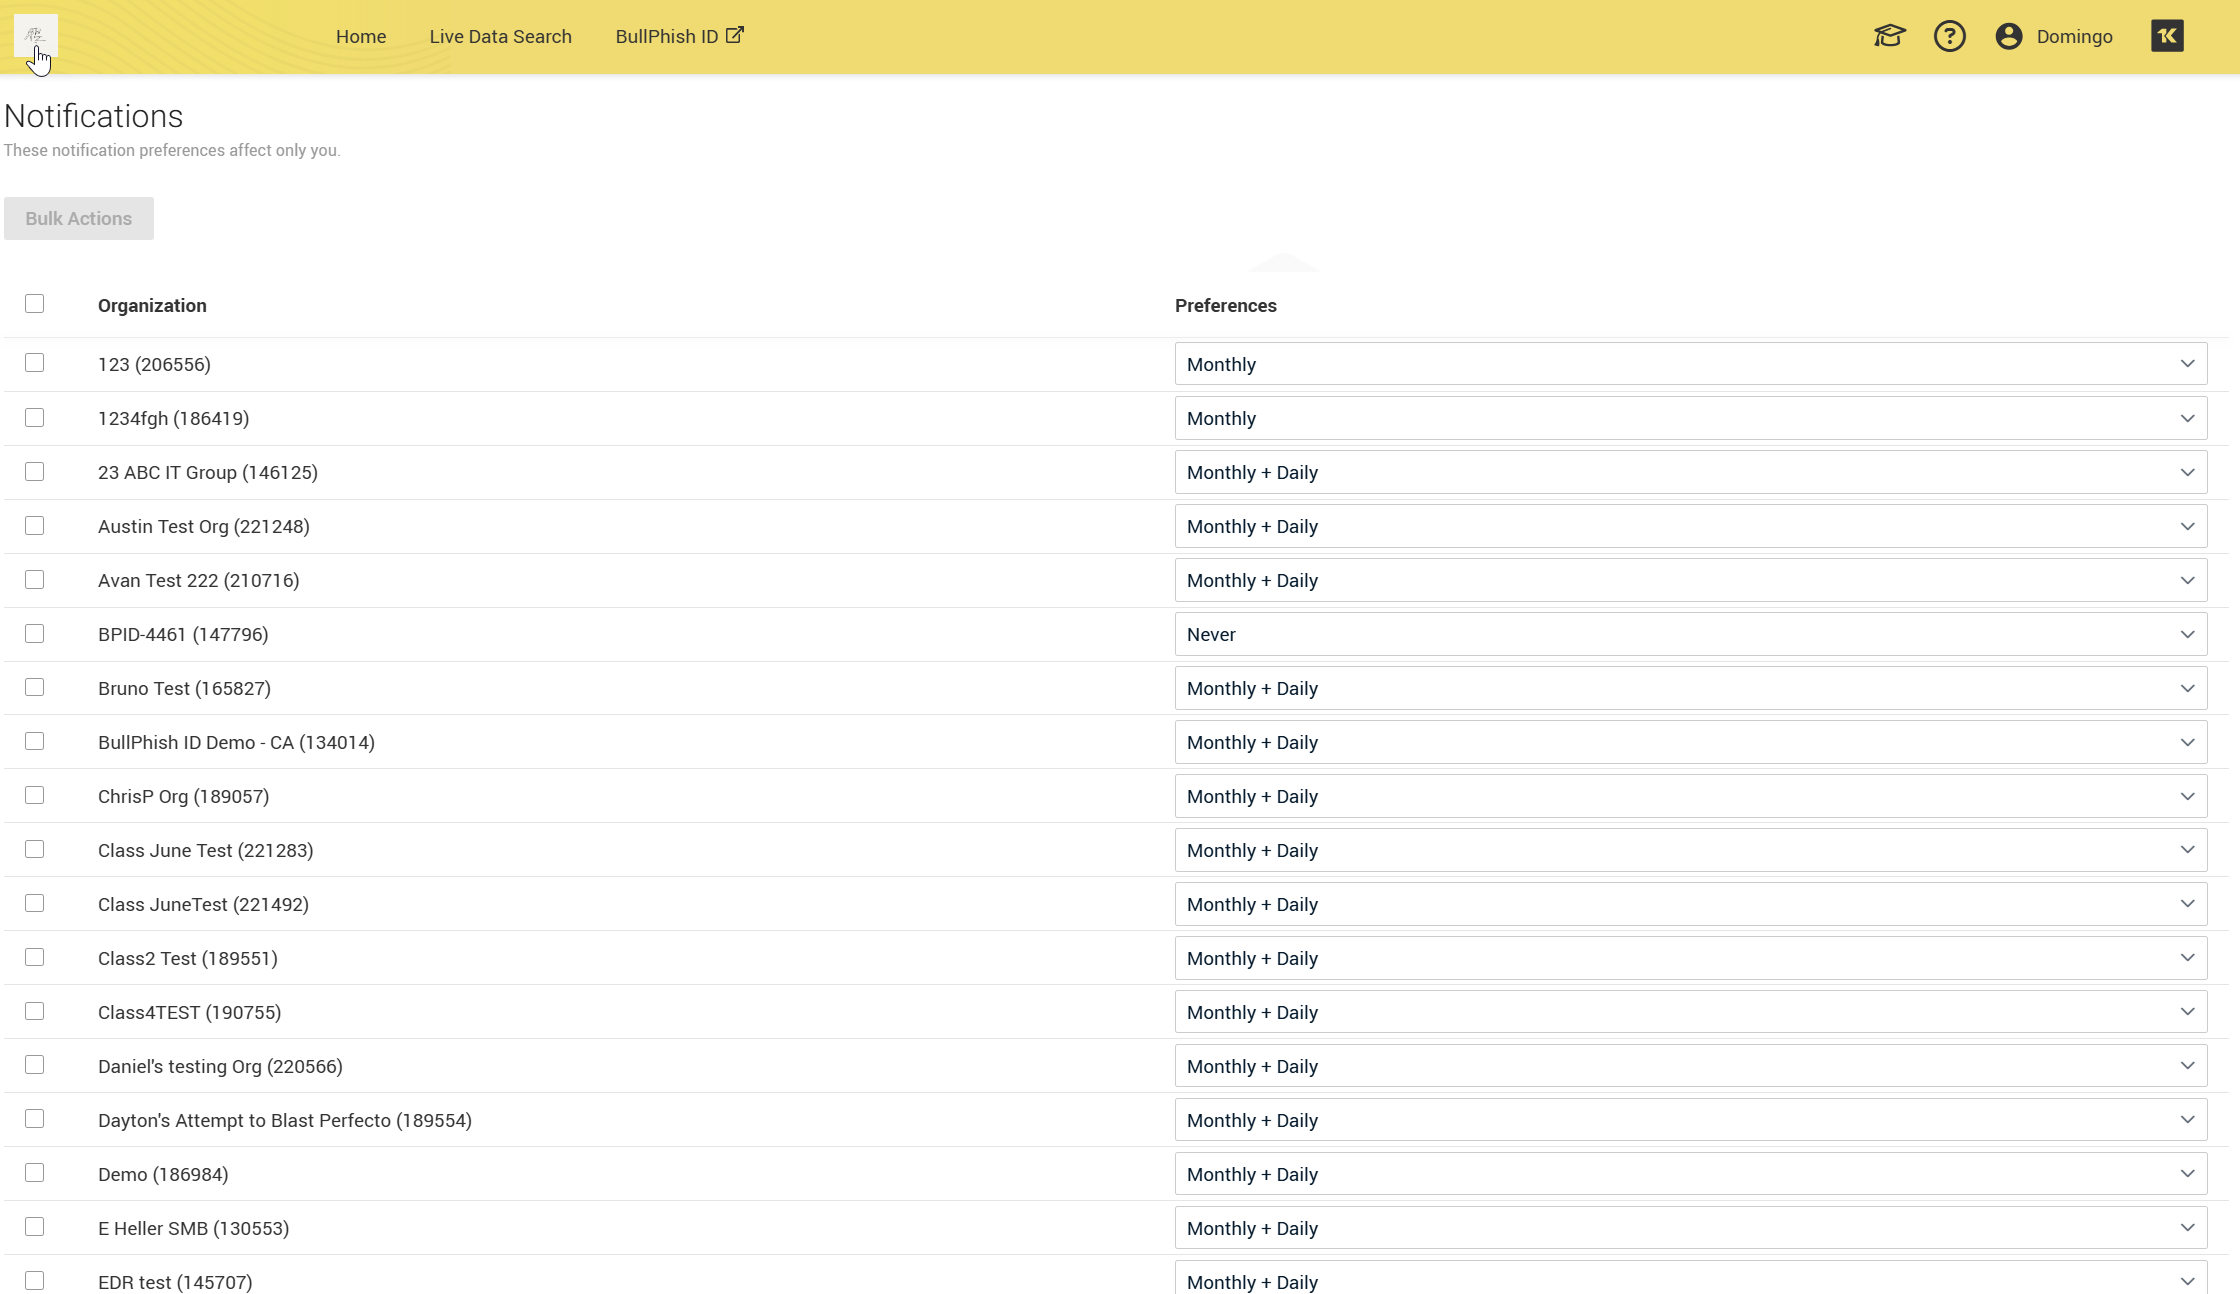
Notifications
The Notifications page allows you to select the frequency for which the compromise reports are sent to your organizations.
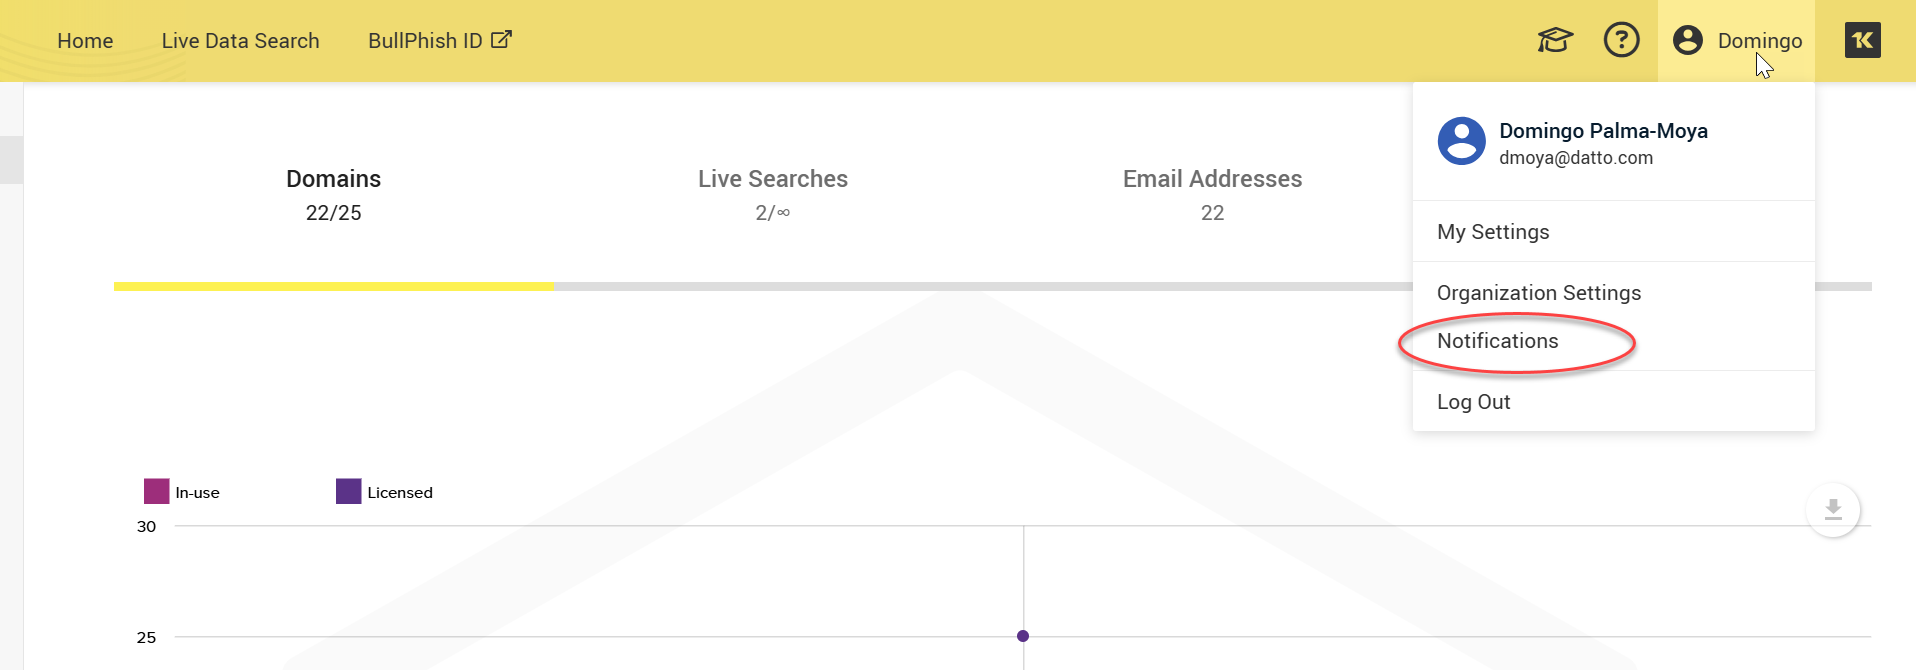
These changes can be edited either in bulk for all organizations or individually.
Organizations
The Organizations page provides a comprehensive overview of the status of all synced or manually created organizations.
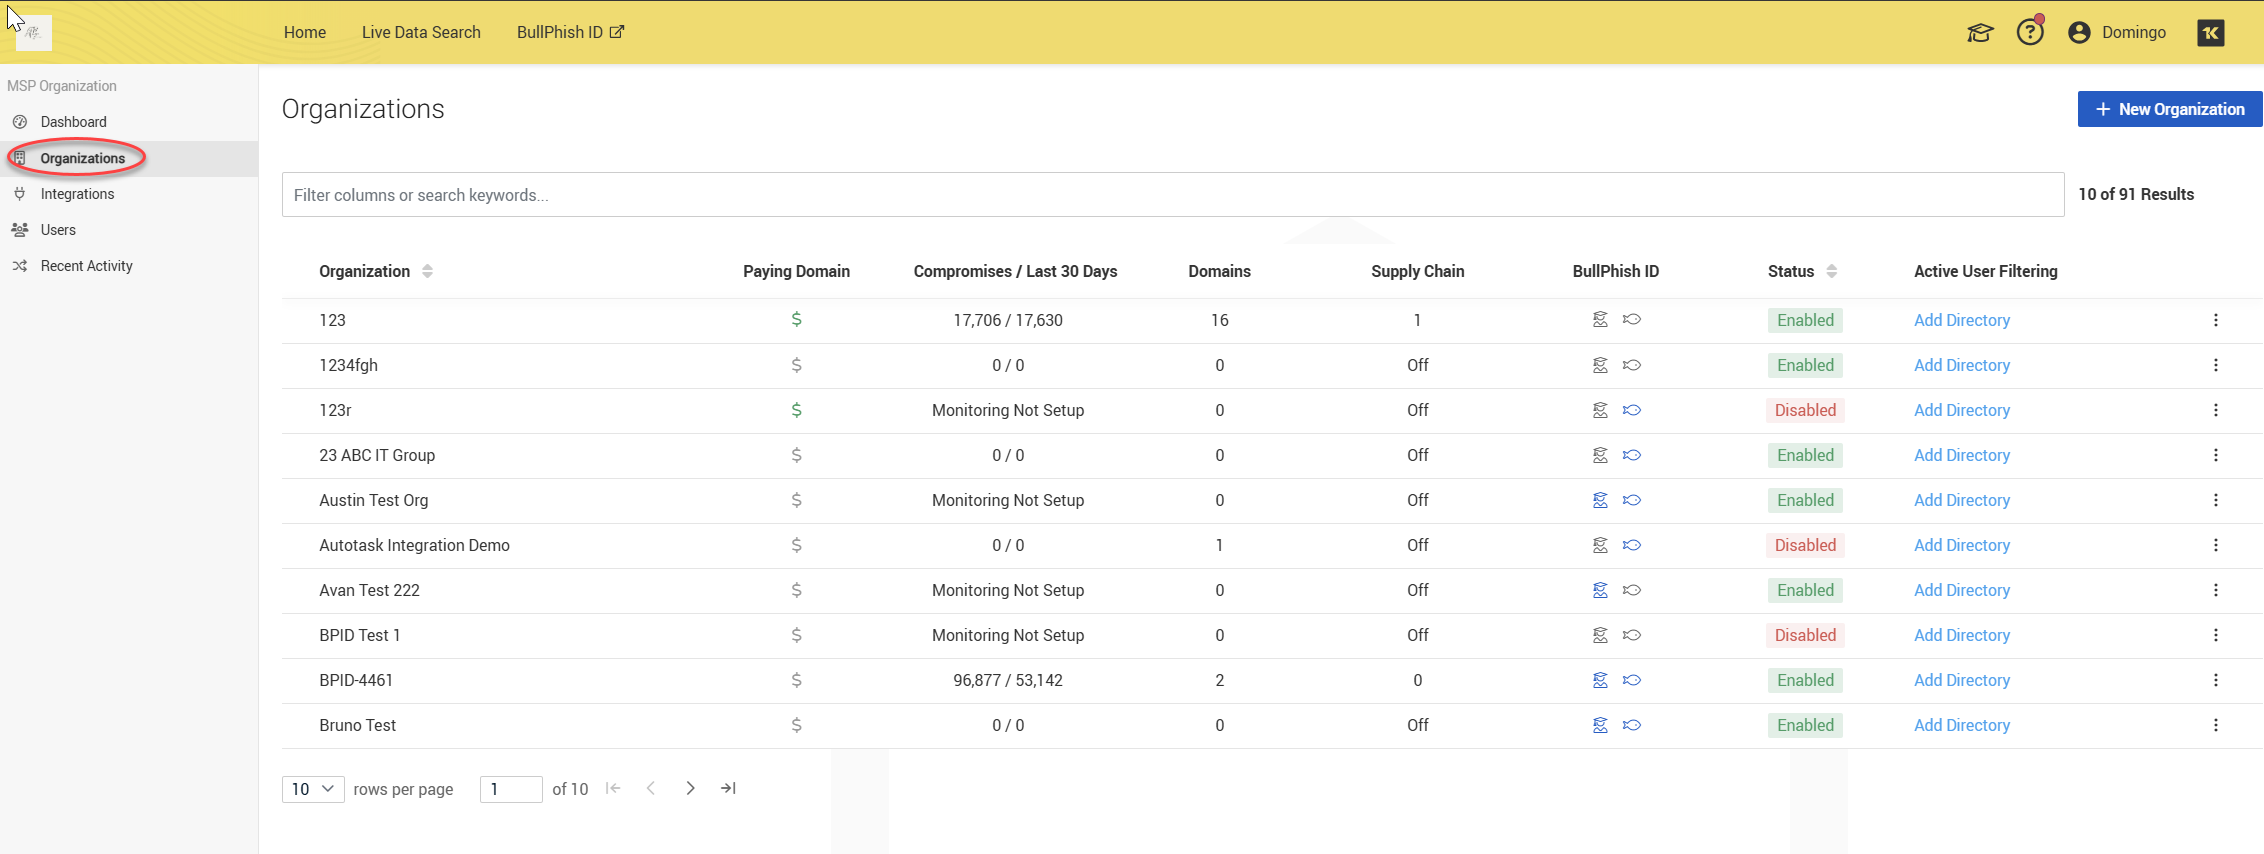
Organizations may be edited, disabled, monitored, or removed through the More menu located on the right side of each organization entry.
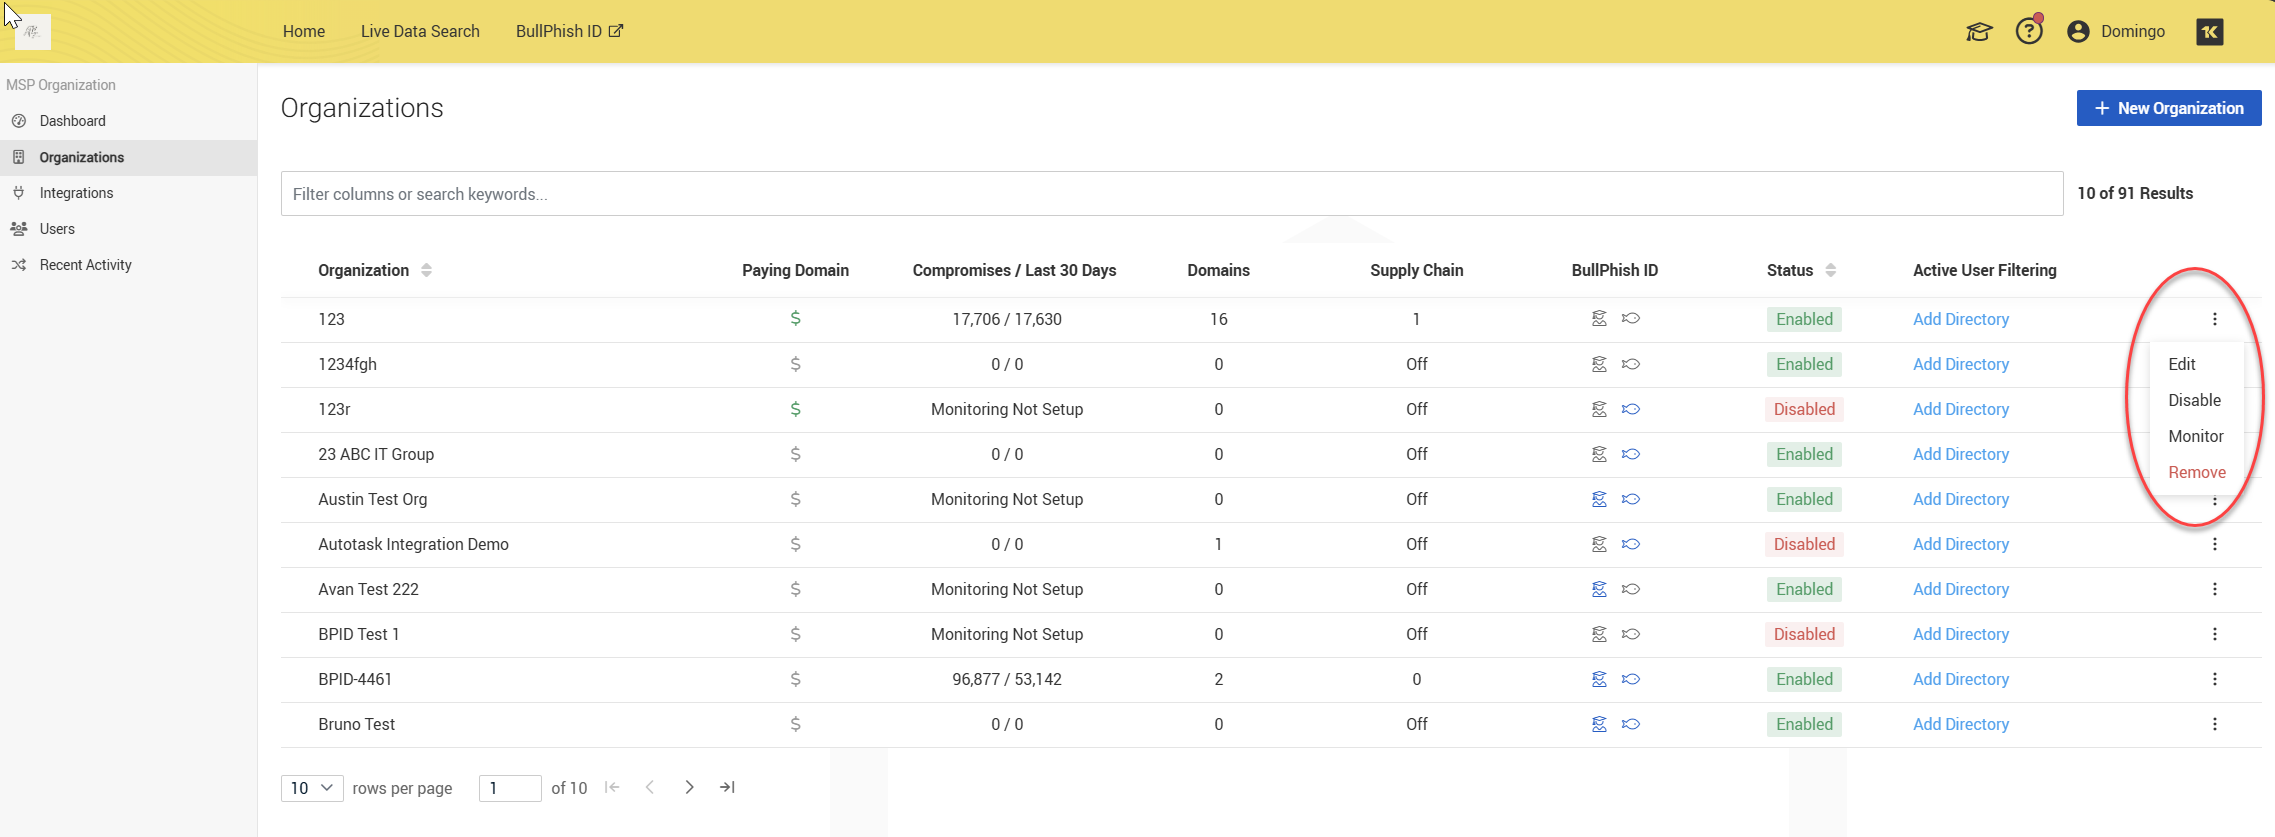
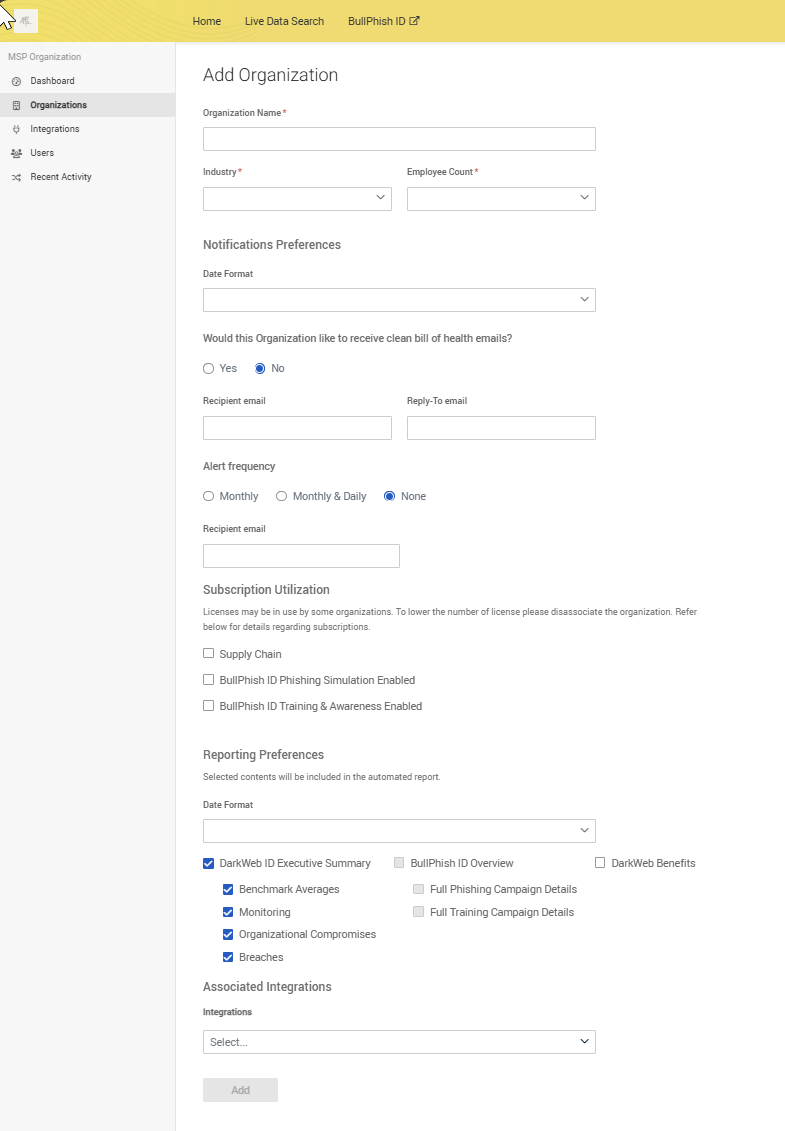
To manually add a new organization, click the + New Organization button in the upper-right corner.

Next, enter the organization's name, industry, and employee count. You also have the option to set notification preferences, subscription utilization, reporting preferences, and associated integrations. This functionality allows for easy management of organizations that are not synced through integrations.
Dashboard overview
The Dashboard provides visibility into domains, live searches, email addresses, and IP addresses. You can track the number of domains, live searches conducted, and emails and IPs that were searched for compromises.
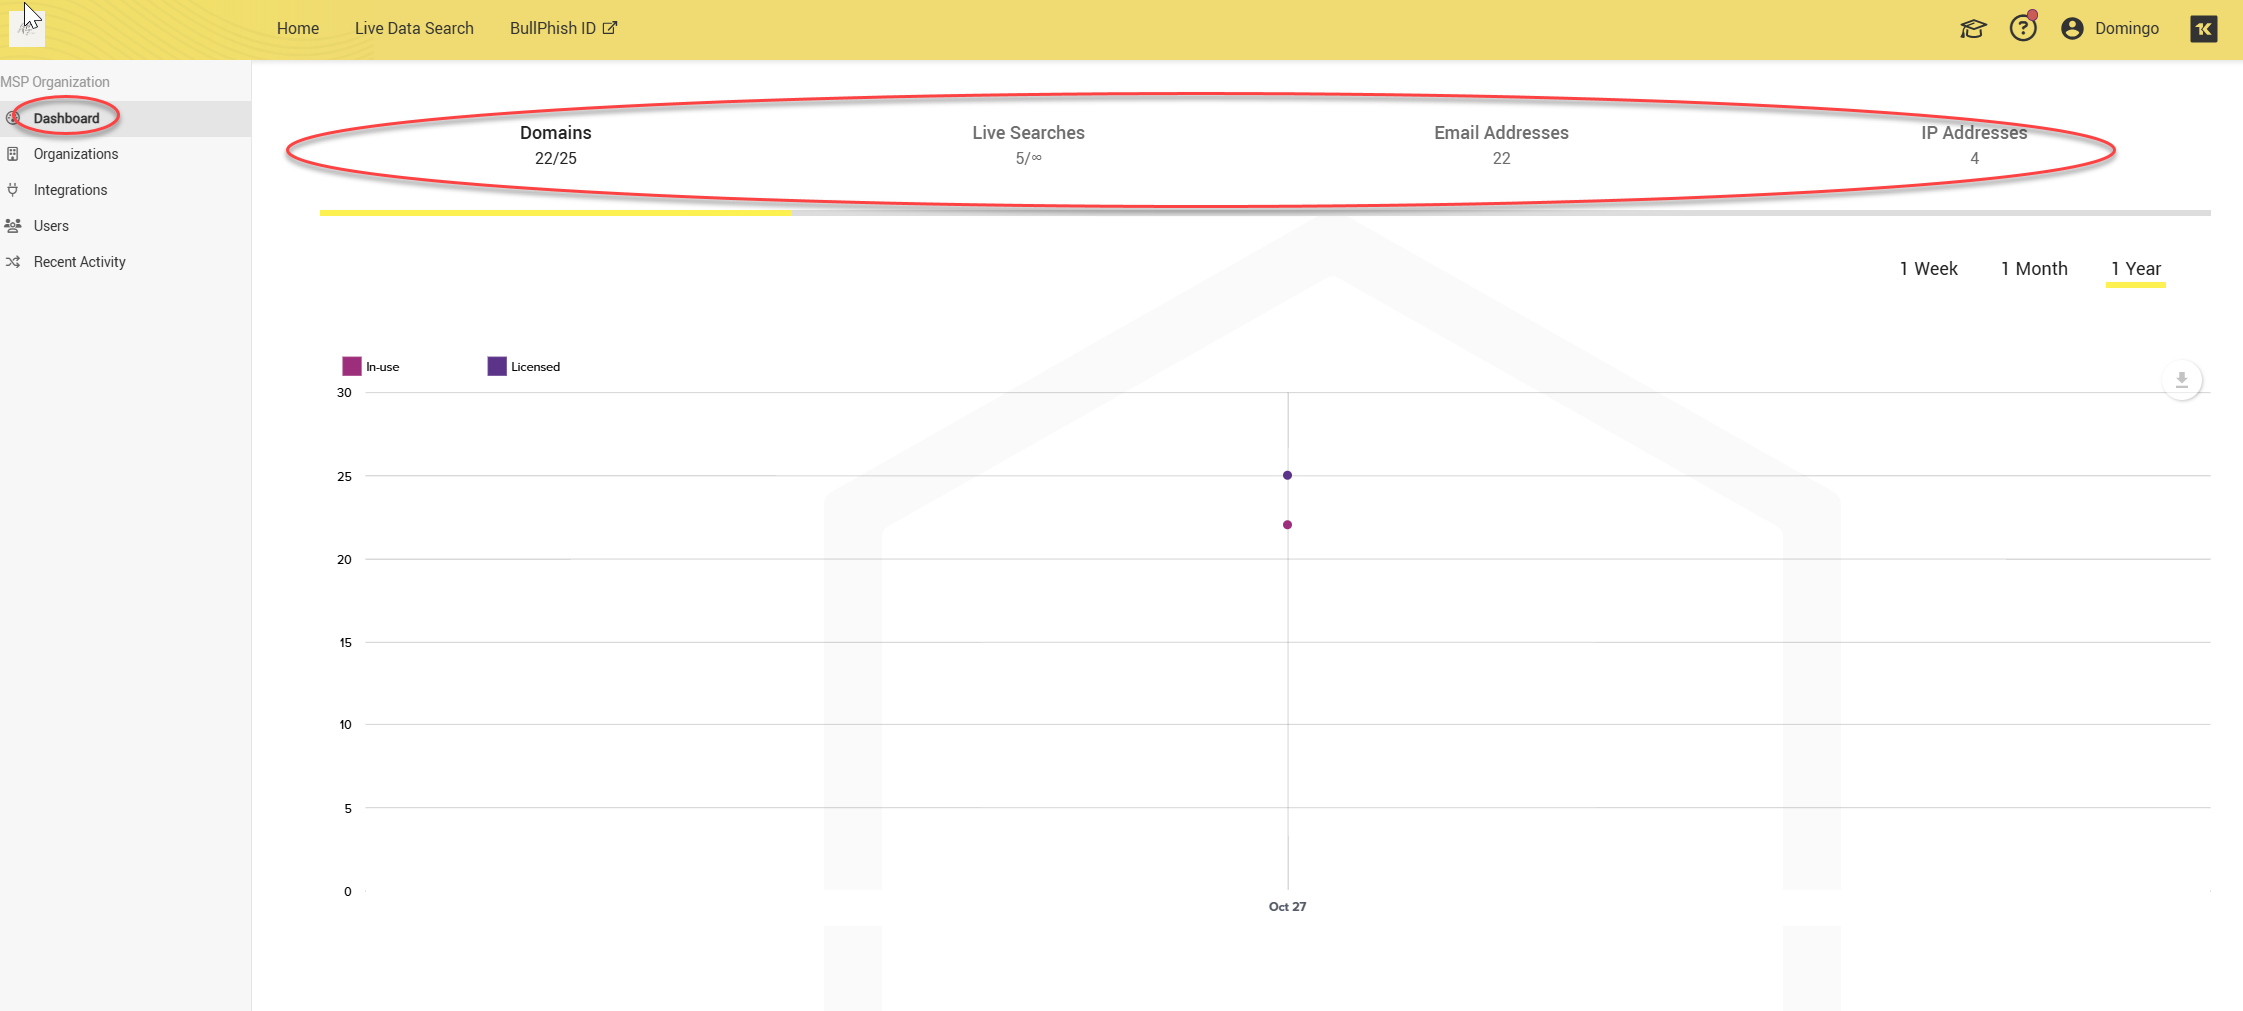
NOTE If you are not subscribed to Live Data Search / Personal Email address monitoring these columns will display 0/0 available.
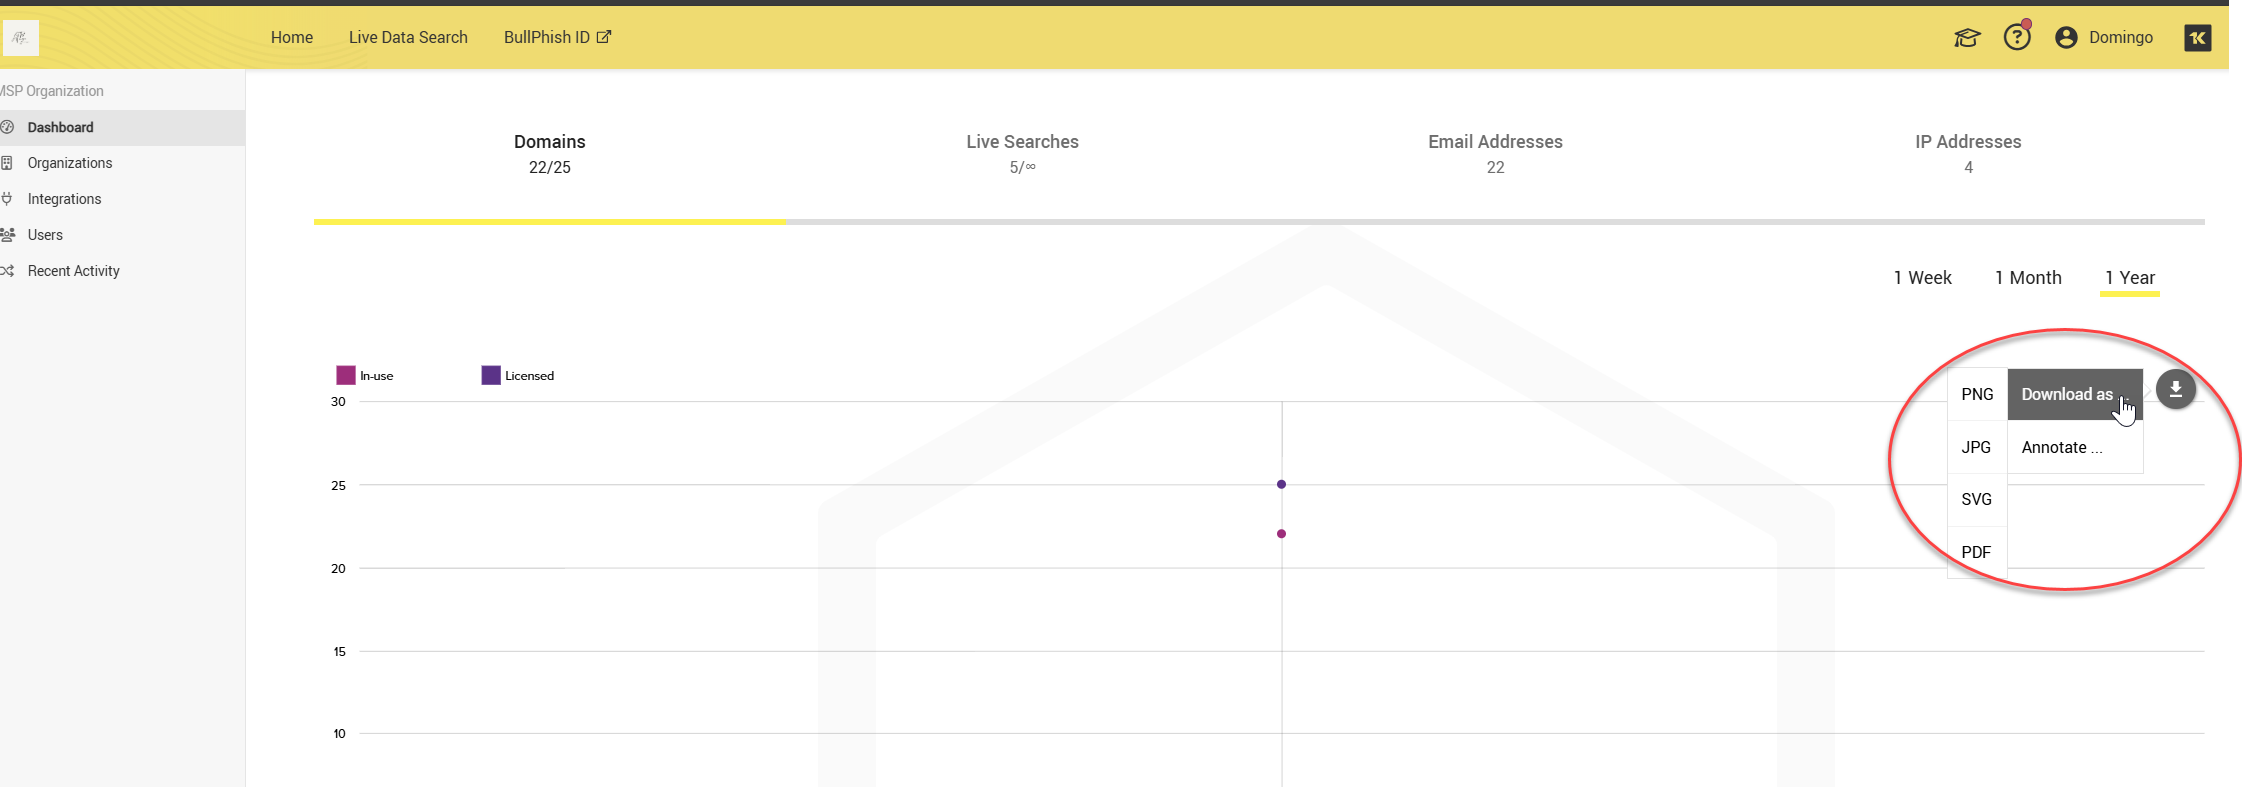
You also have the option to download dashboard data in PDF, JPG, SVG, or PNG format.
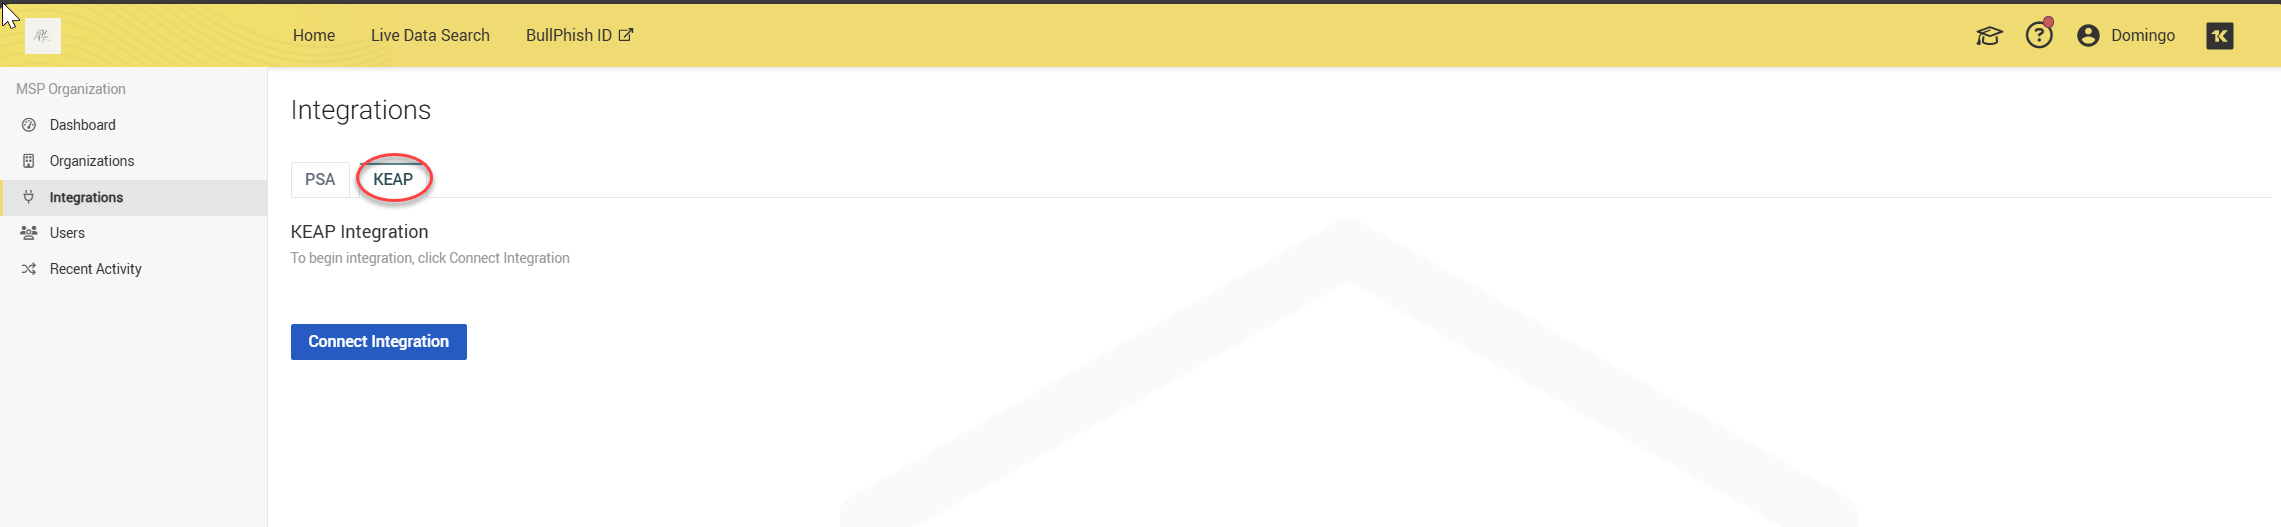
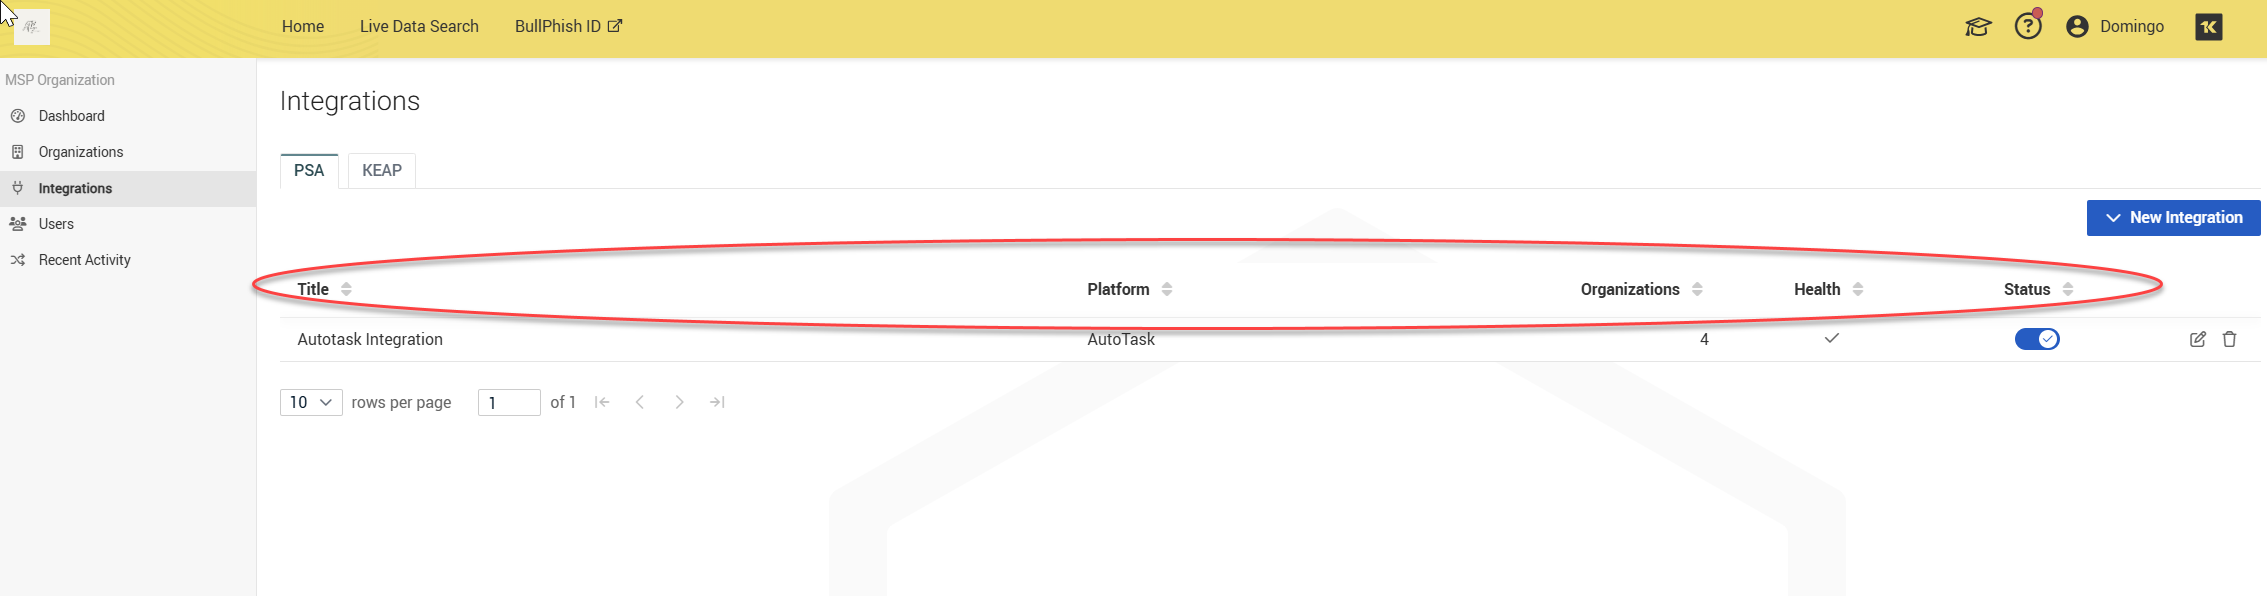
Integrations
The Integrations page allows you to integrate your PSA, such as Autotask, BMS, ConnectWise to sync organizations with Dark Web ID.
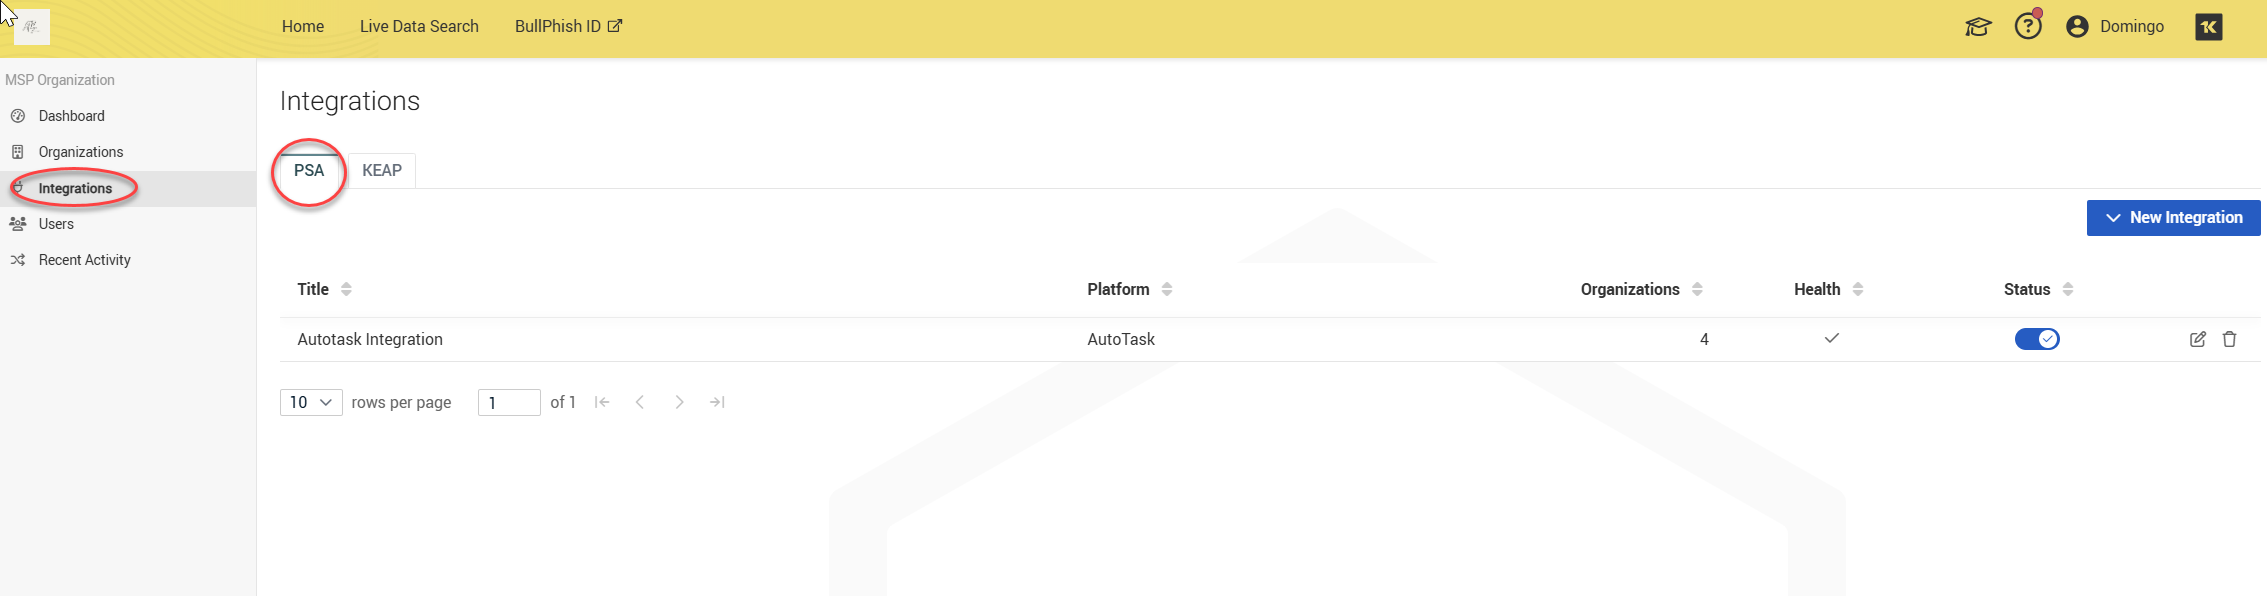
Alternatively, if you have Keap, you can click the tab and integrate.
The organization table lists the platform, number of organizations, health, and statuses of each organizations.
IT Complete integrations
Depending on the other IT Complete modules active in your stack, you can take advantage of the following integrations to improve security and overall operations:
-
Dark Web Integration with Spanning: Dark Web Credential Monitoring in Google Workspace
-
Dark Web Integration with Spanning: Dark Web Credential Monitoring in Microsoft 365
Users
The Users page allows you to create accounts for individuals who need access to your Dark Web ID instance.
To create a new user, follow these steps:
1. Click Users in the left navigation menu.

2. Click + New User in the upper-right corner.

3. Fill out the required form.
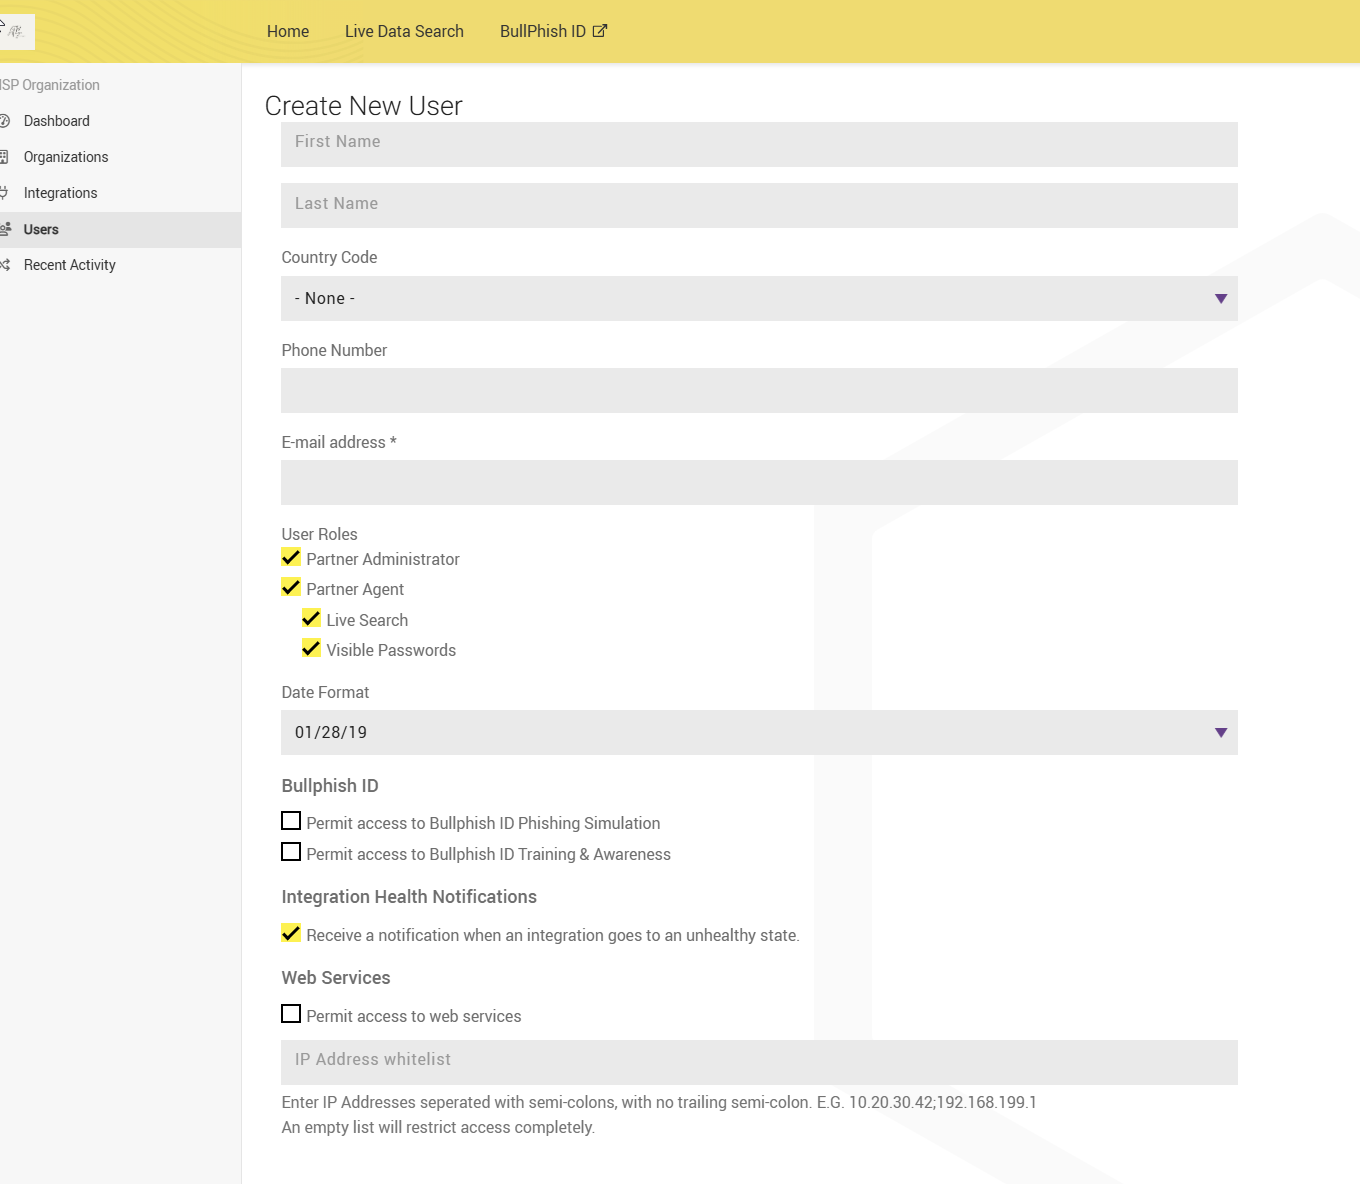
4. Select the appropriate user role for the individual.
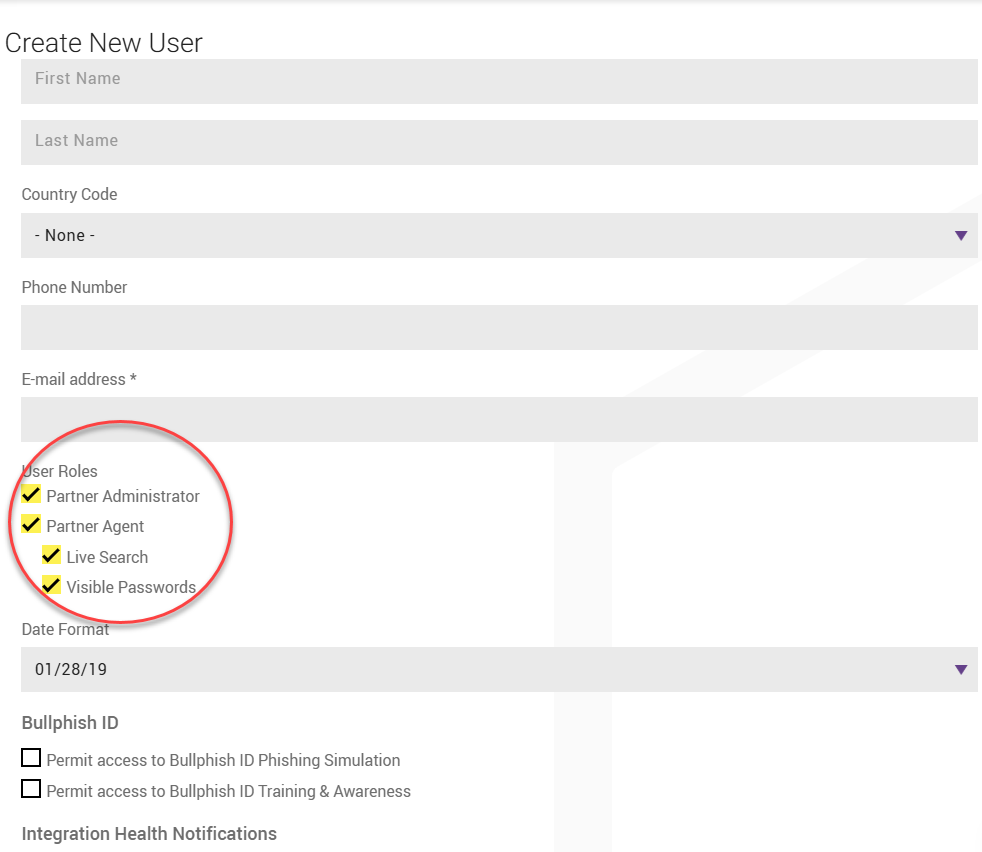
5. If the user requires access to the Dark Web ID API, select the checkbox and enter the IP address from which the user will make API calls.

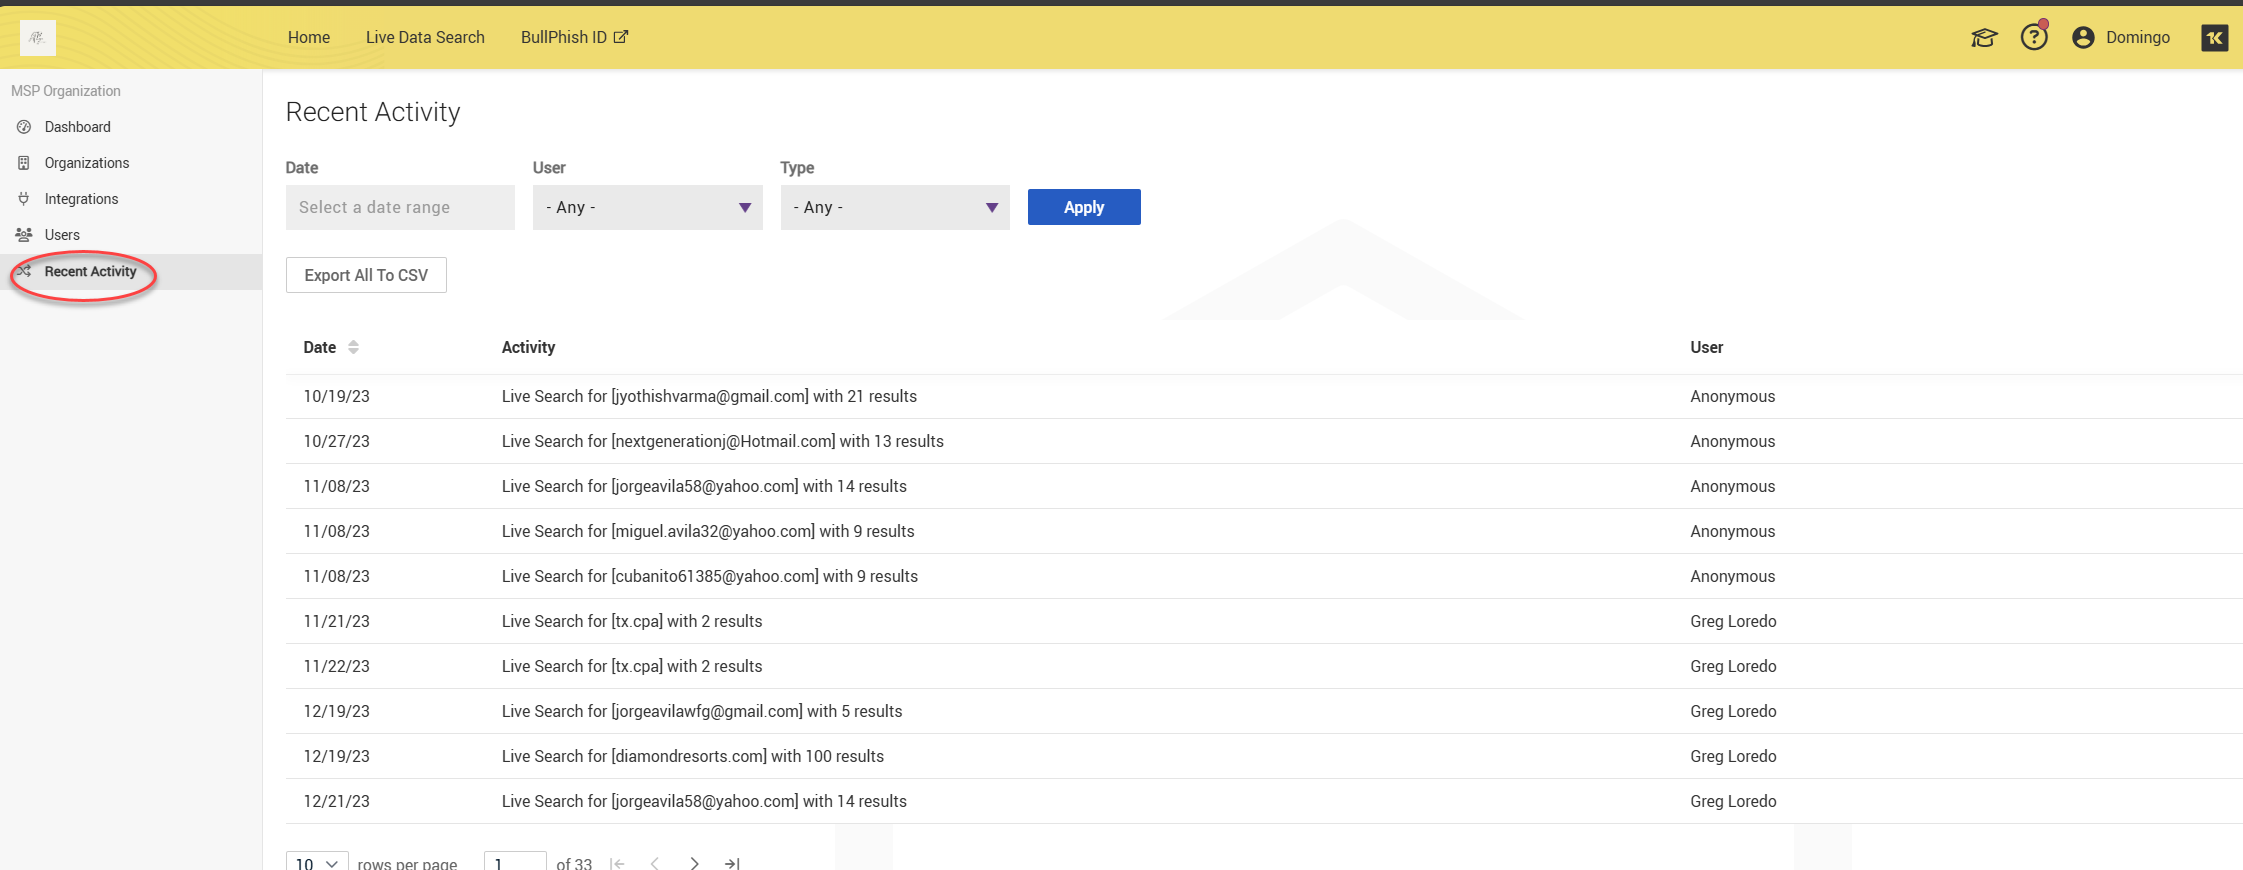
Recent Activity
The Recent Activity page tracks user actions such as creating organizations, performing live searches, and removing domains or organizations. You can filter the results by date, user, or type of activity. Results can be exported in CSV format.
Live Data Search
The Live Data Search tool is a prospecting feature designed for MSPs to generate sales leads by highlighting dark web-related risks to potential clients. On the Live Data Search page, you can search for domains or email addresses to check for compromises. The results are limited to the top 100 of 1,000 discovered issues, and you have the option to export these results as a PDF or CSV if necessary. To access this page, click Live Data Search.

After entering a domain or email address, you can choose to display the results with either hashed passwords or plain text passwords, depending on your needs. You can also acknowledge and understand the use of live search.
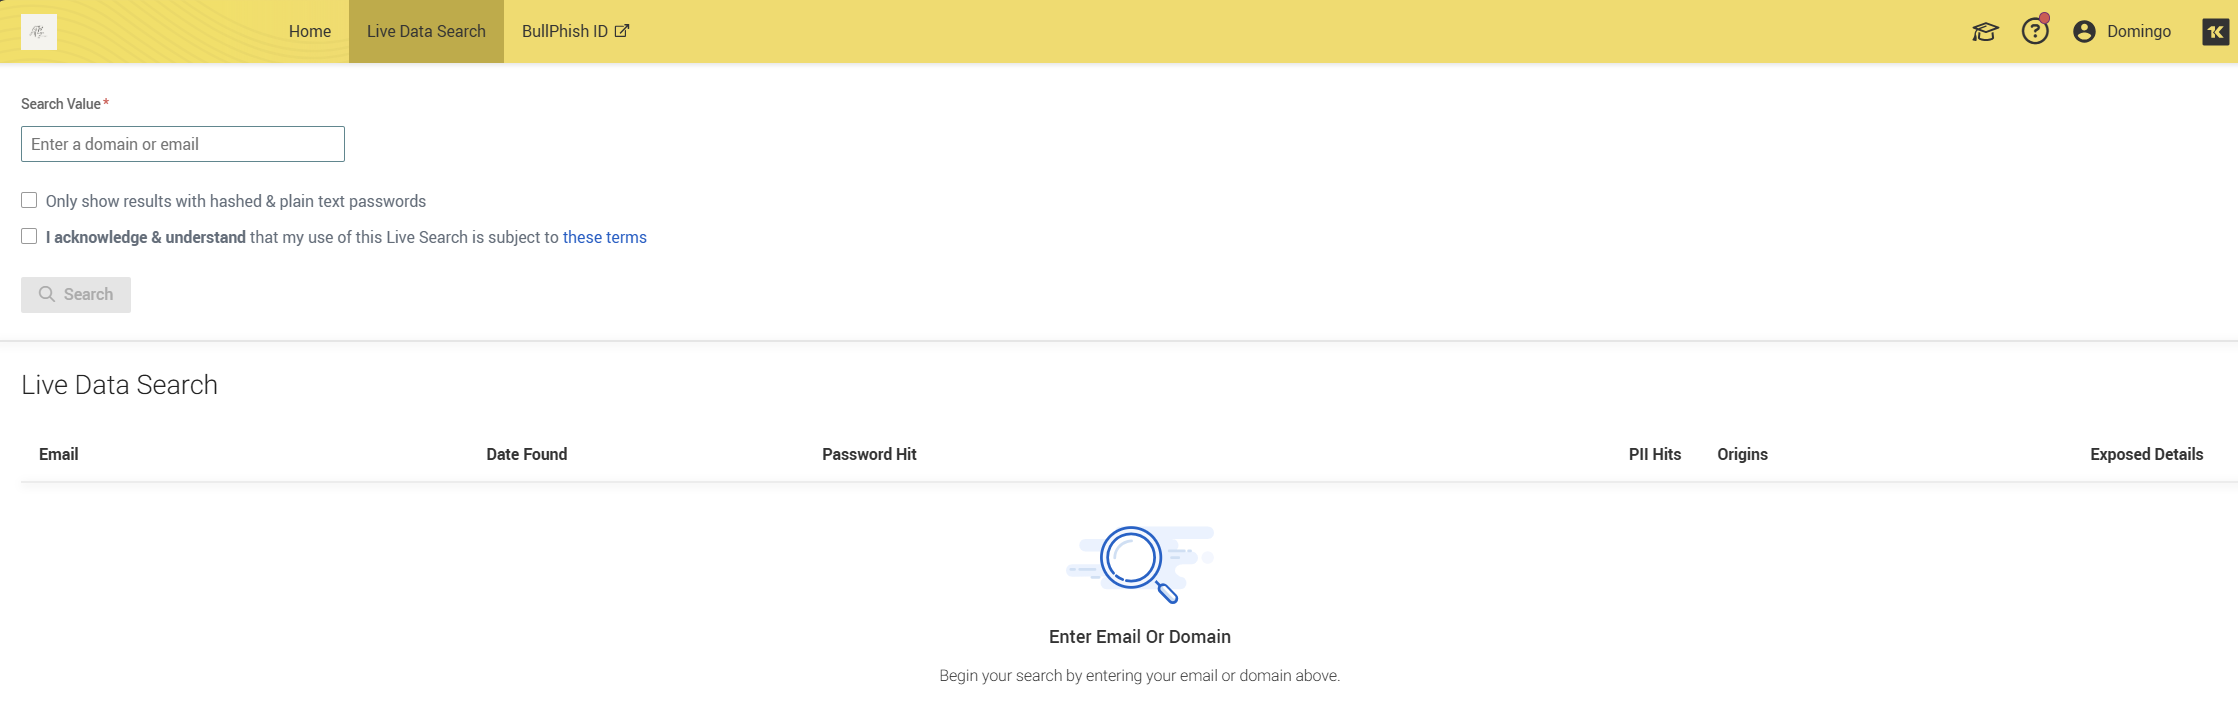
For more detailed information on the Live Data Search feature, refer to Using the Live Data Search tool.
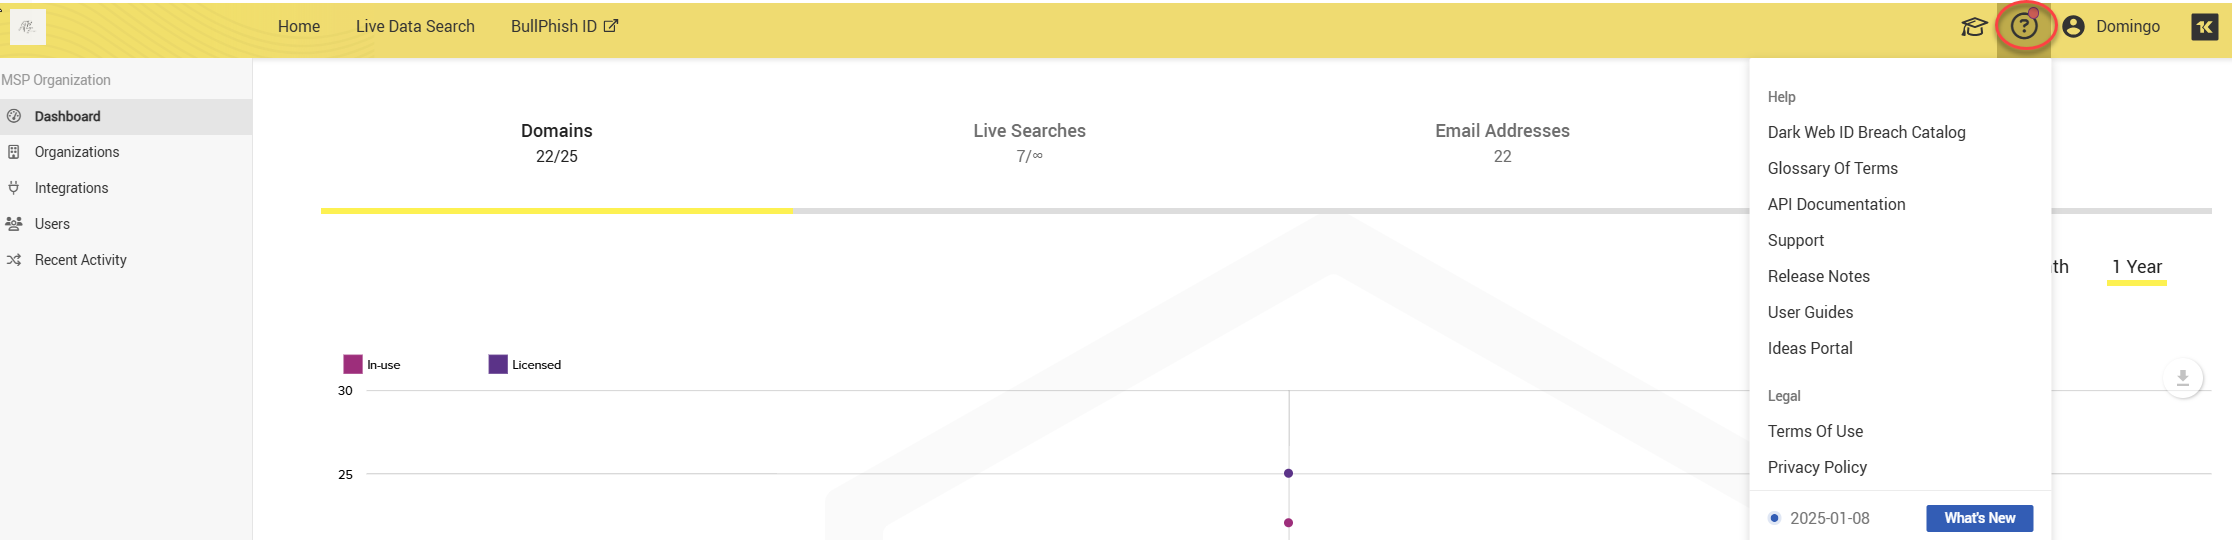
The Help menu
The Help Menu provides access to Dark Web ID resources, including Release Notes, User Guides, and Support. You can also suggest a feature you would like implemented in Dark Web ID.